Android holds a reputation for providing the broadest range of apps and games on a smartphone, and they are as quintessential as cheese on top of a pizza. And, of course, something this big in responsibility comes with its own set of hiccups, and you’re probably here to find a solution.
Don’t worry; we’ve got your back, and here we present you the fix of apps not working on android and related issues. There might be a bunch of culprits behind it, but we’ll make sure to elaborate on each one step-by-step. Stay tuned till the end to get your android apps working again.
Possible Fixes for Apps Not Working on Android
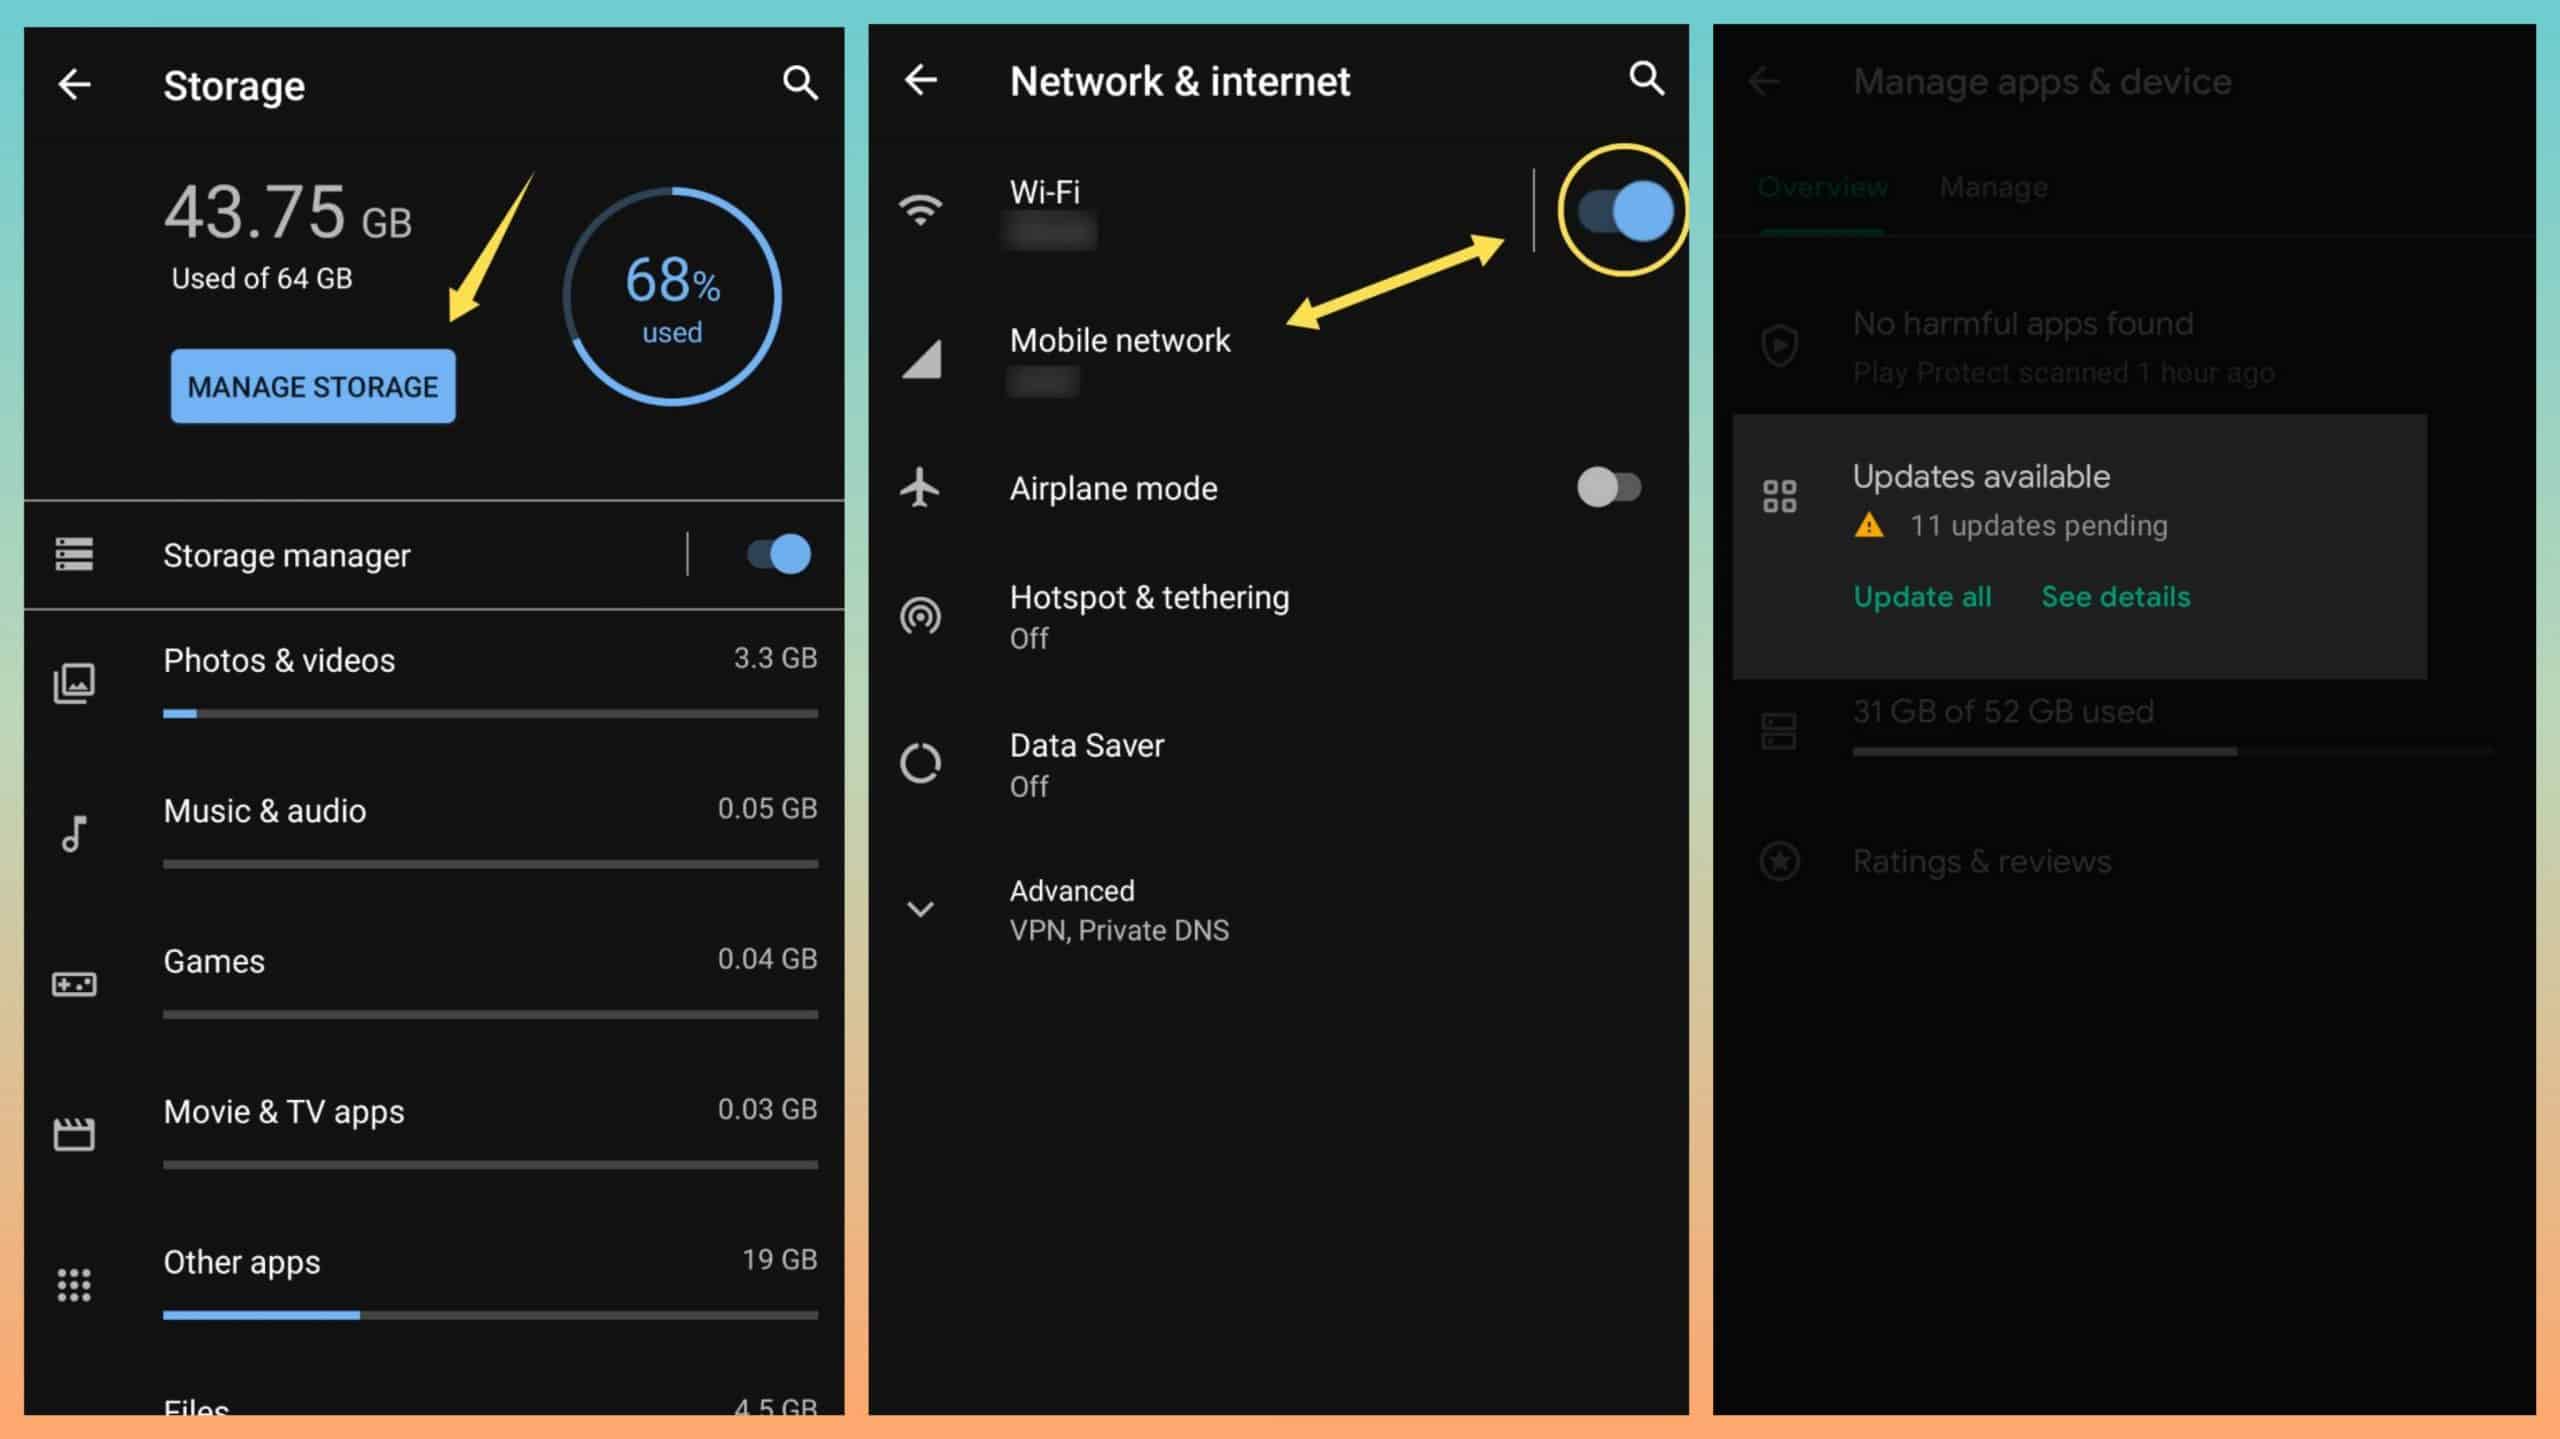
Android apps don’t regularly face such complications, but if they do, here’s a set of reasons why. Firstly, the prime cause for apps not working on android is the lack of ample storage. If you own those dated devices with 16GB or 32GB of internal storage, there’s a pretty good chance that your storage is on the verge of being empty. So, take out time and clear off the unnecessary things and see if it works.
If your app requires the internet to work correctly, make sure that there’s a stable internet connection; if not, make the necessary connections and try again. Most importantly, your apps should run in their latest versions, so the next time the Google Play Store pushes that annoying notification to update your apps, think twice before swiping it away.
In many cases, a simple reboot of your device might do miracles, so there’s no harm in giving it a try too. Everything starts over again, and who knows if it was all your smartphone needed. These solutions were for those with generic troubles, but if yours wasn’t one of them, we’ve still got more than half a dozen mends for apps not working on android.
1. Install the Previous Version of App
Sometimes, getting the latest of everything is not the best choice. Similarly, when it comes to applications, the latest versions or beta releases of a few apps often come along with some uninvited bugs and glitches, which might be the cause behind apps not working on android.
While most app developers make sure to mention “bug fixes” with every update, most of them can’t guarantee you about the same, so you might have to roll back to the previous versions of that app. Unfortunately, Play Store doesn’t provide such a feature natively, so you’ll have to take another route, i.e., install an APK (Android Package) of the same.
For that, you can find various sites on the web, the popular ones being APKMirror, APKPure, etc. Head over to one such website, and search for the app’s APK file, which is WhatsApp in this case. Click on any relatively older version, and it will direct you to a new page.
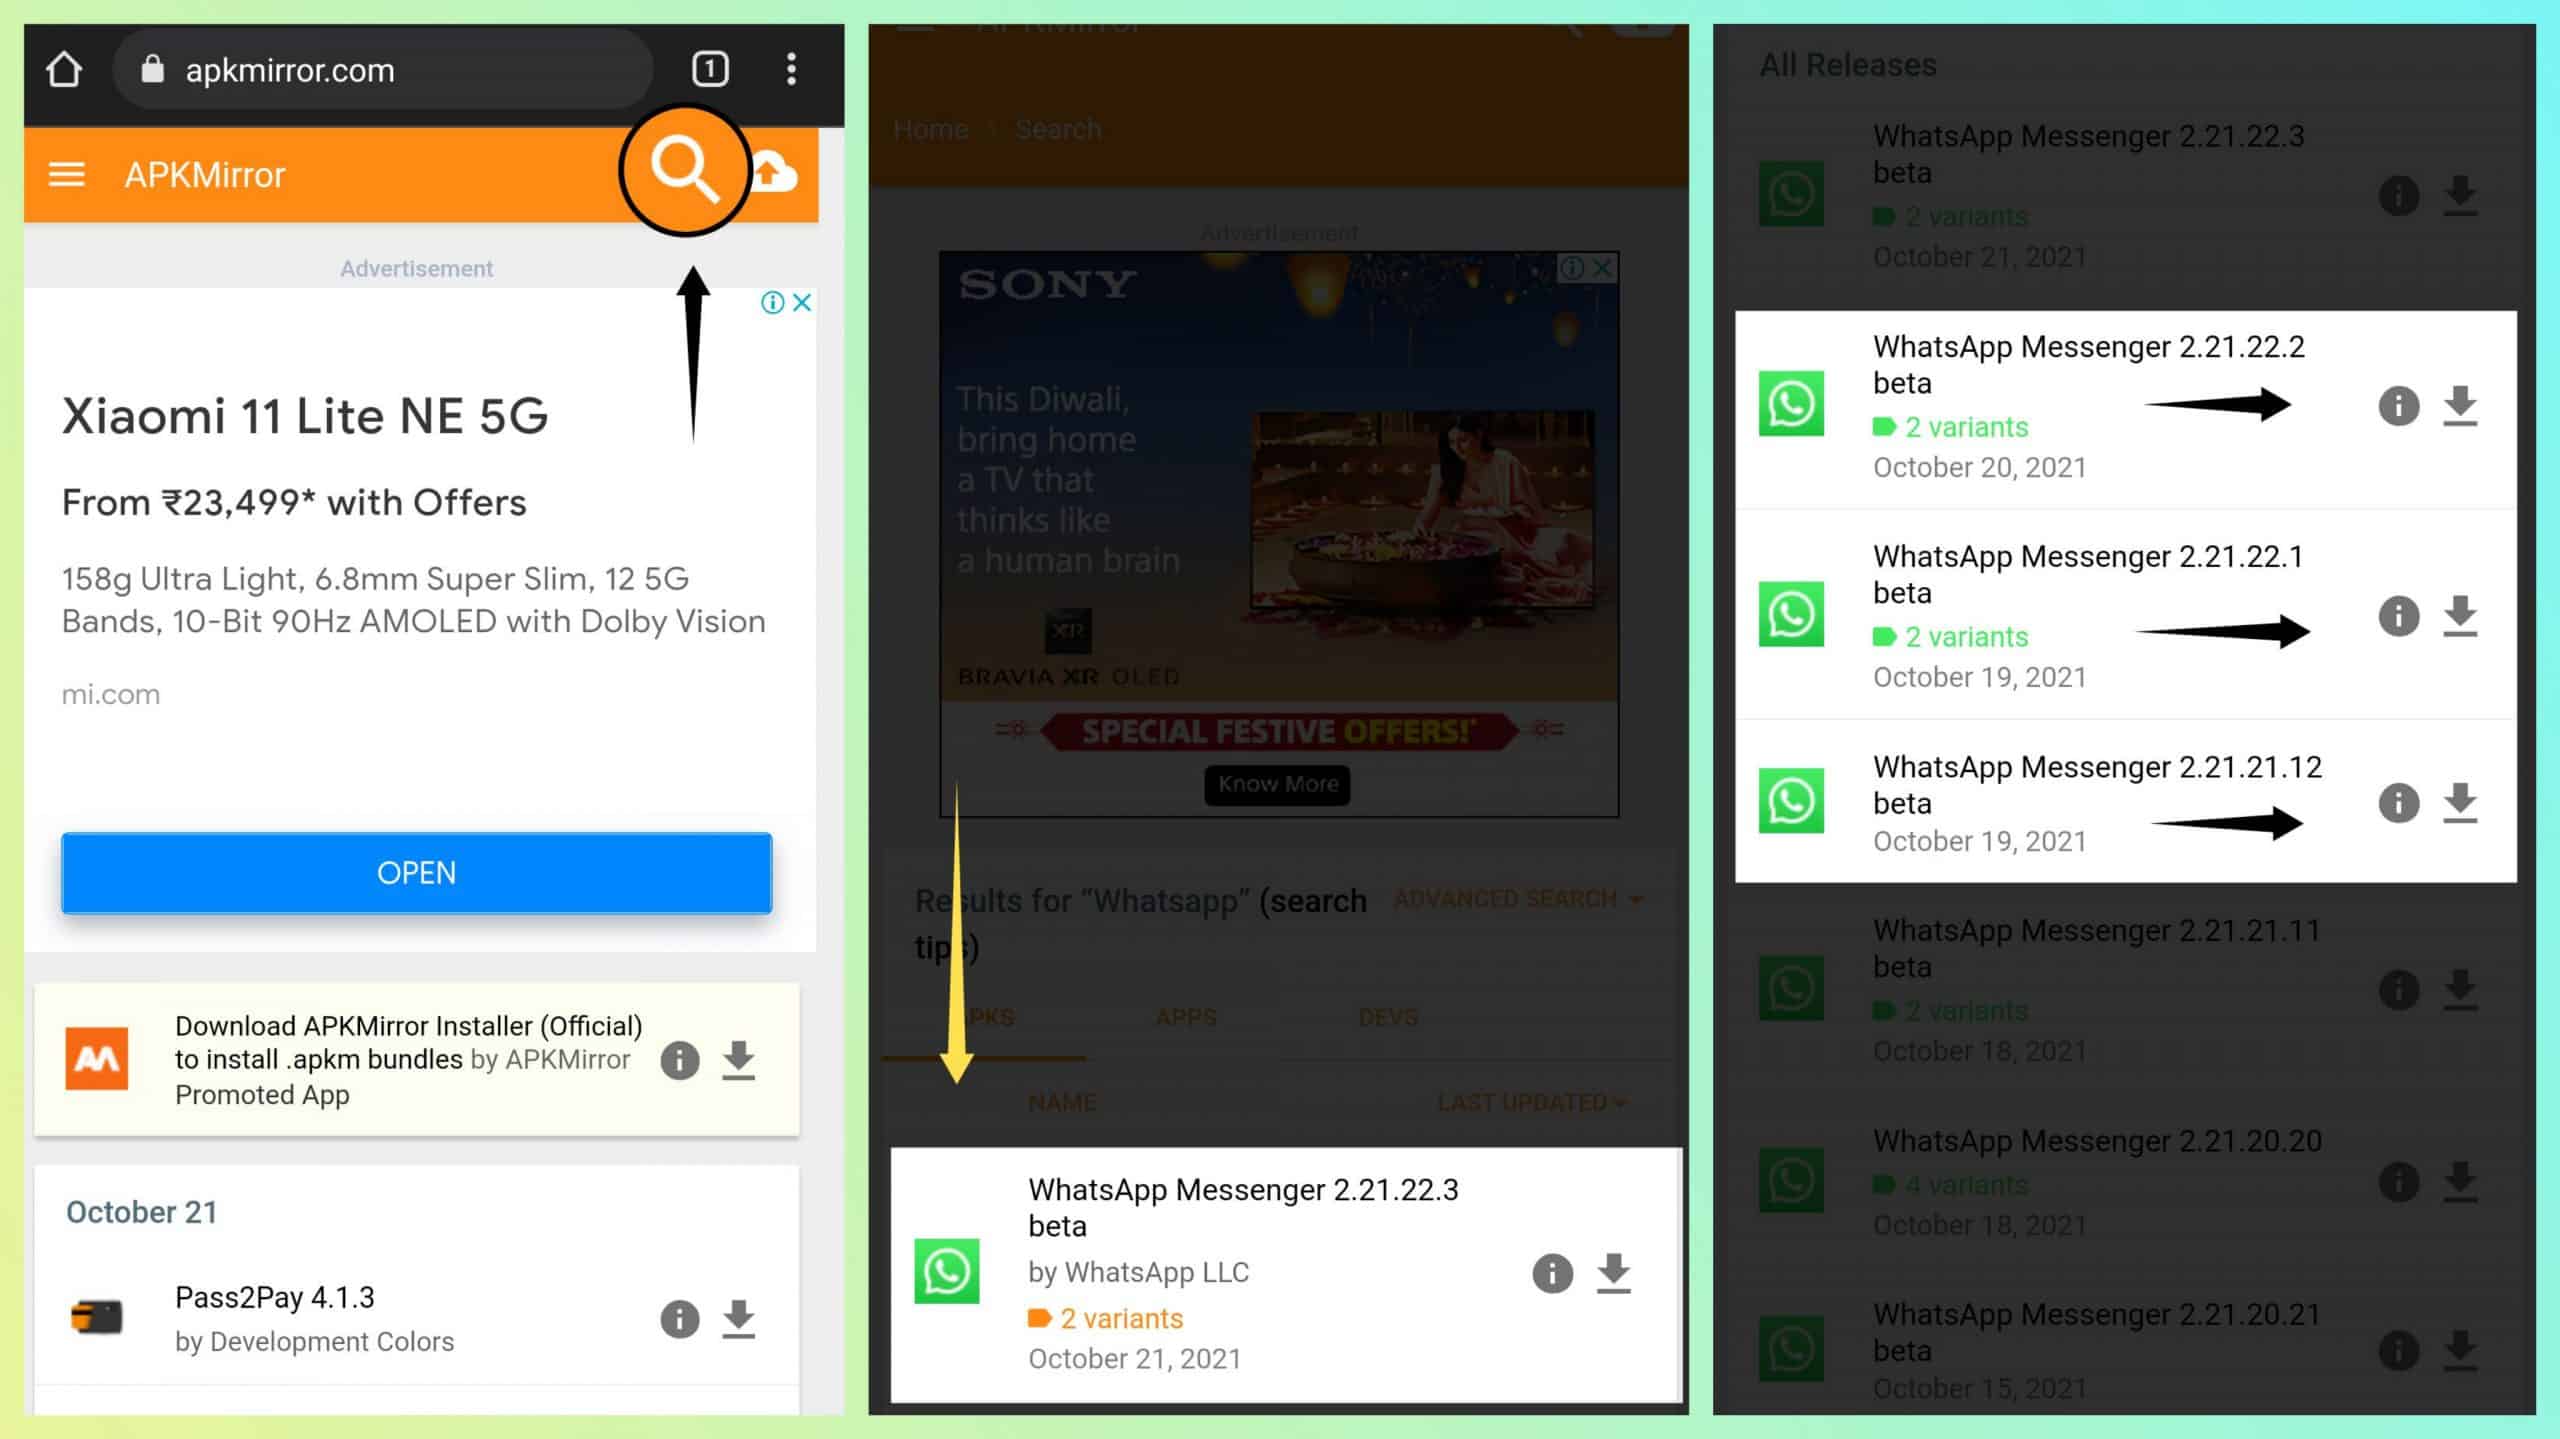
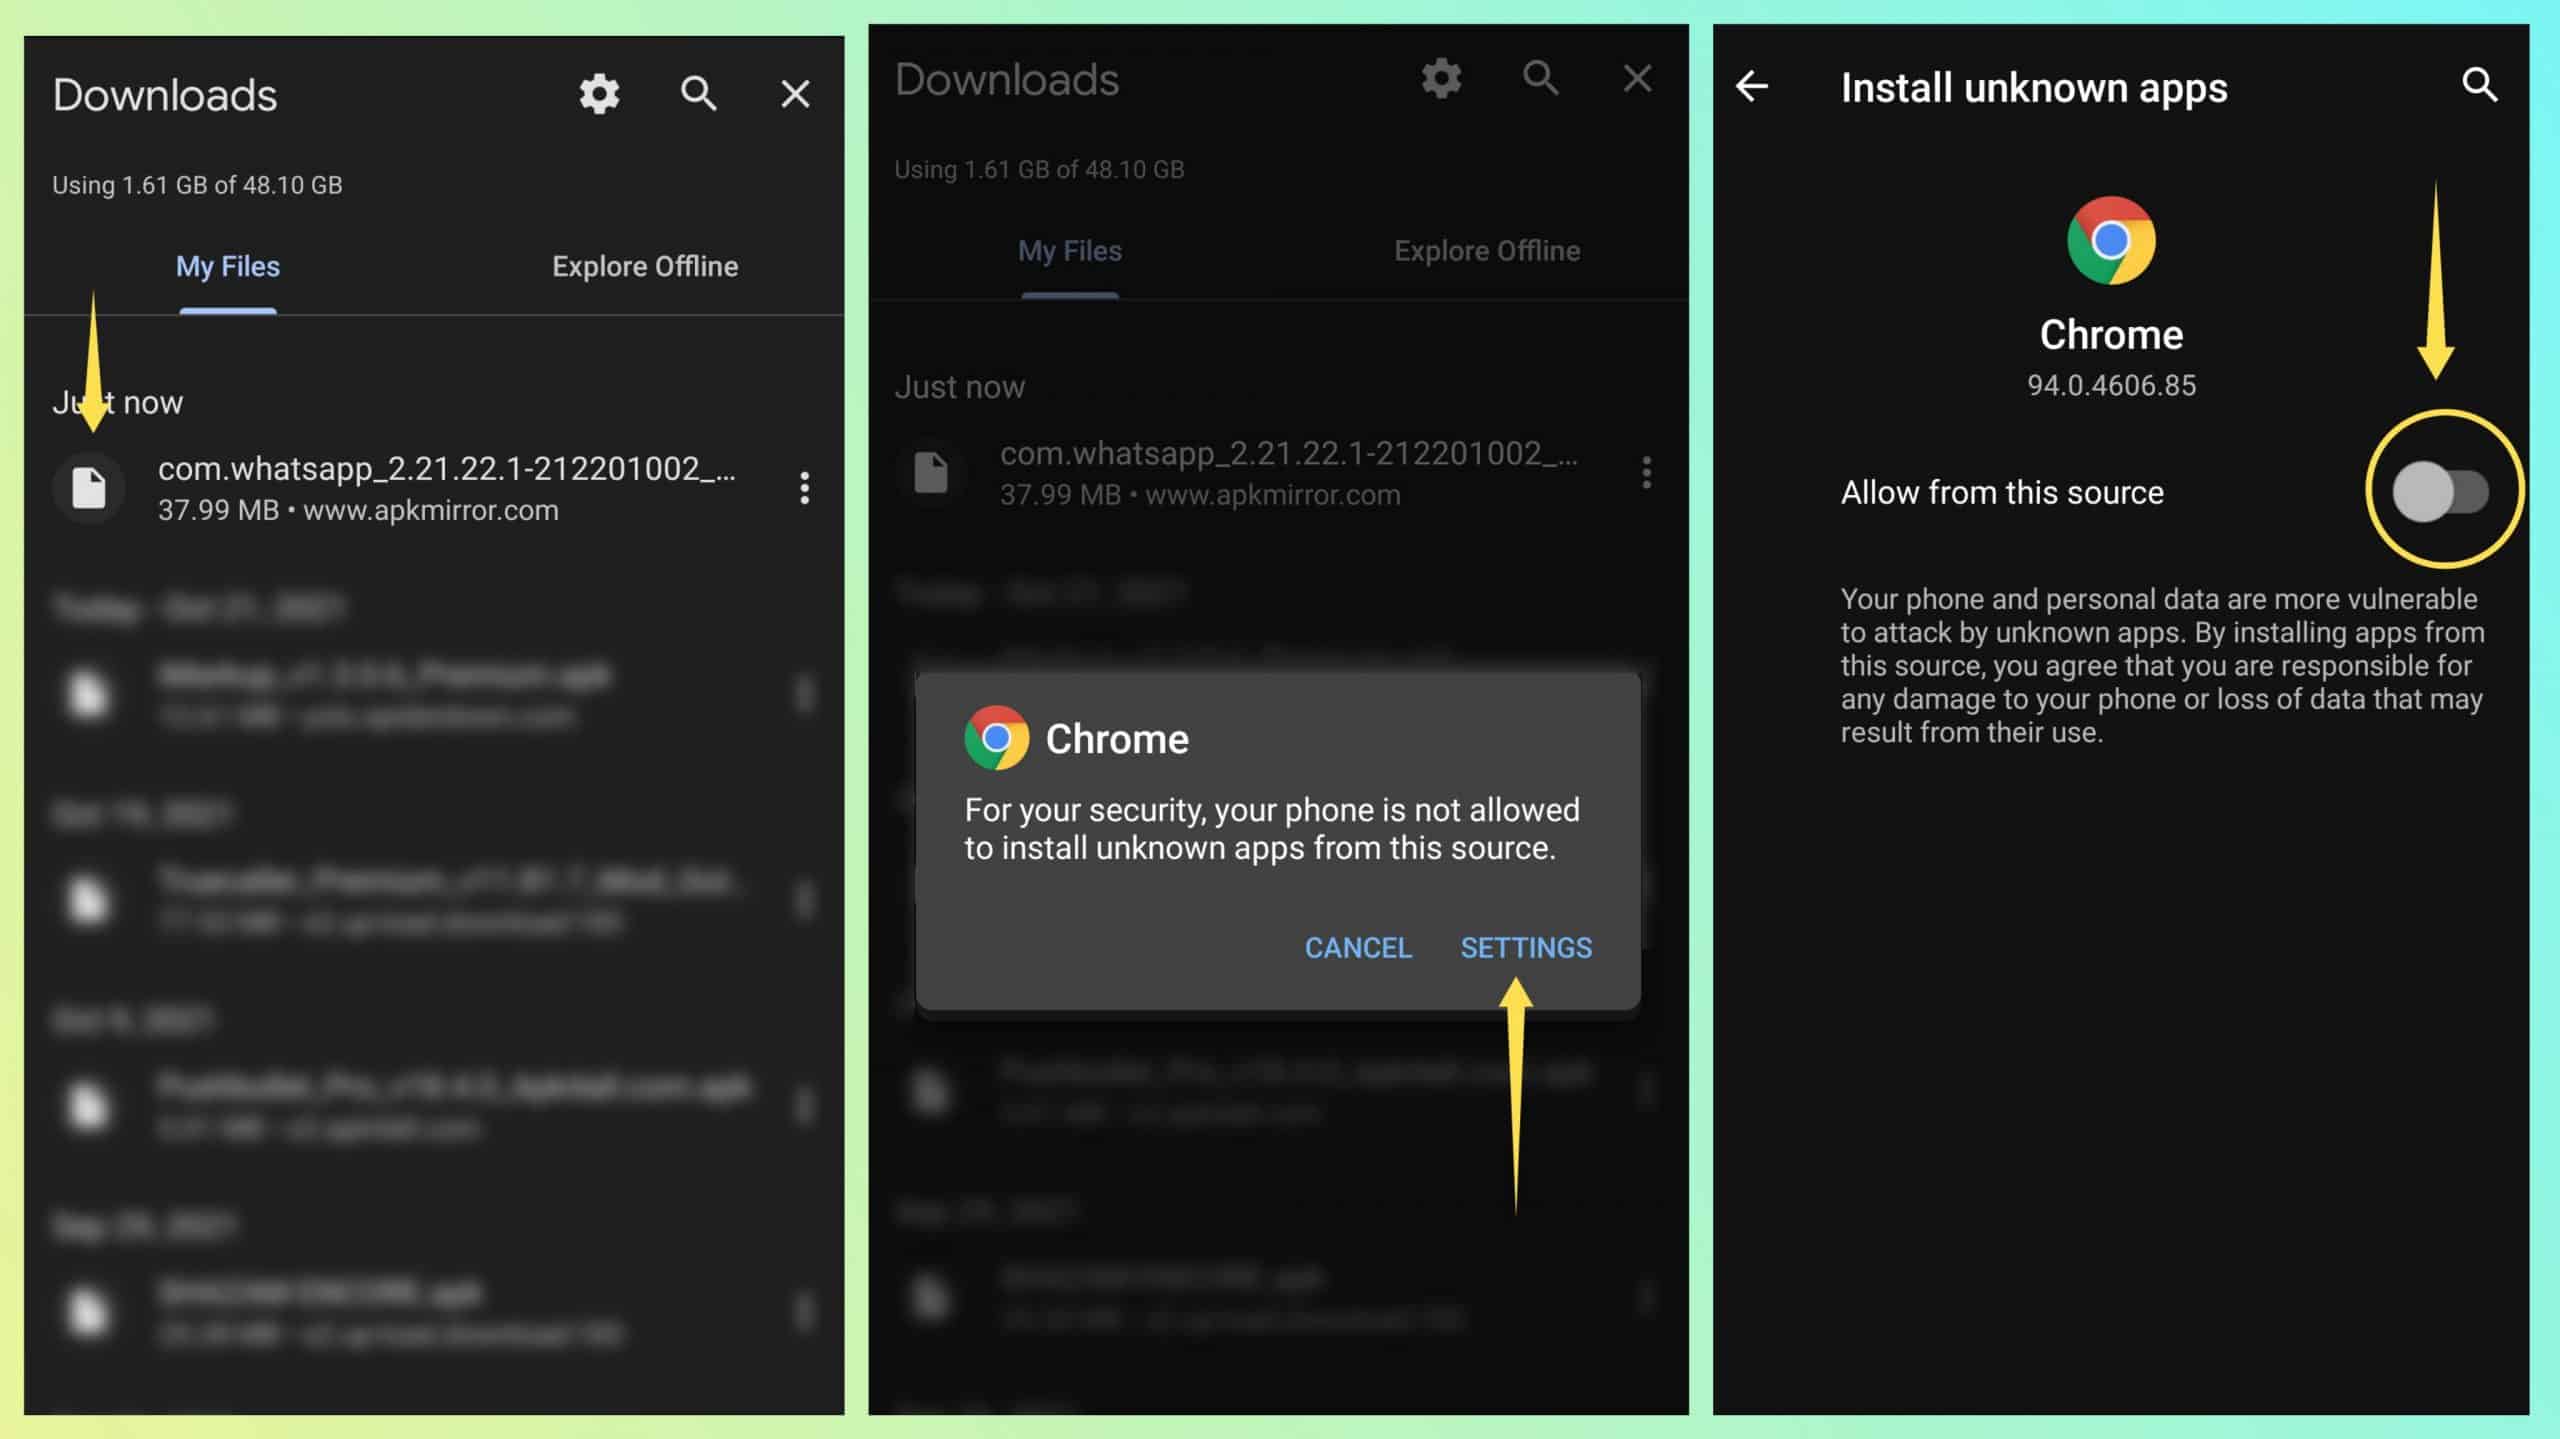
Then, scroll down till you find the download button and click on it. If you’re doing something like this for the first time, your phone will ask you to allow your browser to install apps from unknown sources. Once enabled, you are good to go.
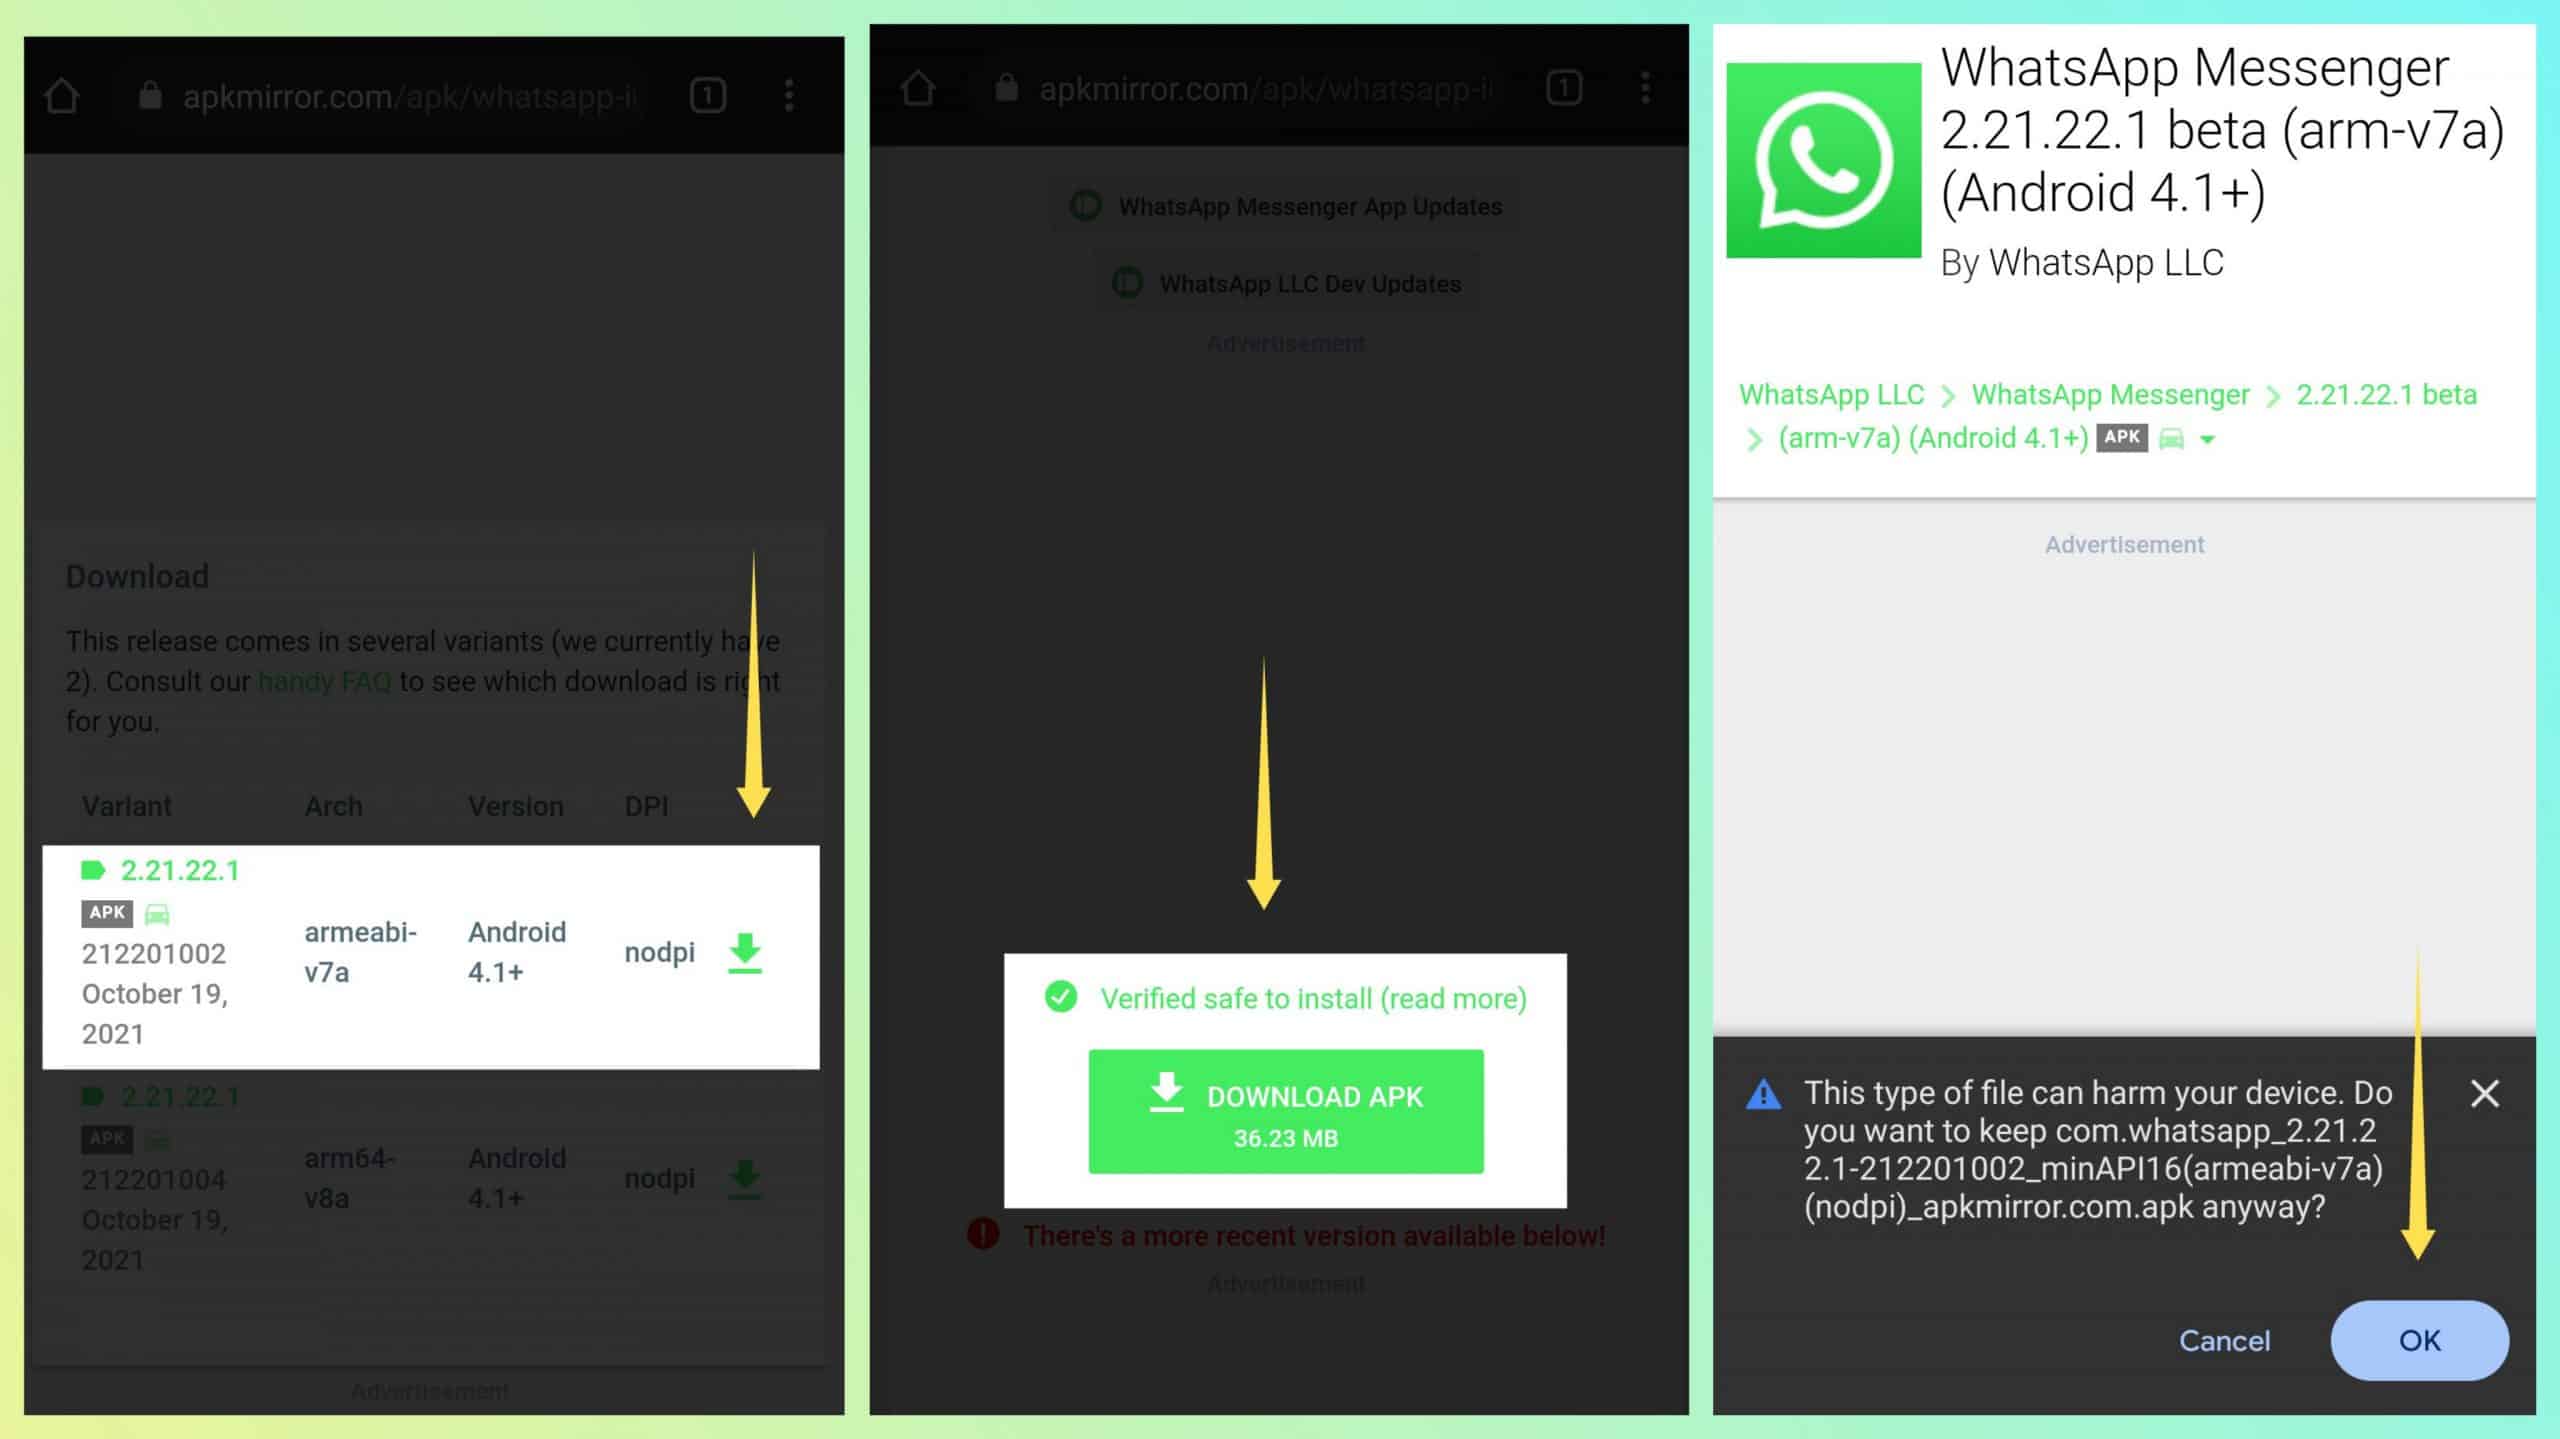
It will reflect in the downloads section of your browser; click on it and install. You’ve successfully installed the older version of your desired app, and it should now be available in your apps tray. Hopefully, this should repair the problem of apps not working on android.
2. Uninstall Updates of Android System WebView
Android System WebView, as the name suggests, is what an app uses to display content from the web. You can’t uninstall it since it’s a system app. Many times, Android System WebView often messes up with apps and eventually crashes them. All we can do is uninstall its updates, which should prevent apps from crashing.
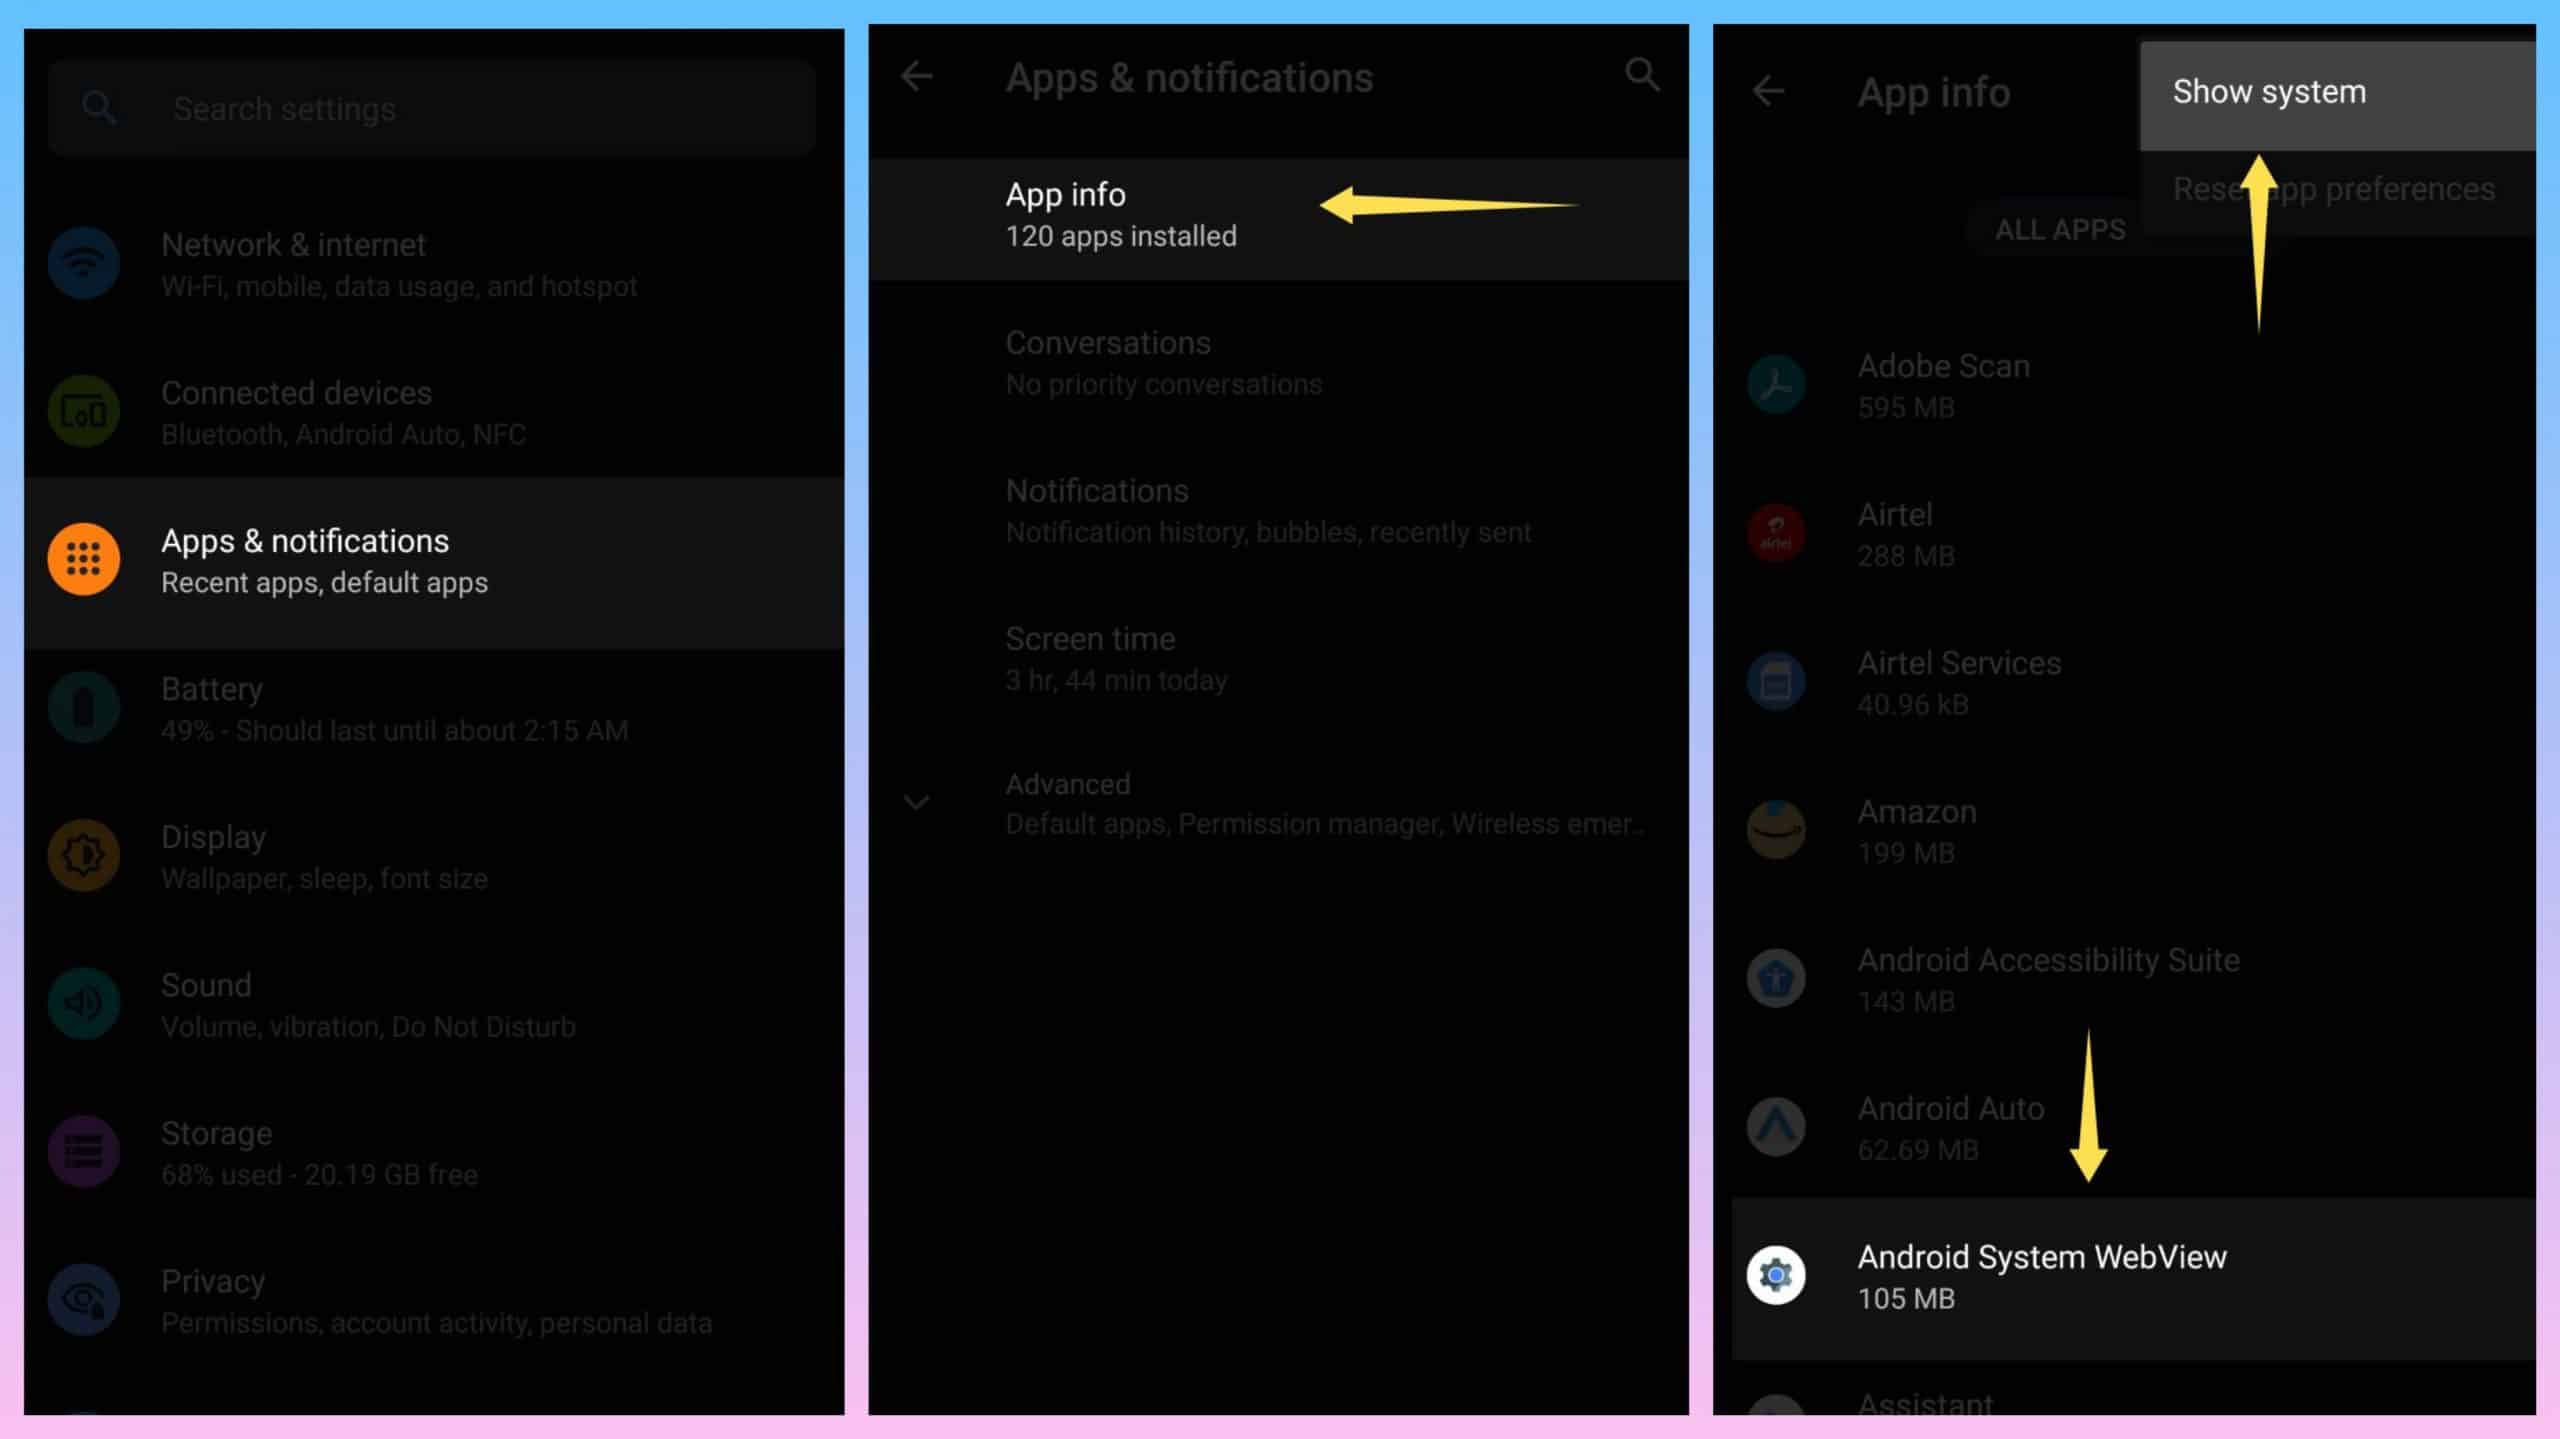
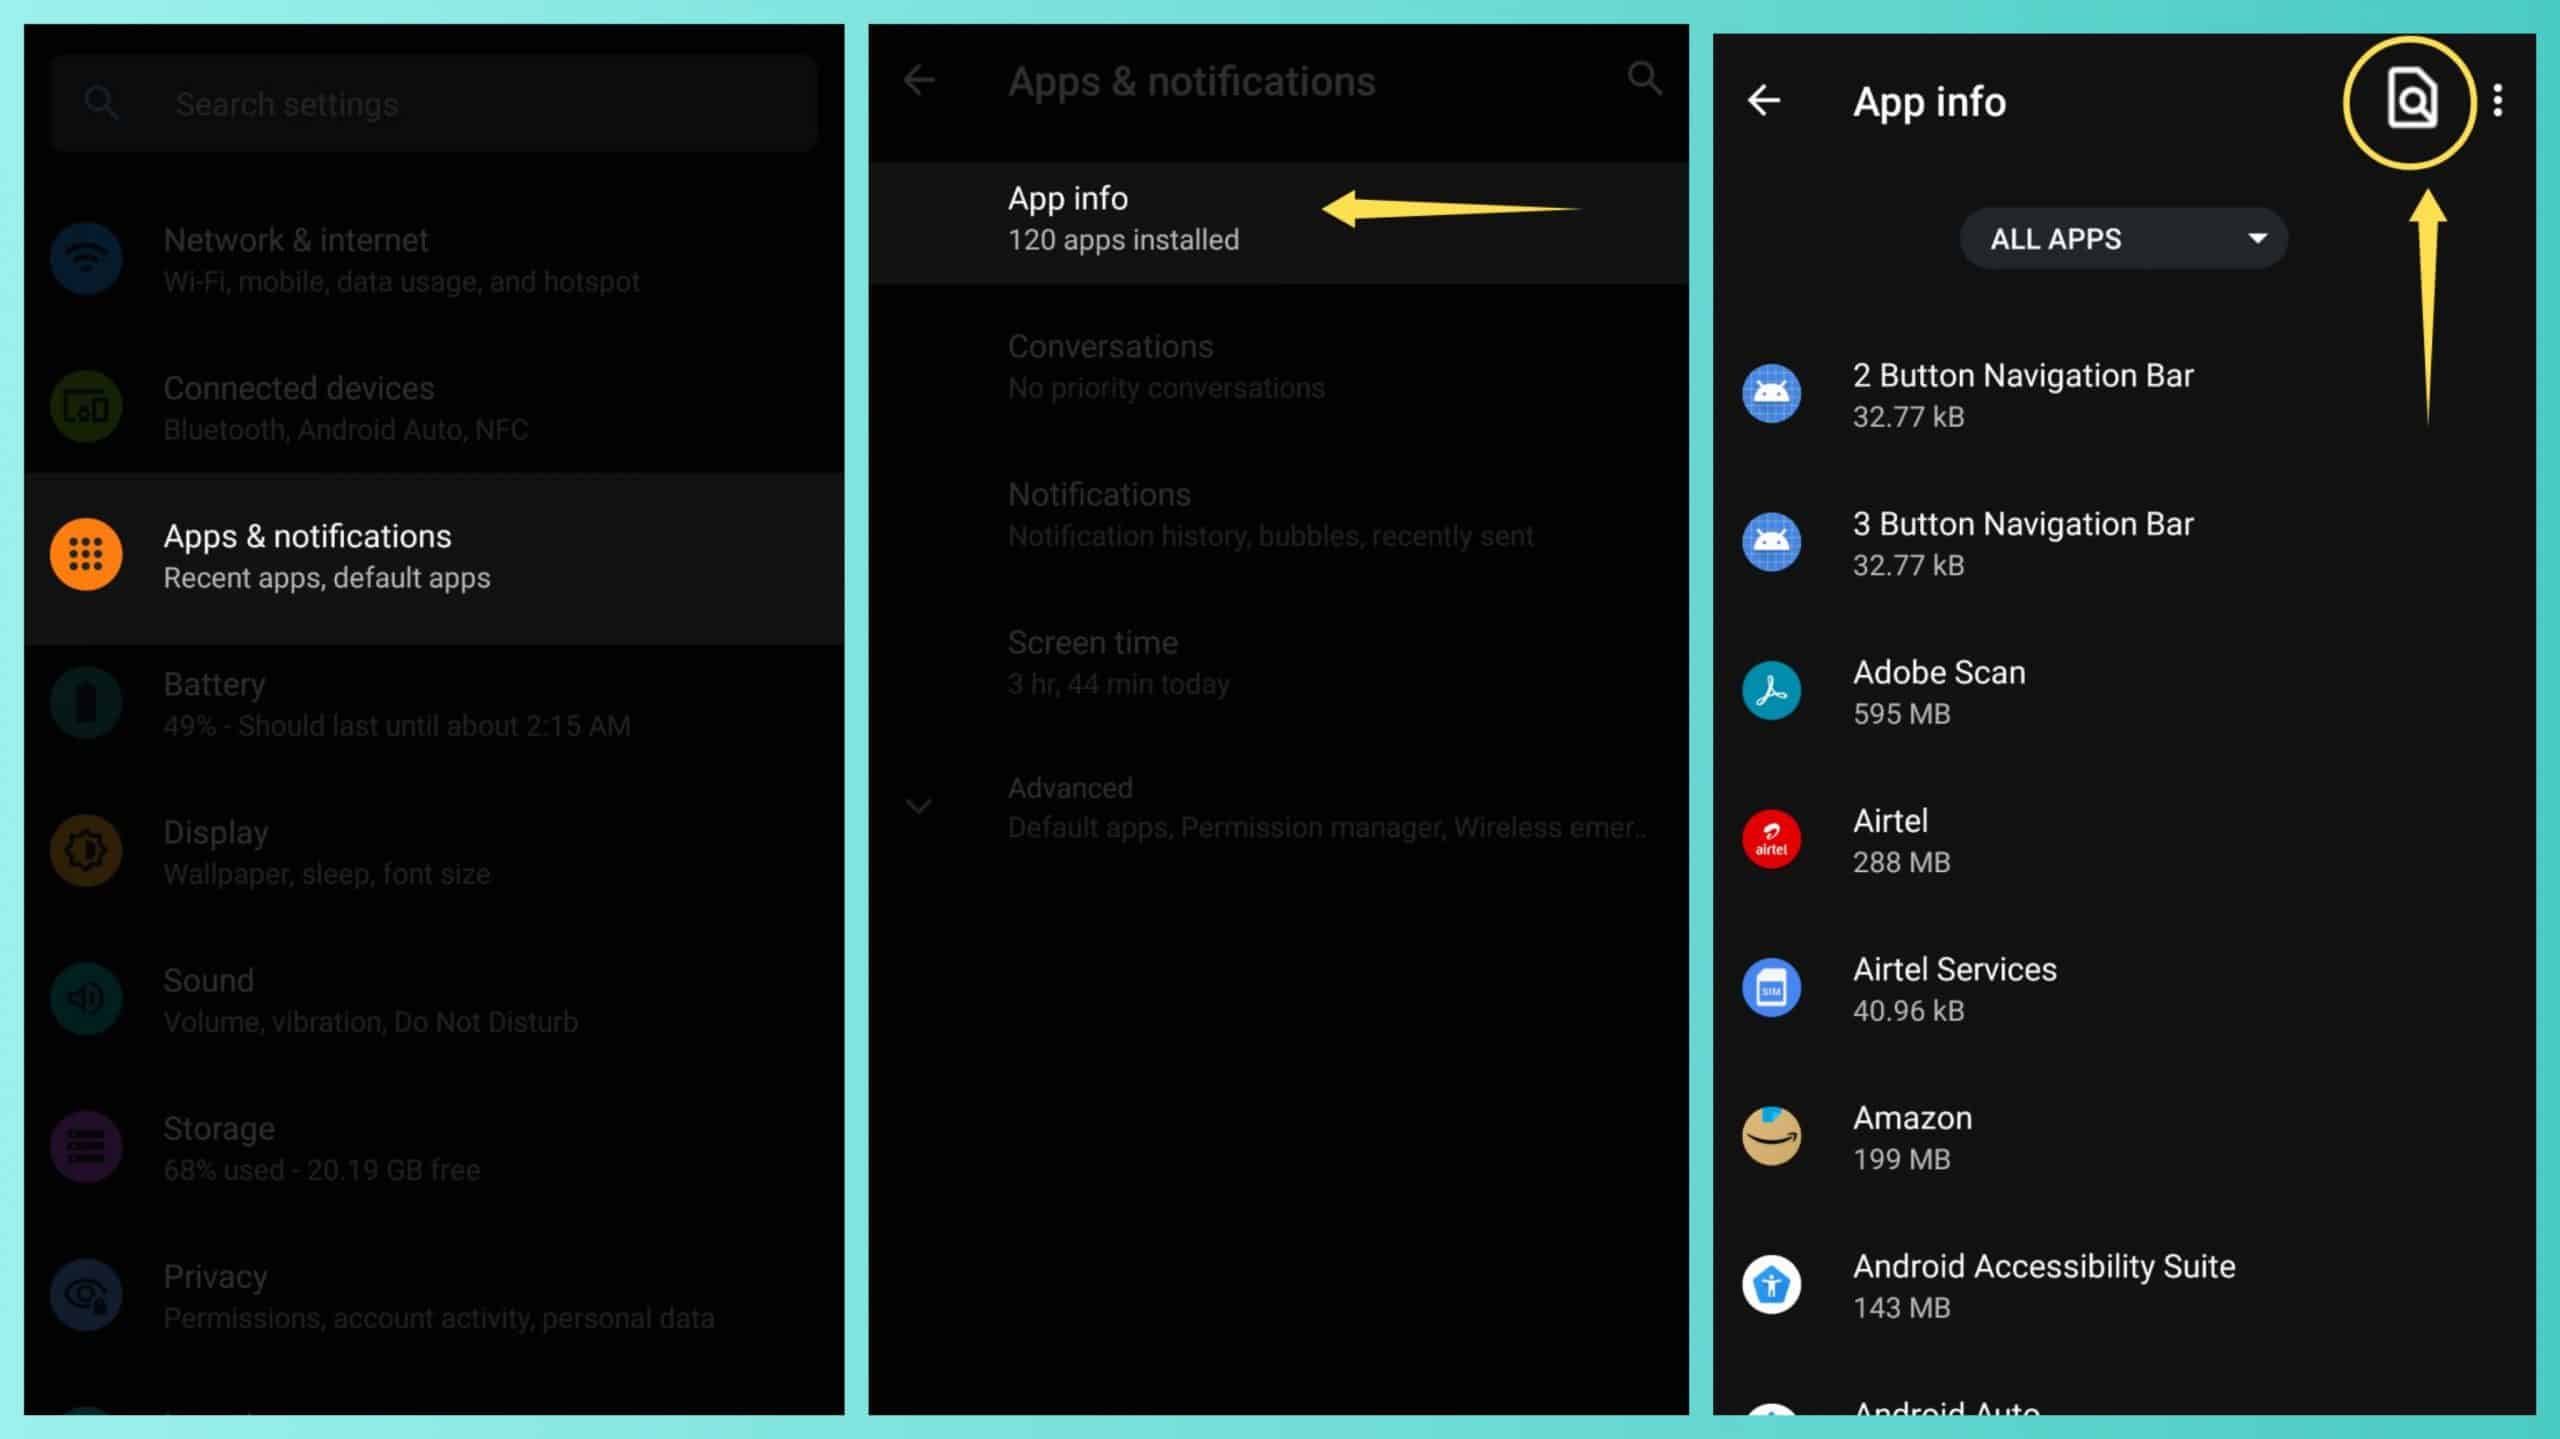
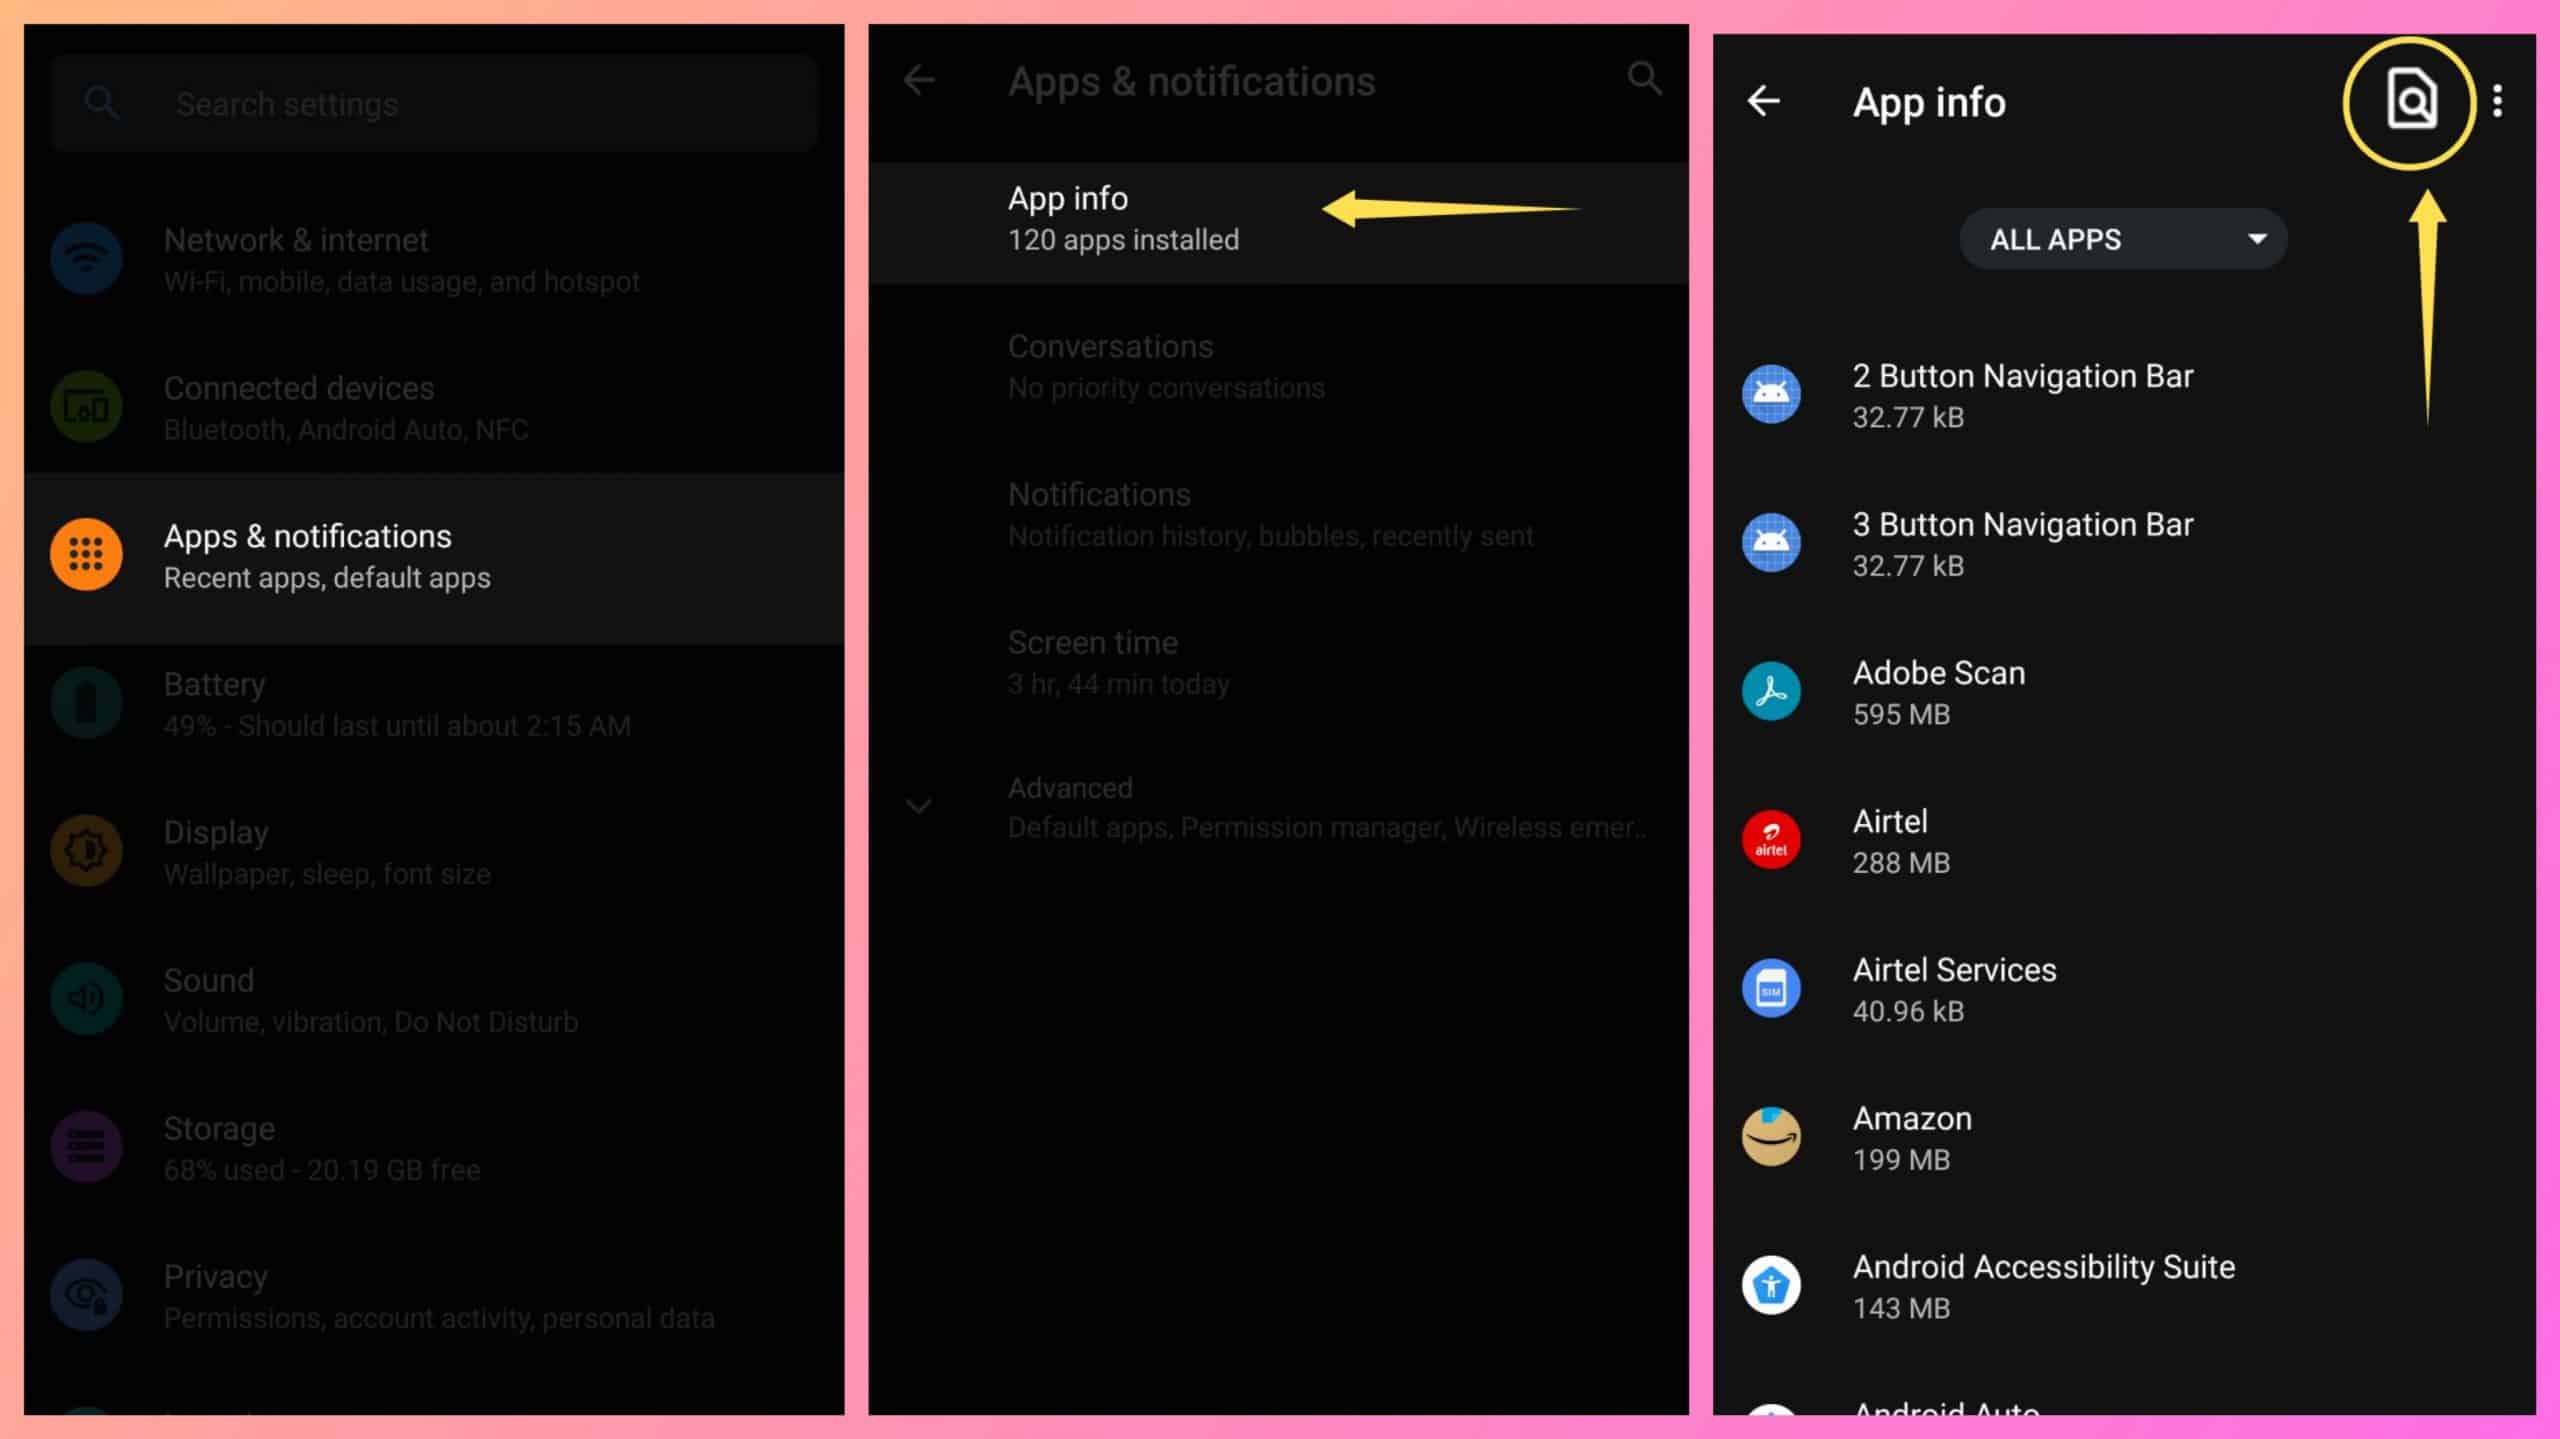
Firstly, open your device’s settings and find the section named “Apps & notifications.” Clicking on it will take you to another area, where you must select “App Info.” What you’ll now see is the list of your installed applications, and since Android System WebView is alphabetically ahead of others, it should show up on the first page itself. Else, click on the three dots menu in the top right corner and select “Show system.”
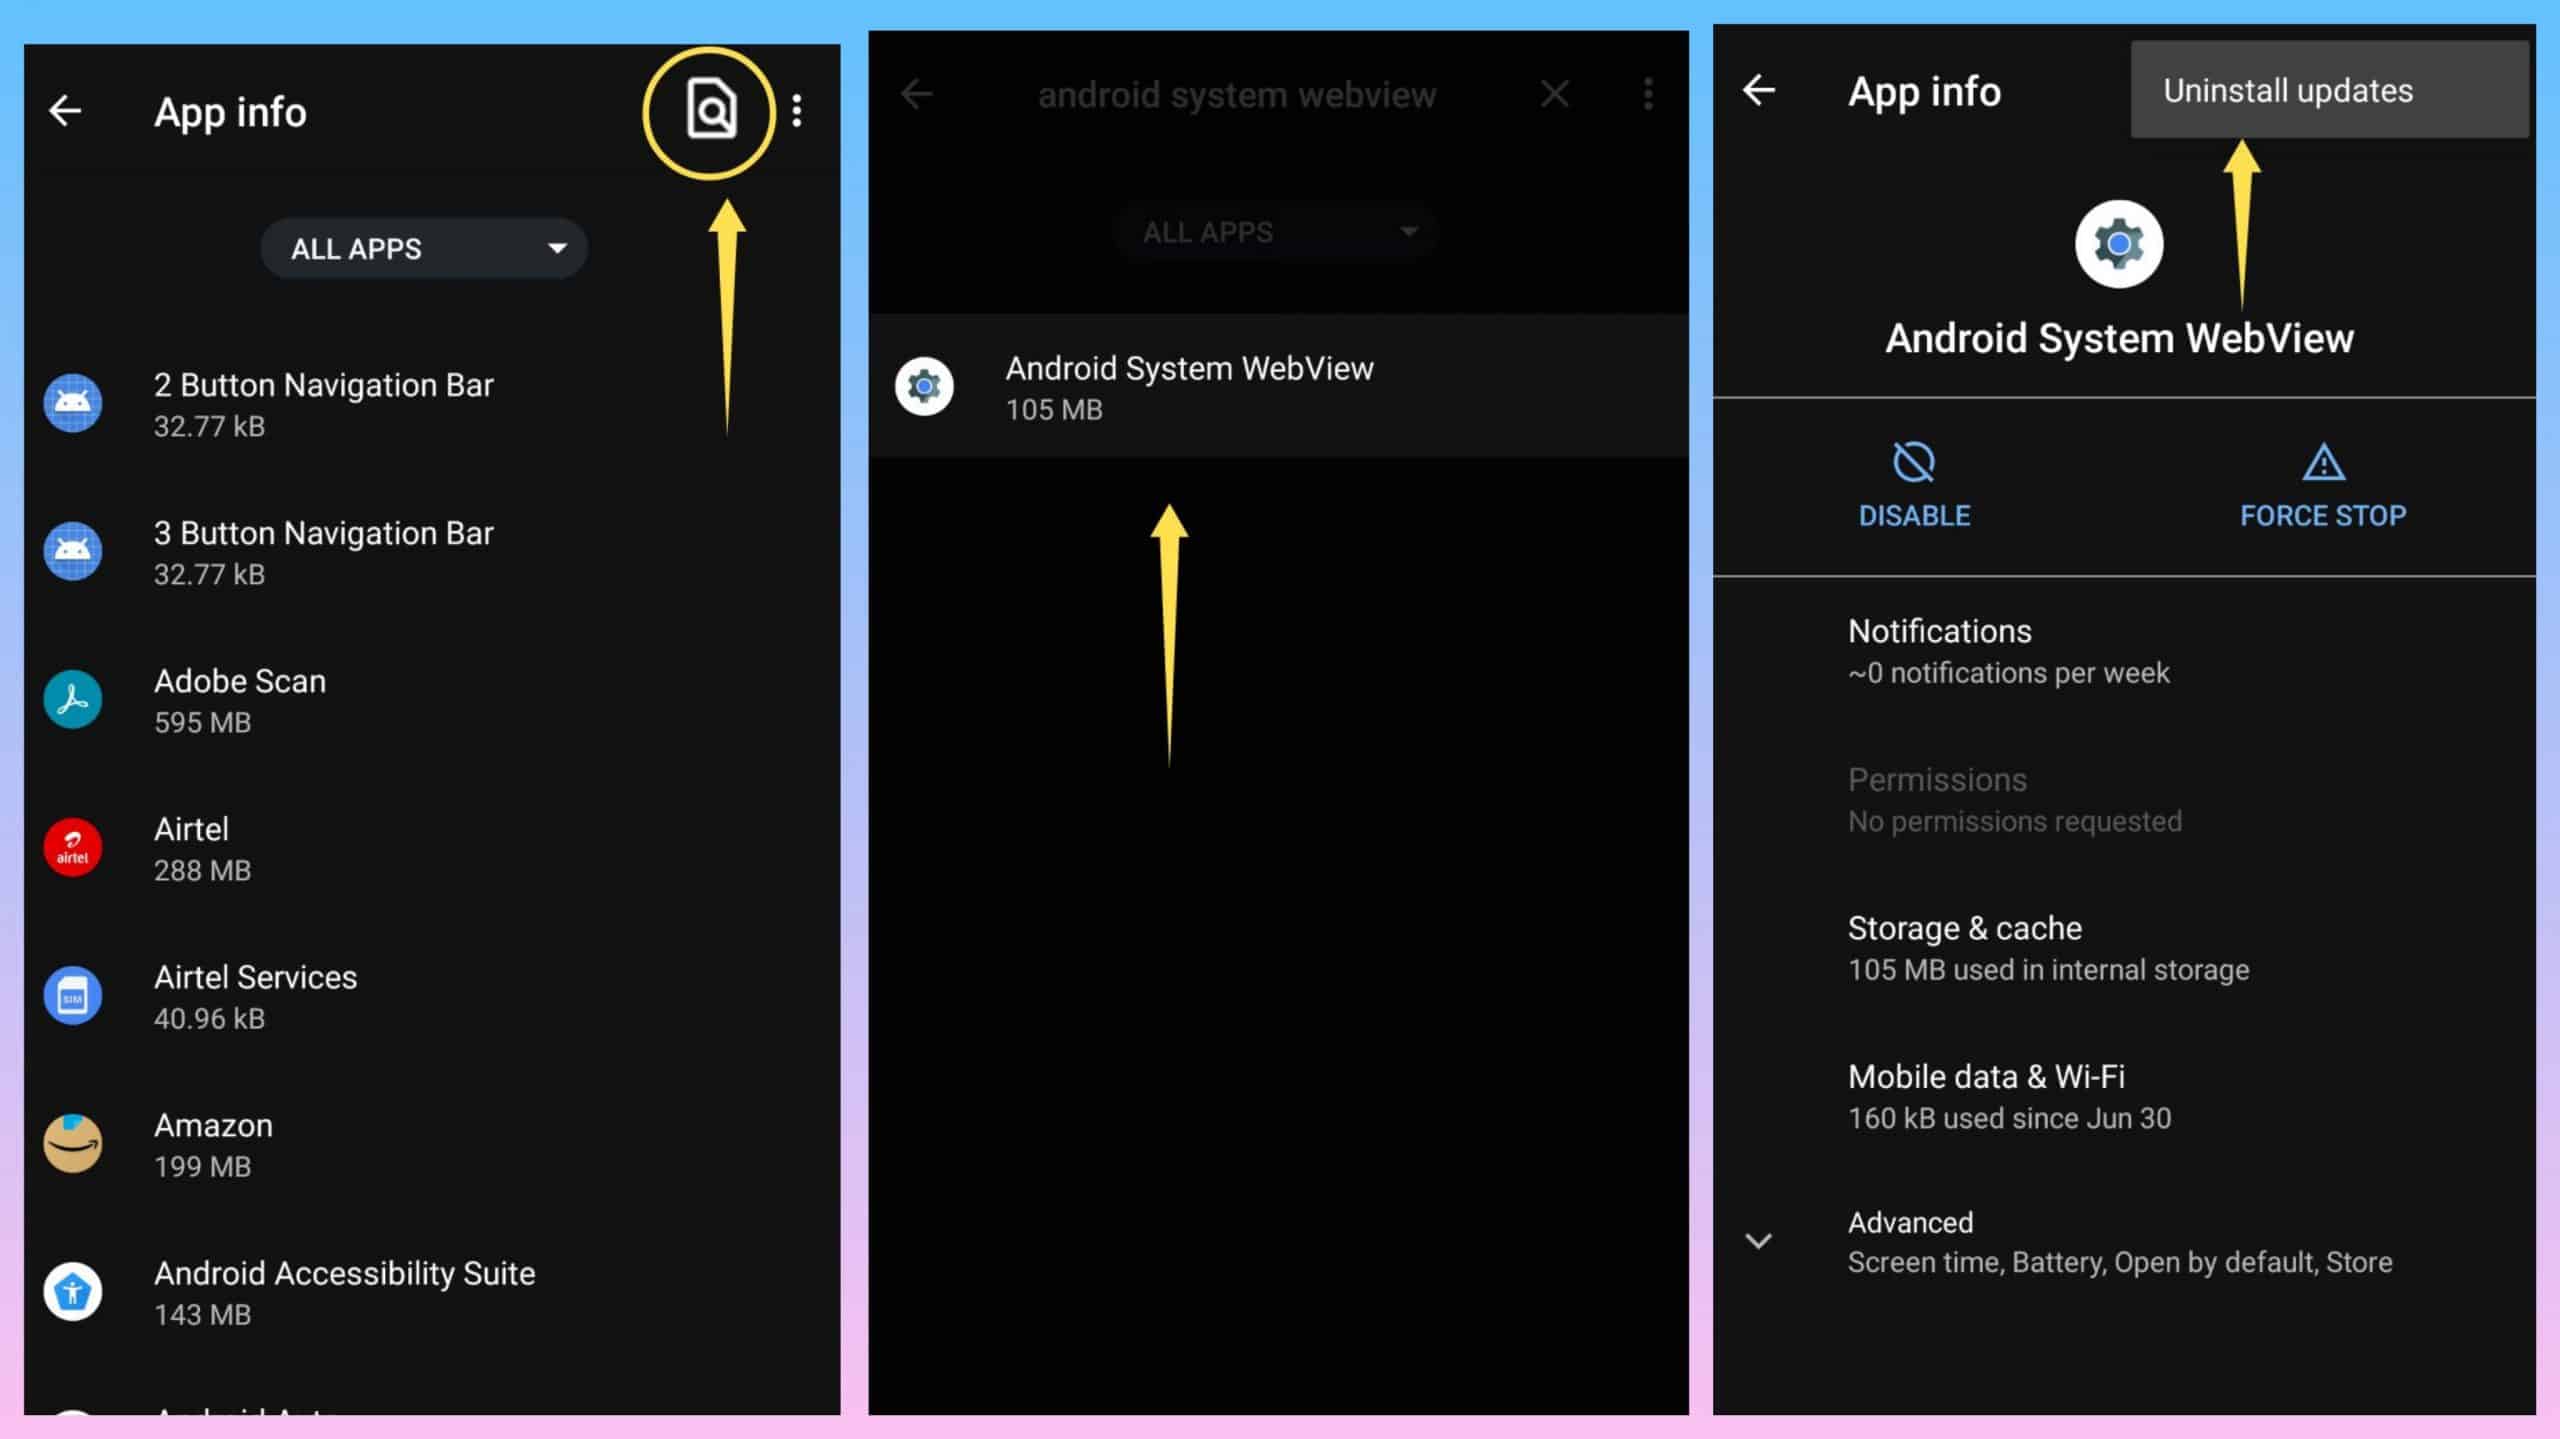
A few more things will show up now, and our desired application lies within them. There’s a search button beside the three dots menu to ease your efforts. After finding the app, click on it, and it will show its details. Again, click on the three dots menu and select “Uninstall updates.” Once done, you will hopefully find your app working just as intended.
3. Update the App to Latest Version
It’s the same as the one mentioned before, but just for knowing how to do it, here’s it again. Updating is one such thing as servicing your vehicle — an important task which most of us forget. In case you’re wondering how to do it, here’s a detailed walk-through.
Head over to the Google Play Store and click on your profile picture. Once you’re in, you’ll find the option to manage your apps and device. Select that option, and you will arrive at another section containing information about your device’s storage, ratings, reviews, etc.
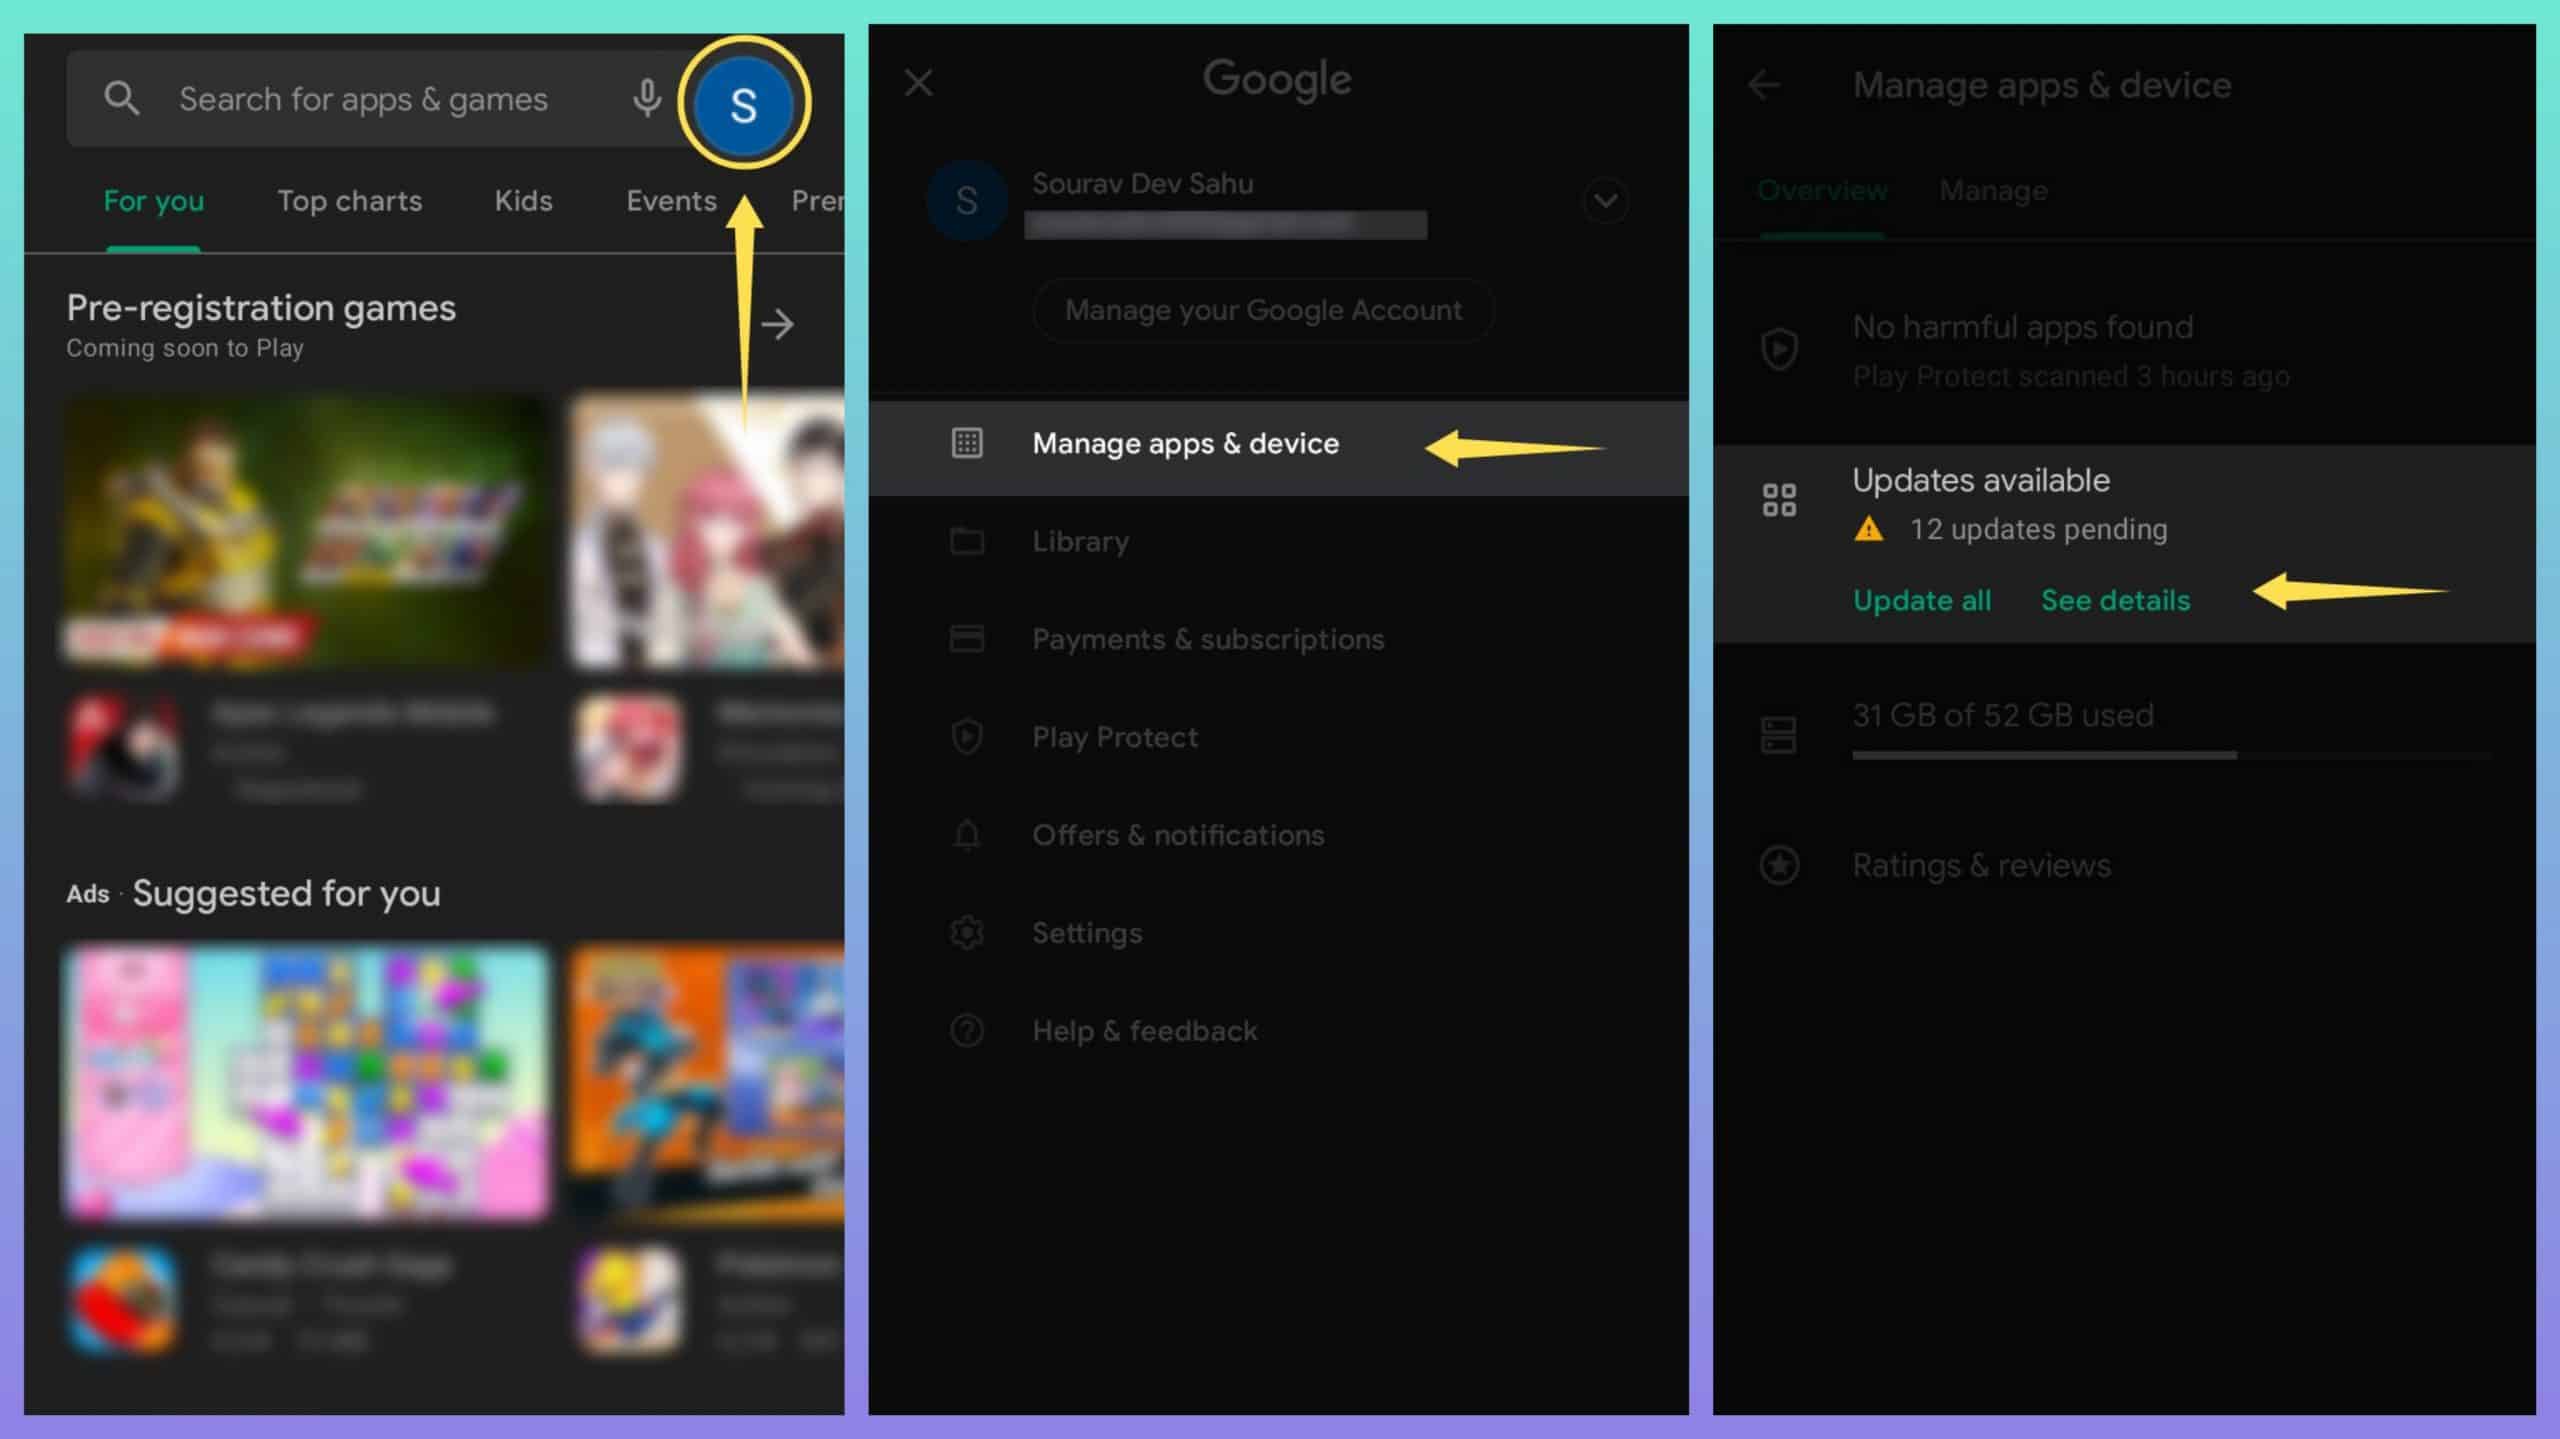
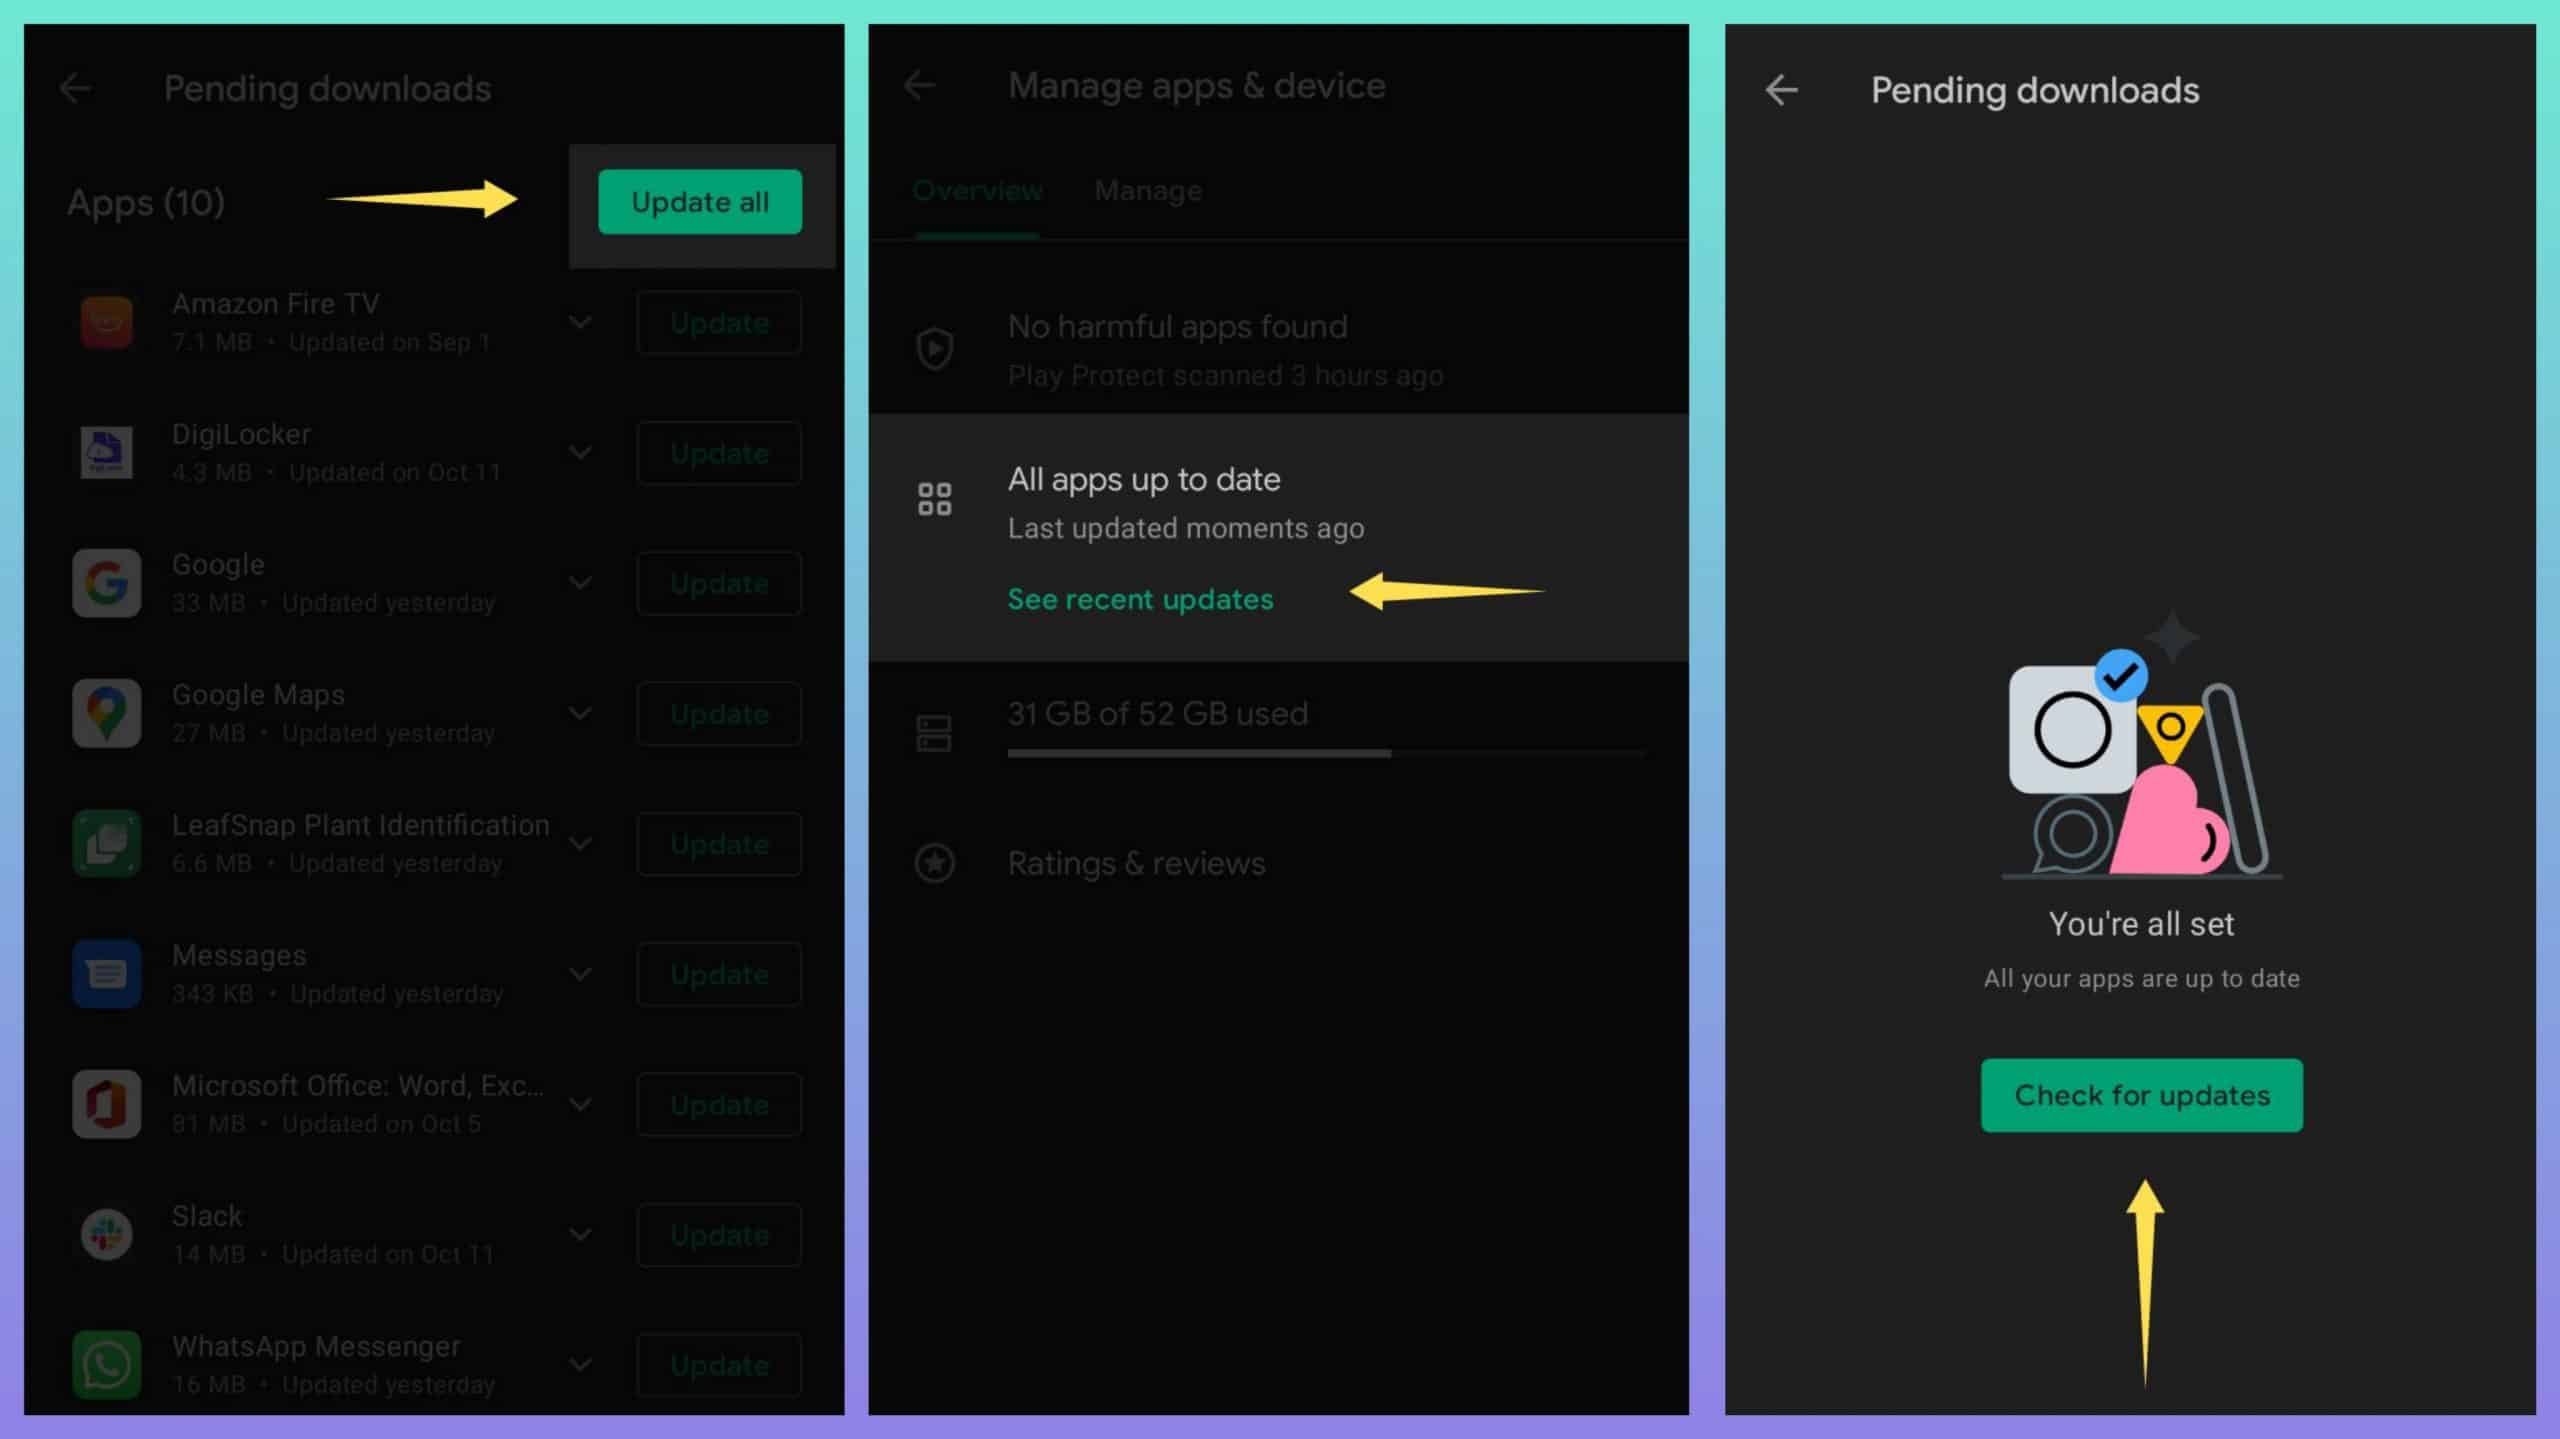
In the option saying “Updates available,” you’ll find two options: update all the apps and see details. Unless you want to select what all apps you wish to update, we’d suggest you choose “Update all.” After the waiting games, Play Store will update all the apps to their latest versions, and the problem of apps not working on android should get solved.
4. Check for Android Updates for your Phone
Many apps, especially the popular ones, stop working on ancient Android Versions like Android Ice Cream Sandwich, Android KitKat, etc. So, if you haven’t updated your phones in a long time, it’s time to do so. Even if your phone is running on the latest Android version, check for the security patch updates, if any.
For this, go to your phone’s settings first. Depending on what phone you’re using, find the section named “System” and click on it. Again, our device might not be the same as yours, so proceed accordingly. This particular device is a Nokia 8.1 running Stock Android based on Android 11.
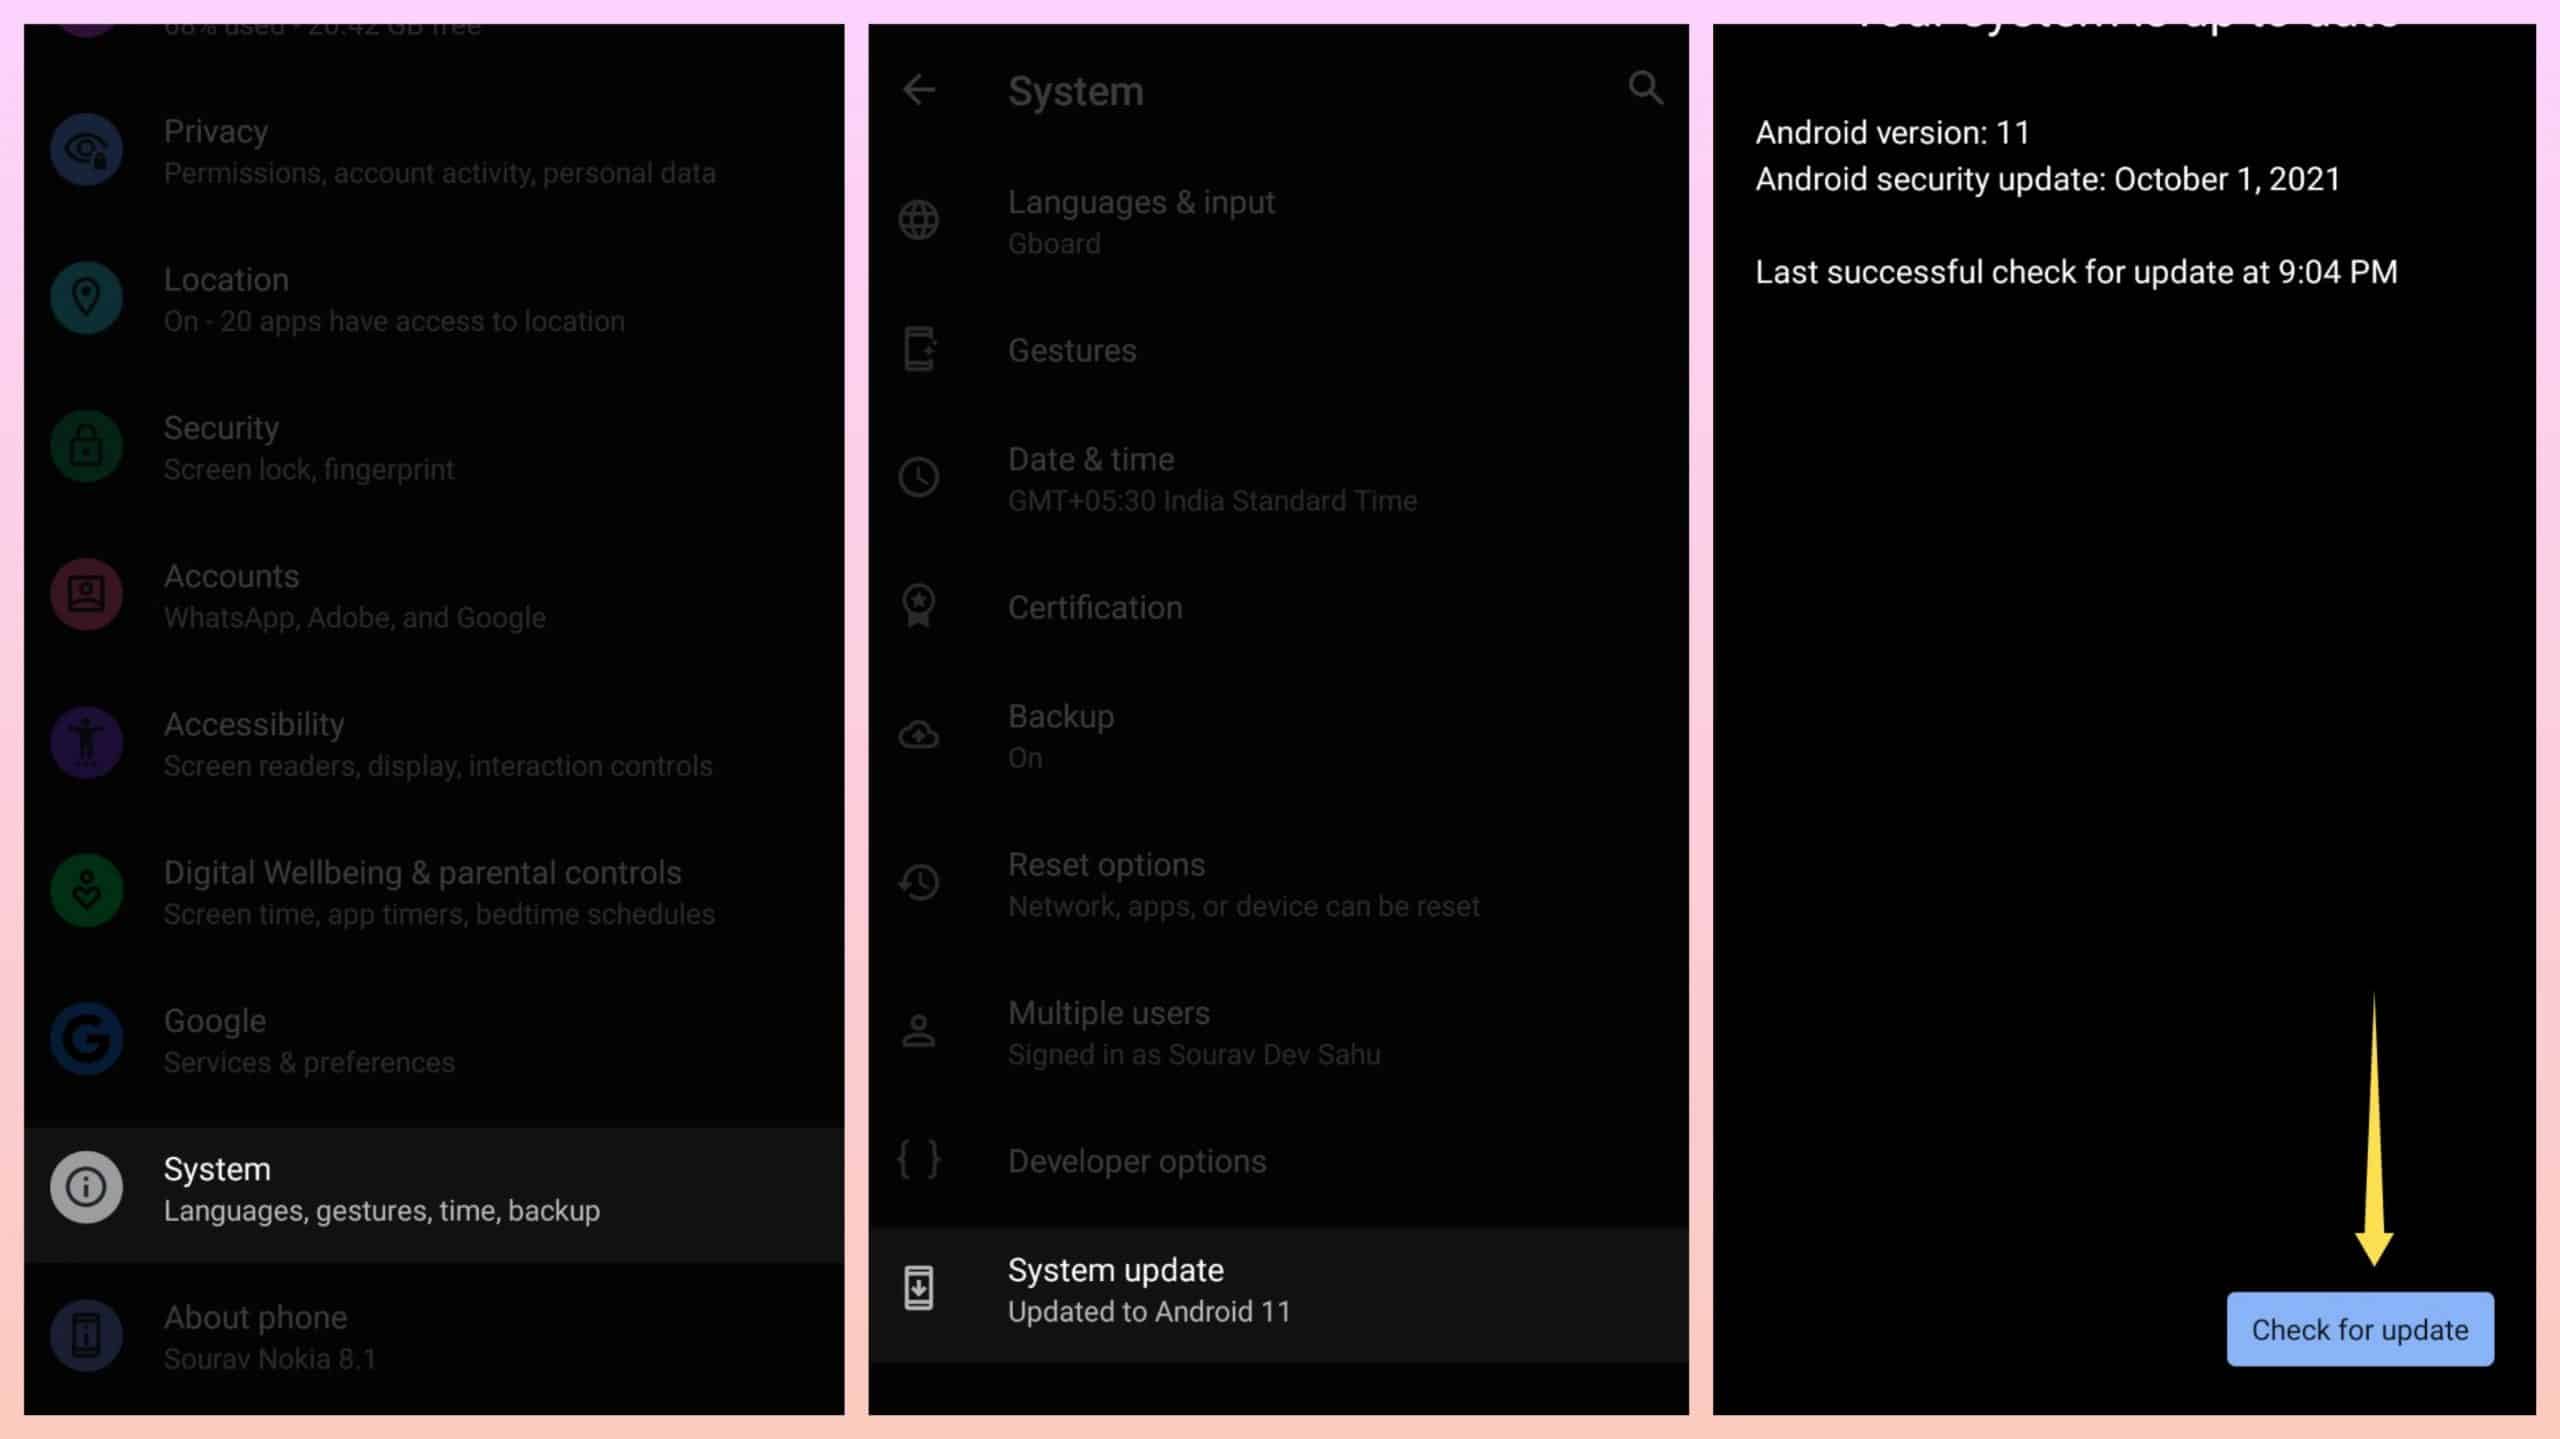
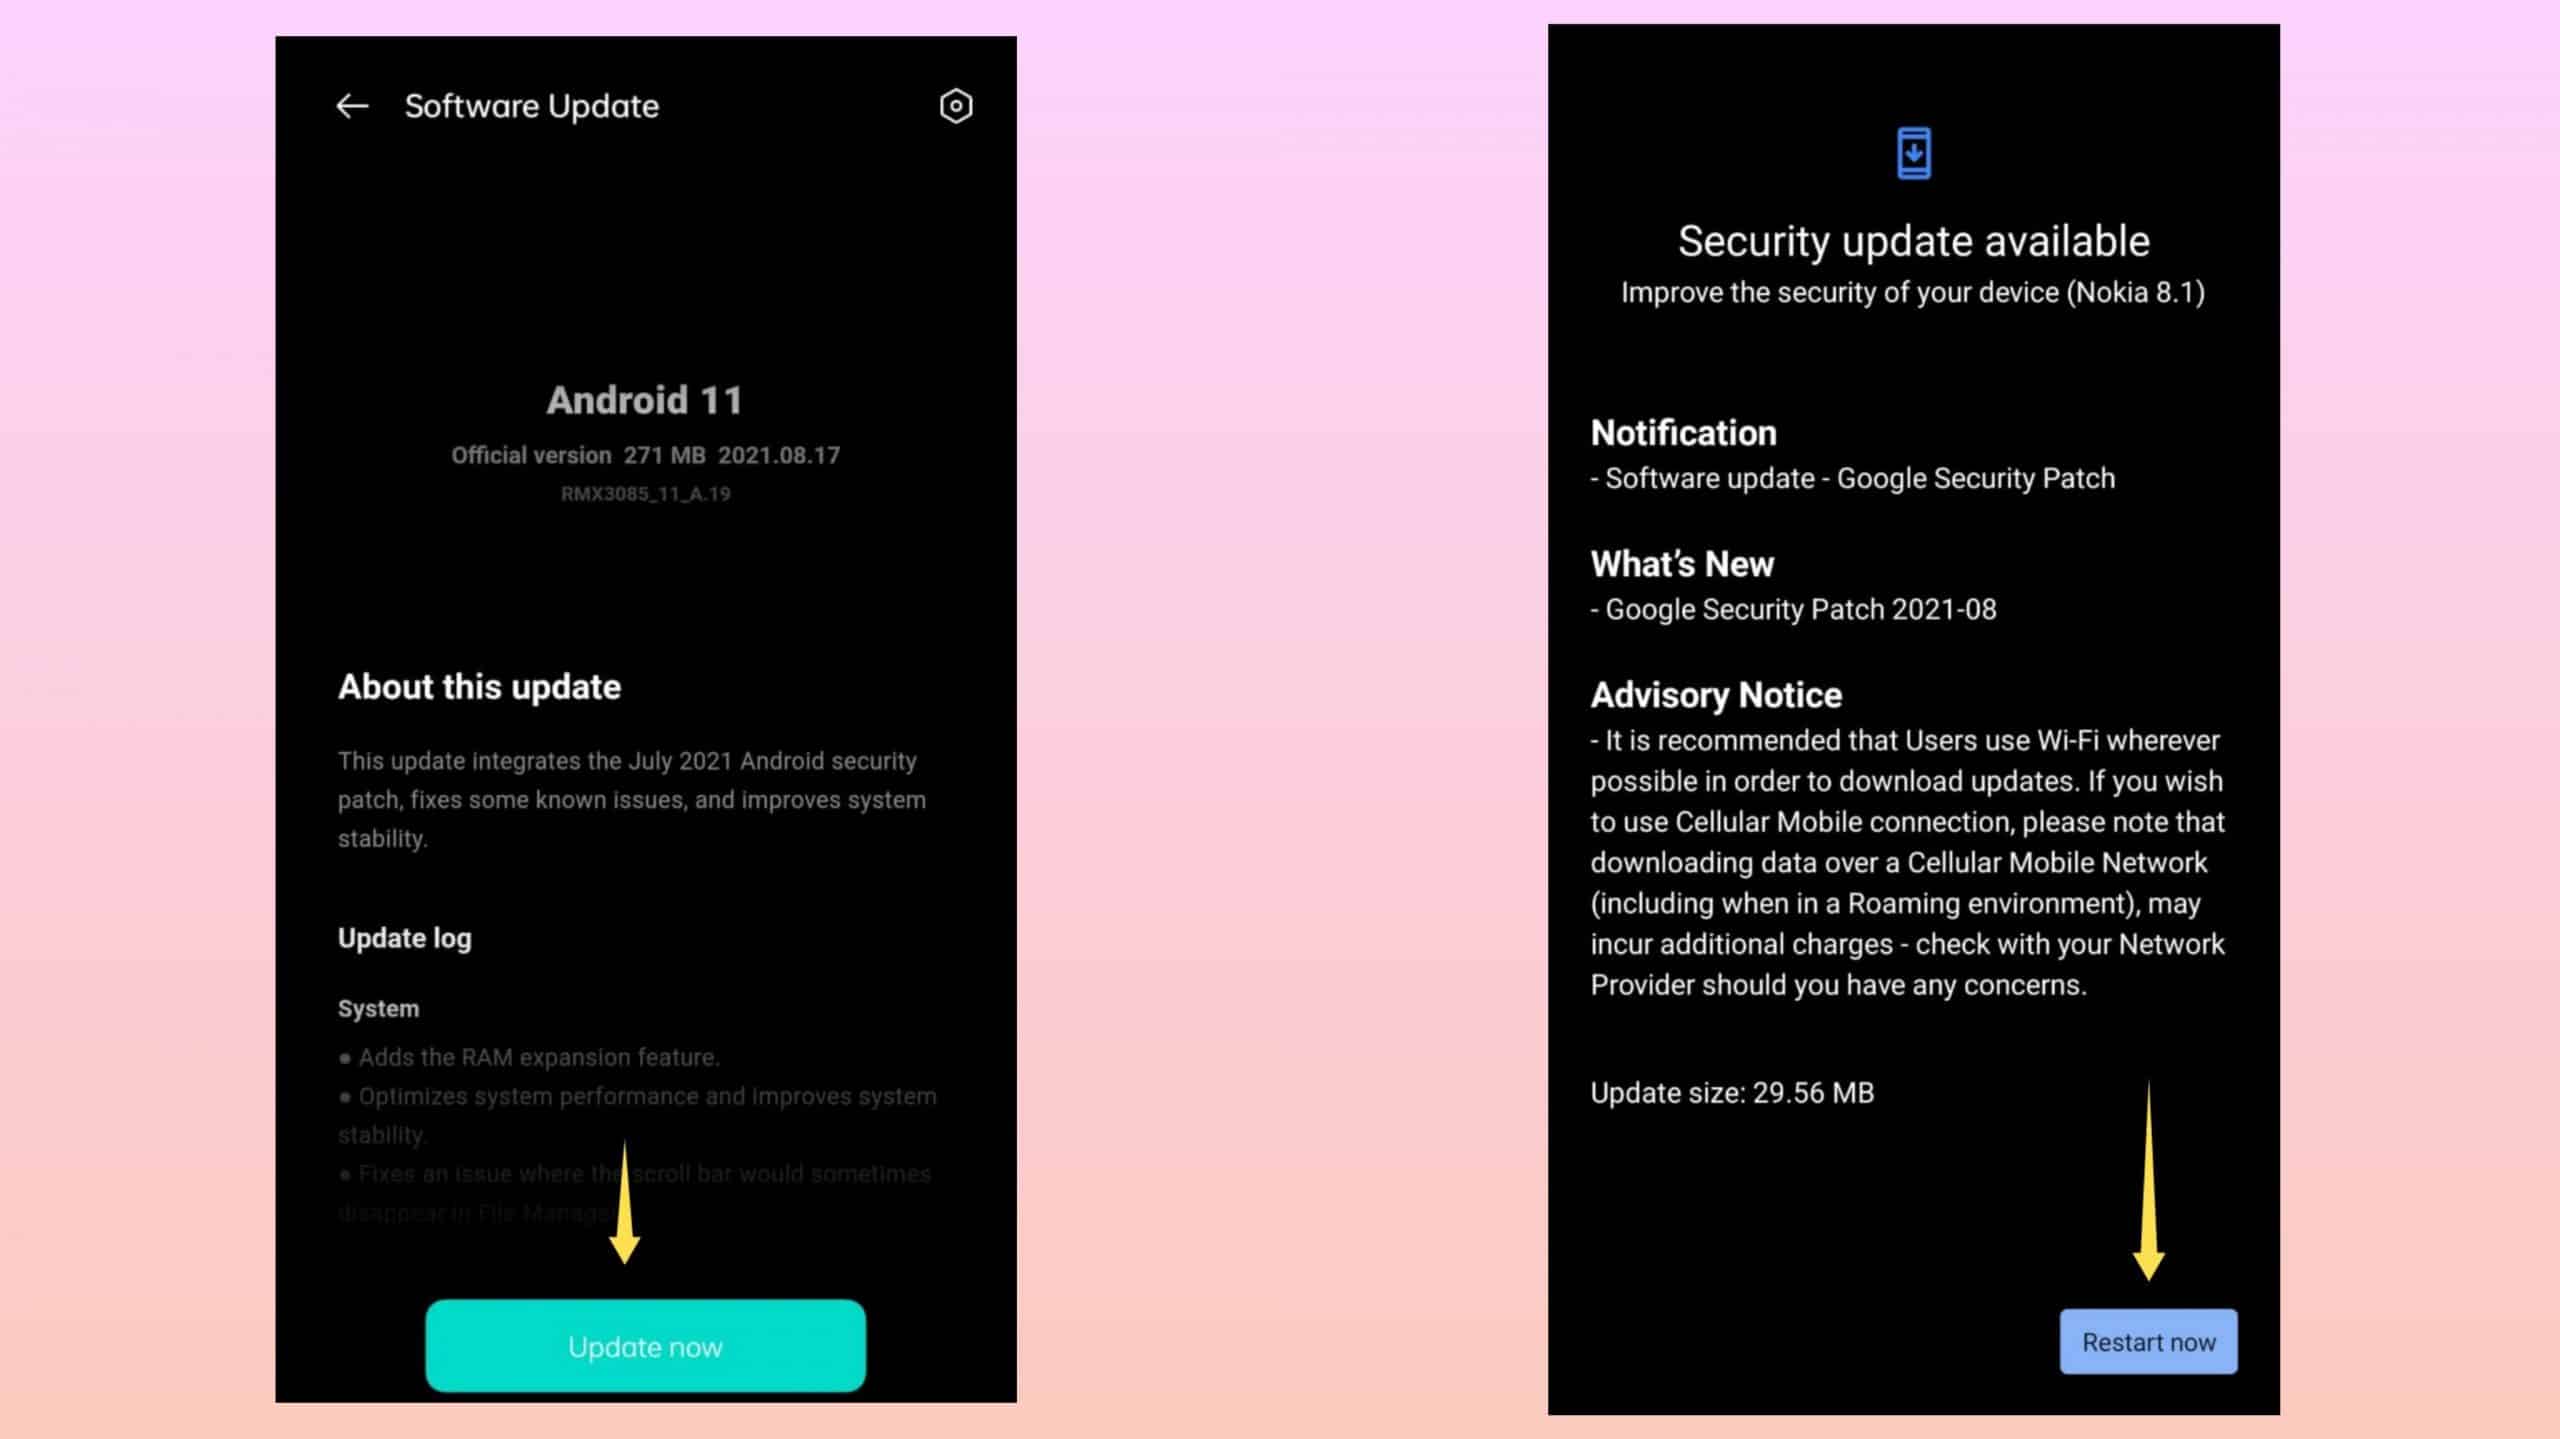
From there, click on “System update” and see if there is any. There isn’t any in our phone right now, but we’ve made sure to depict how it looks. Click on install/update now, after which it will take some time to perform the same. Once done, the device will ask you to reboot it, and you’re good to go! This simple fix should do the job.
5. Force Stop and Restart the App
No superpower can fix a running car; you have to bring it to a halt first. Similarly, you’ll have to close the app entirely or force stop if in case it crashes or freezes. Even if you clear it from your Recents tray, there’s a pretty good chance that the app is running in the background and performing some background processes. Here, force stop comes into play and ultimately kills the app.
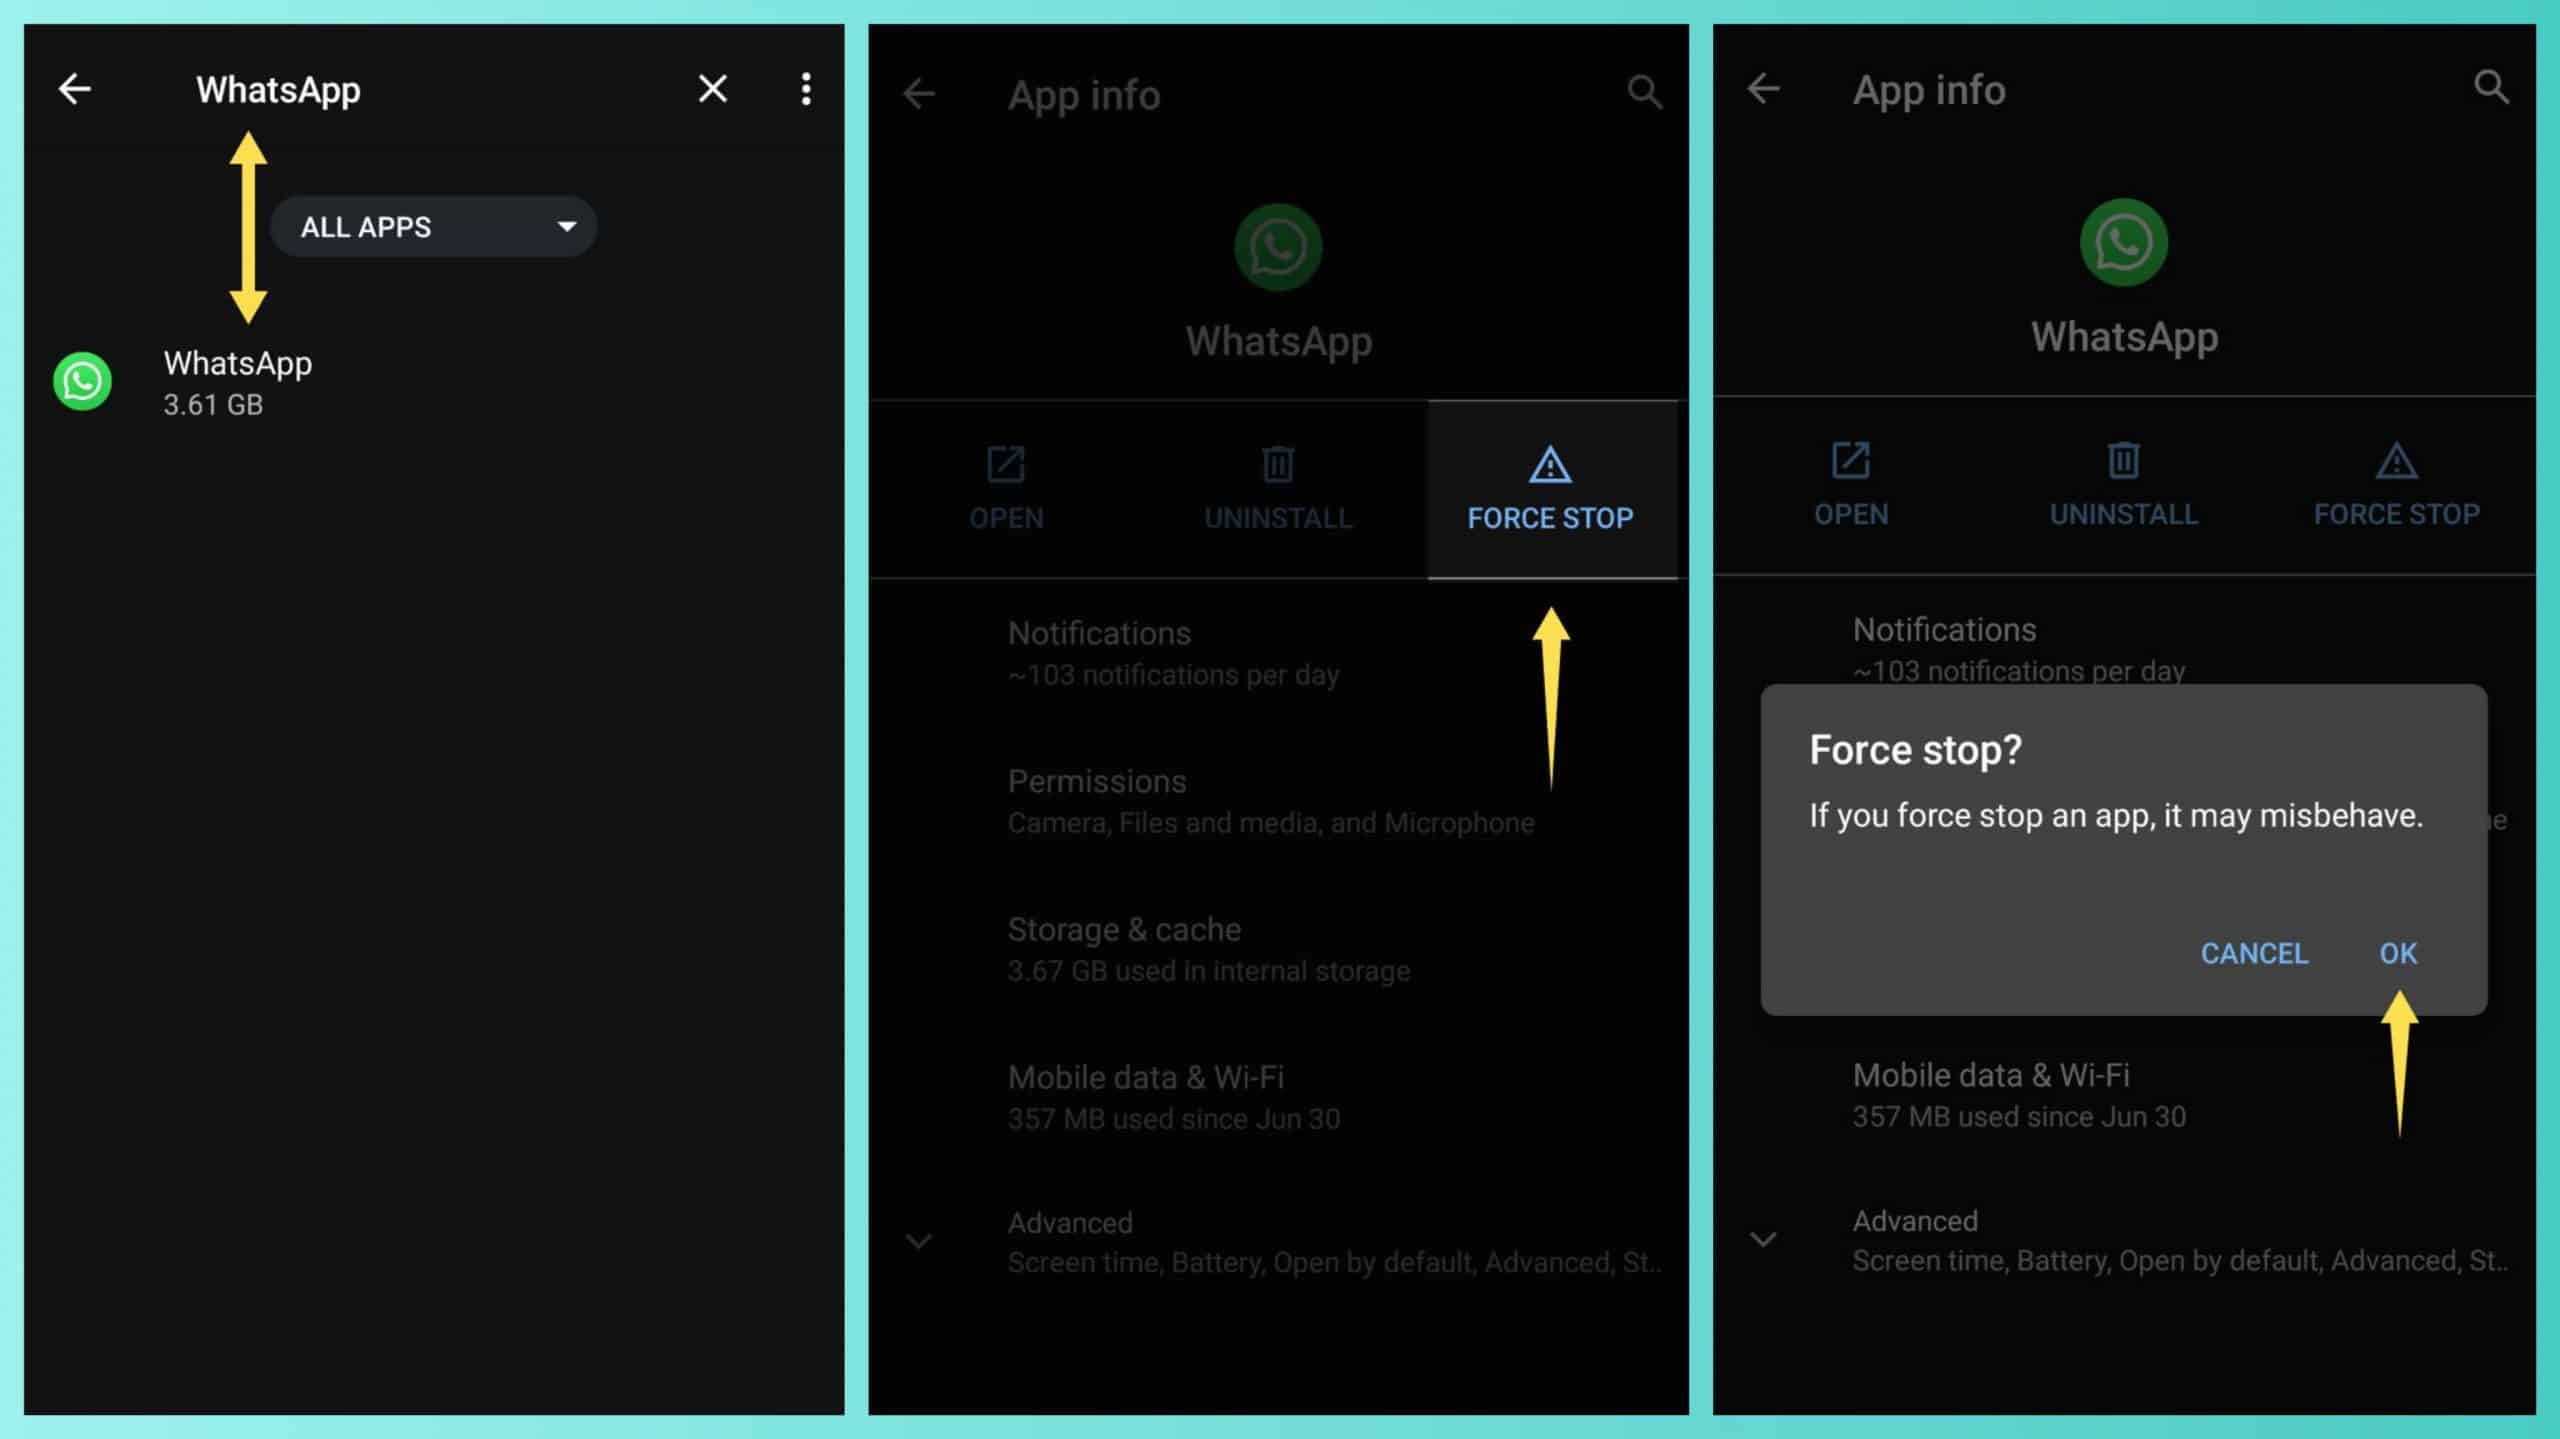
To need to do this, you will once again have to open your settings app and look out for the “Apps & notifications” section. Like last time, click on “App info” and search for the frozen/crashed app in the search box. Once it shows up, click on it.
Once done, it will show you every piece of information about that particular app, but all you need to do is find the “Force stop” option. Select that option, and a dialogue box will appear asking you to confirm your decision. Don’t worry, almost no app misbehaves, so click on OK and wait till your next breath. Open the app once again and see if the problem of apps not working on android is solved.
6. Clear the Cache of App
Cached data of an app is something that the app or website stores in the form of images, files, scripts, and other multimedia the second you open or visit it. It helps the app to assemble its data quickly and reduce the load time. Sounds good, right? But wait until you know that this data gets accumulated very rapidly and, in due course, fills up your device’s memory. As a result, you’ll have to clear it once in a while.
As usual, for any app-related issues, you’ll have to follow the same path as above. Go to your device’s settings and click on “Apps & notifications.” There, click on “App info,” and in the next step, search for the required application using the search button above.
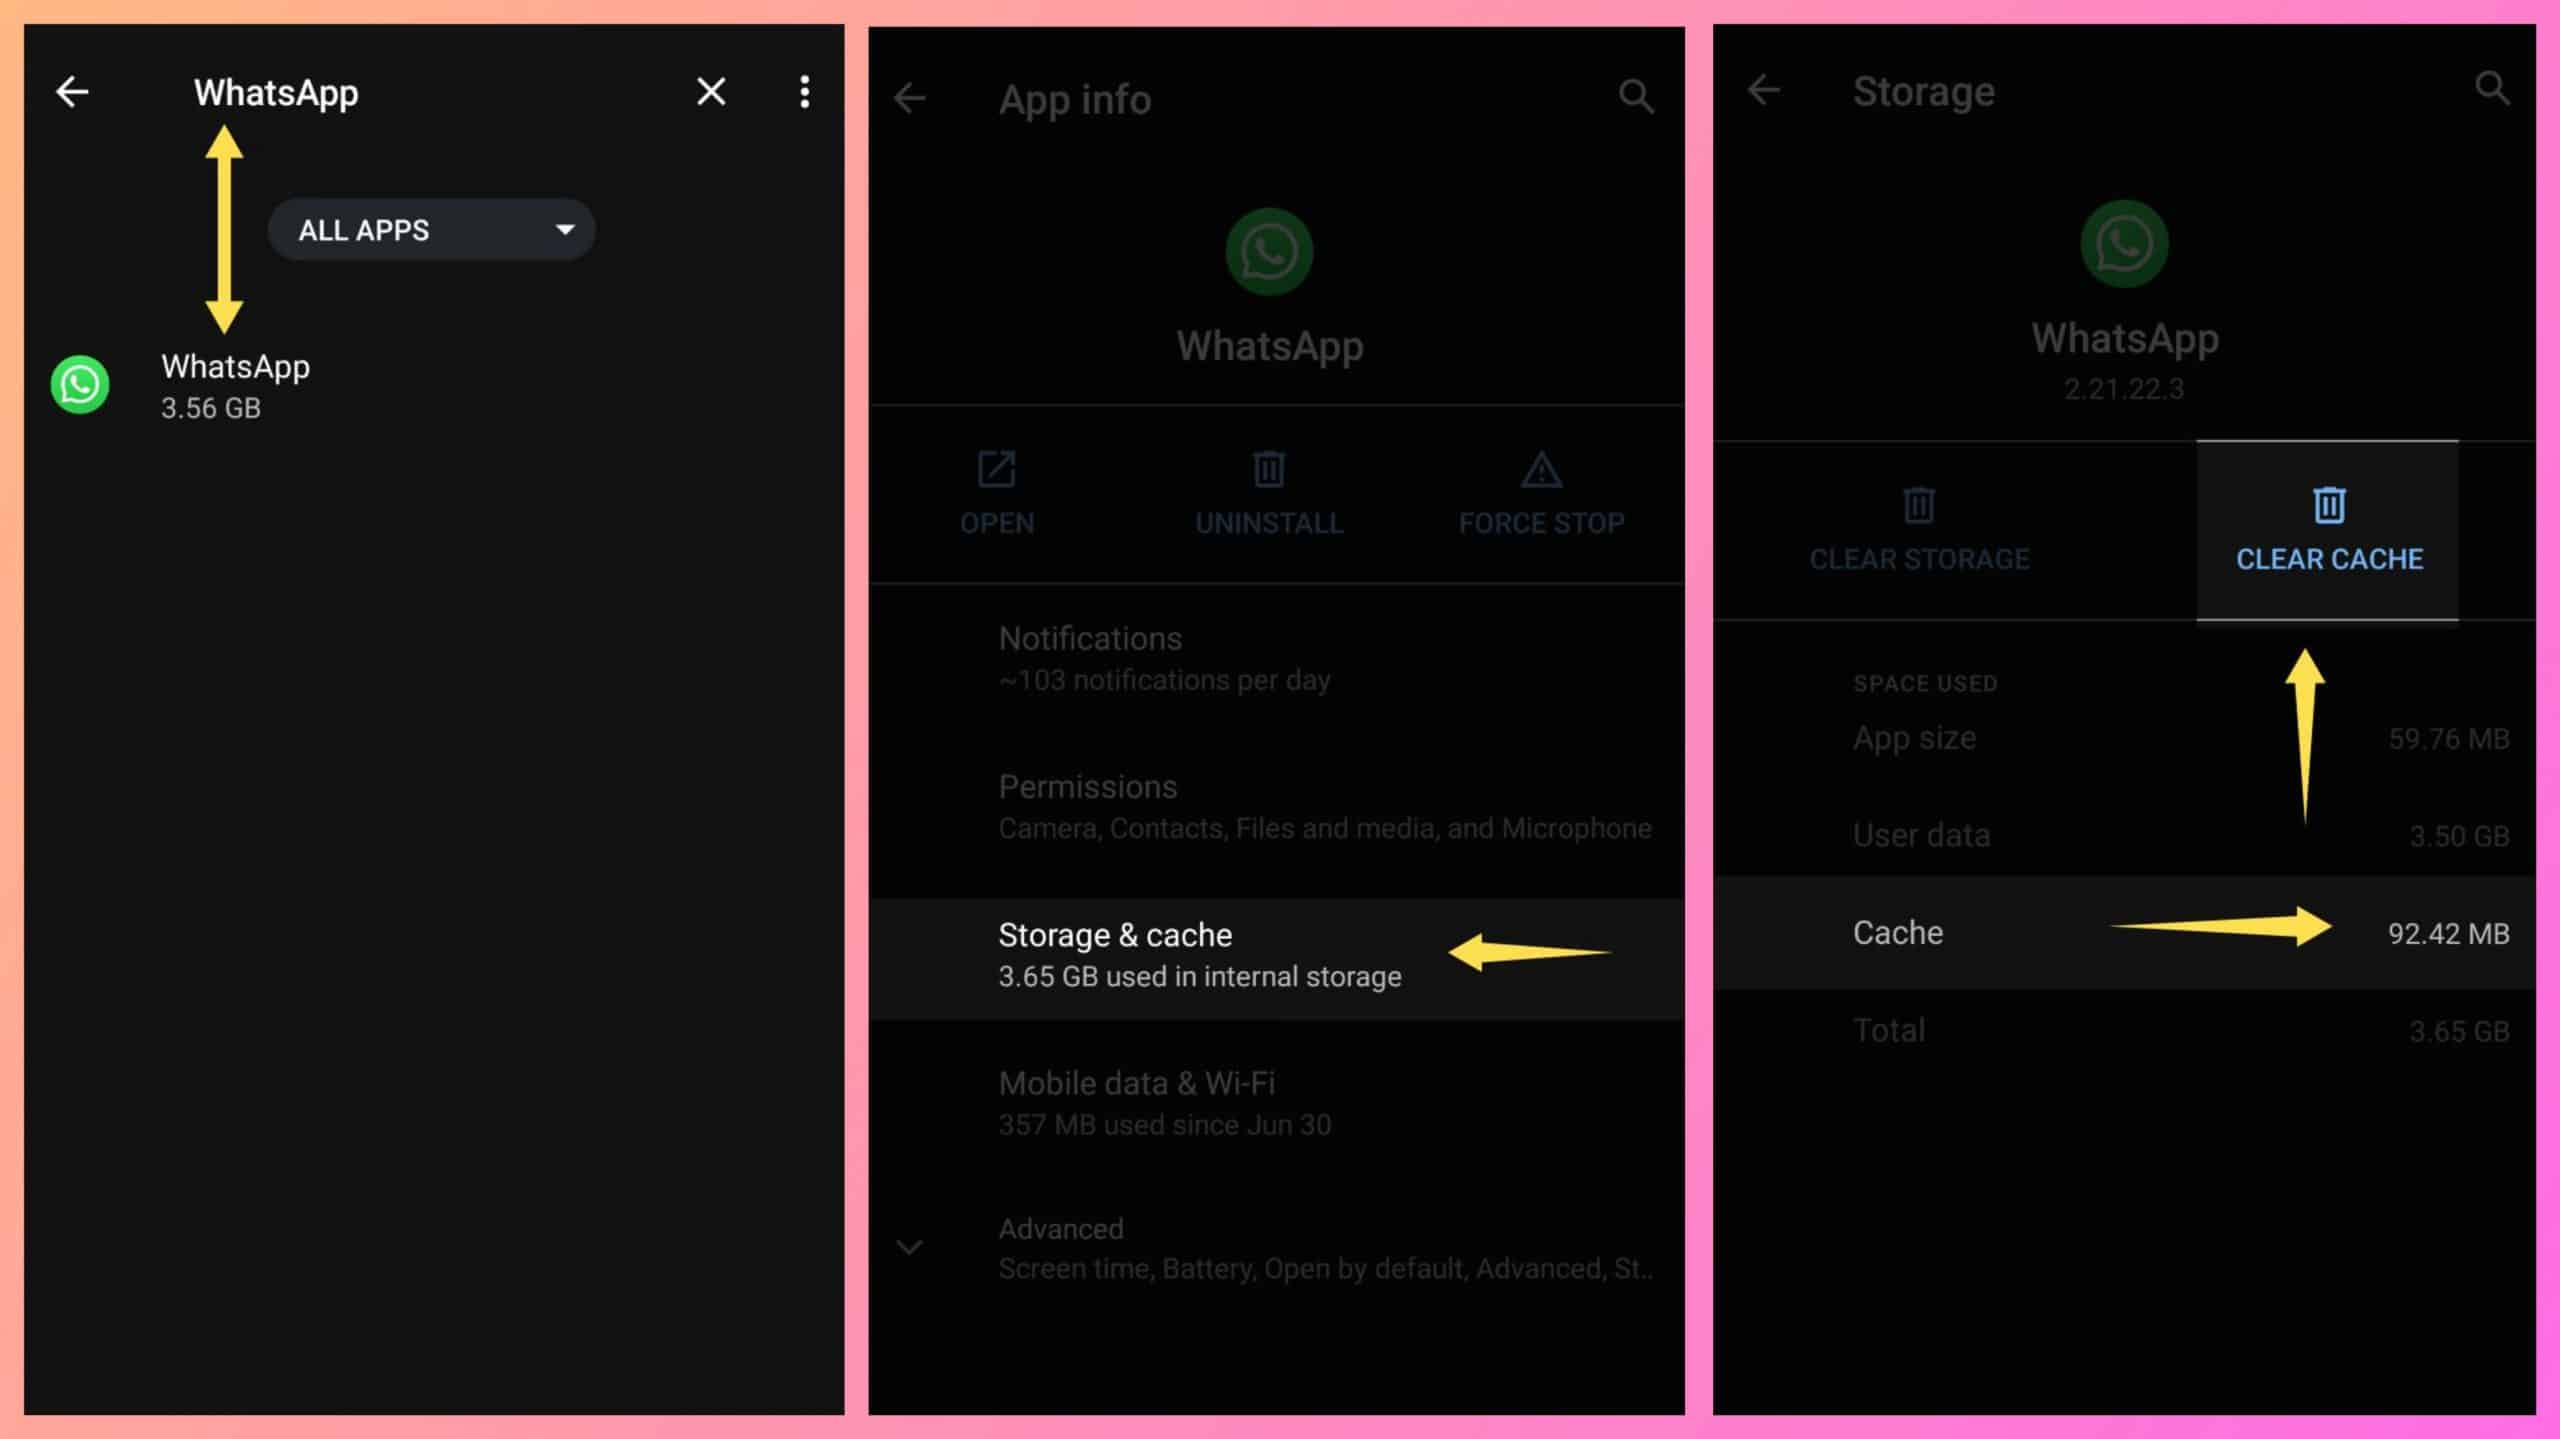
Once found, click on that app and look out for the “Storage & cache” option. Select that option, then choose the “Clear cache” option. After some time, Cache data will be nil, i.e., you’ve successfully cleared away that app’s cache.
7. Reinstall the App
When nothing works, it’s better to perform a fresh start. In most cases, simply reinstalling the app fixes most of the common issues present in it. Some people might have installed an unstable/unsupported version from a third-party source, and if you face the problem of apps not working on android, it’s better to install it officially from the Google Play Store.
Most of us already know how to do it, but for the sake of making a complete how-to guide, we’ll explain how to perform it. At first, locate the app in your app gallery. Once you find it, long-press the app’s icon to drag it to the top of your screen, where you’ll find the option to uninstall it. Drop the app there, and the app will get uninstalled.
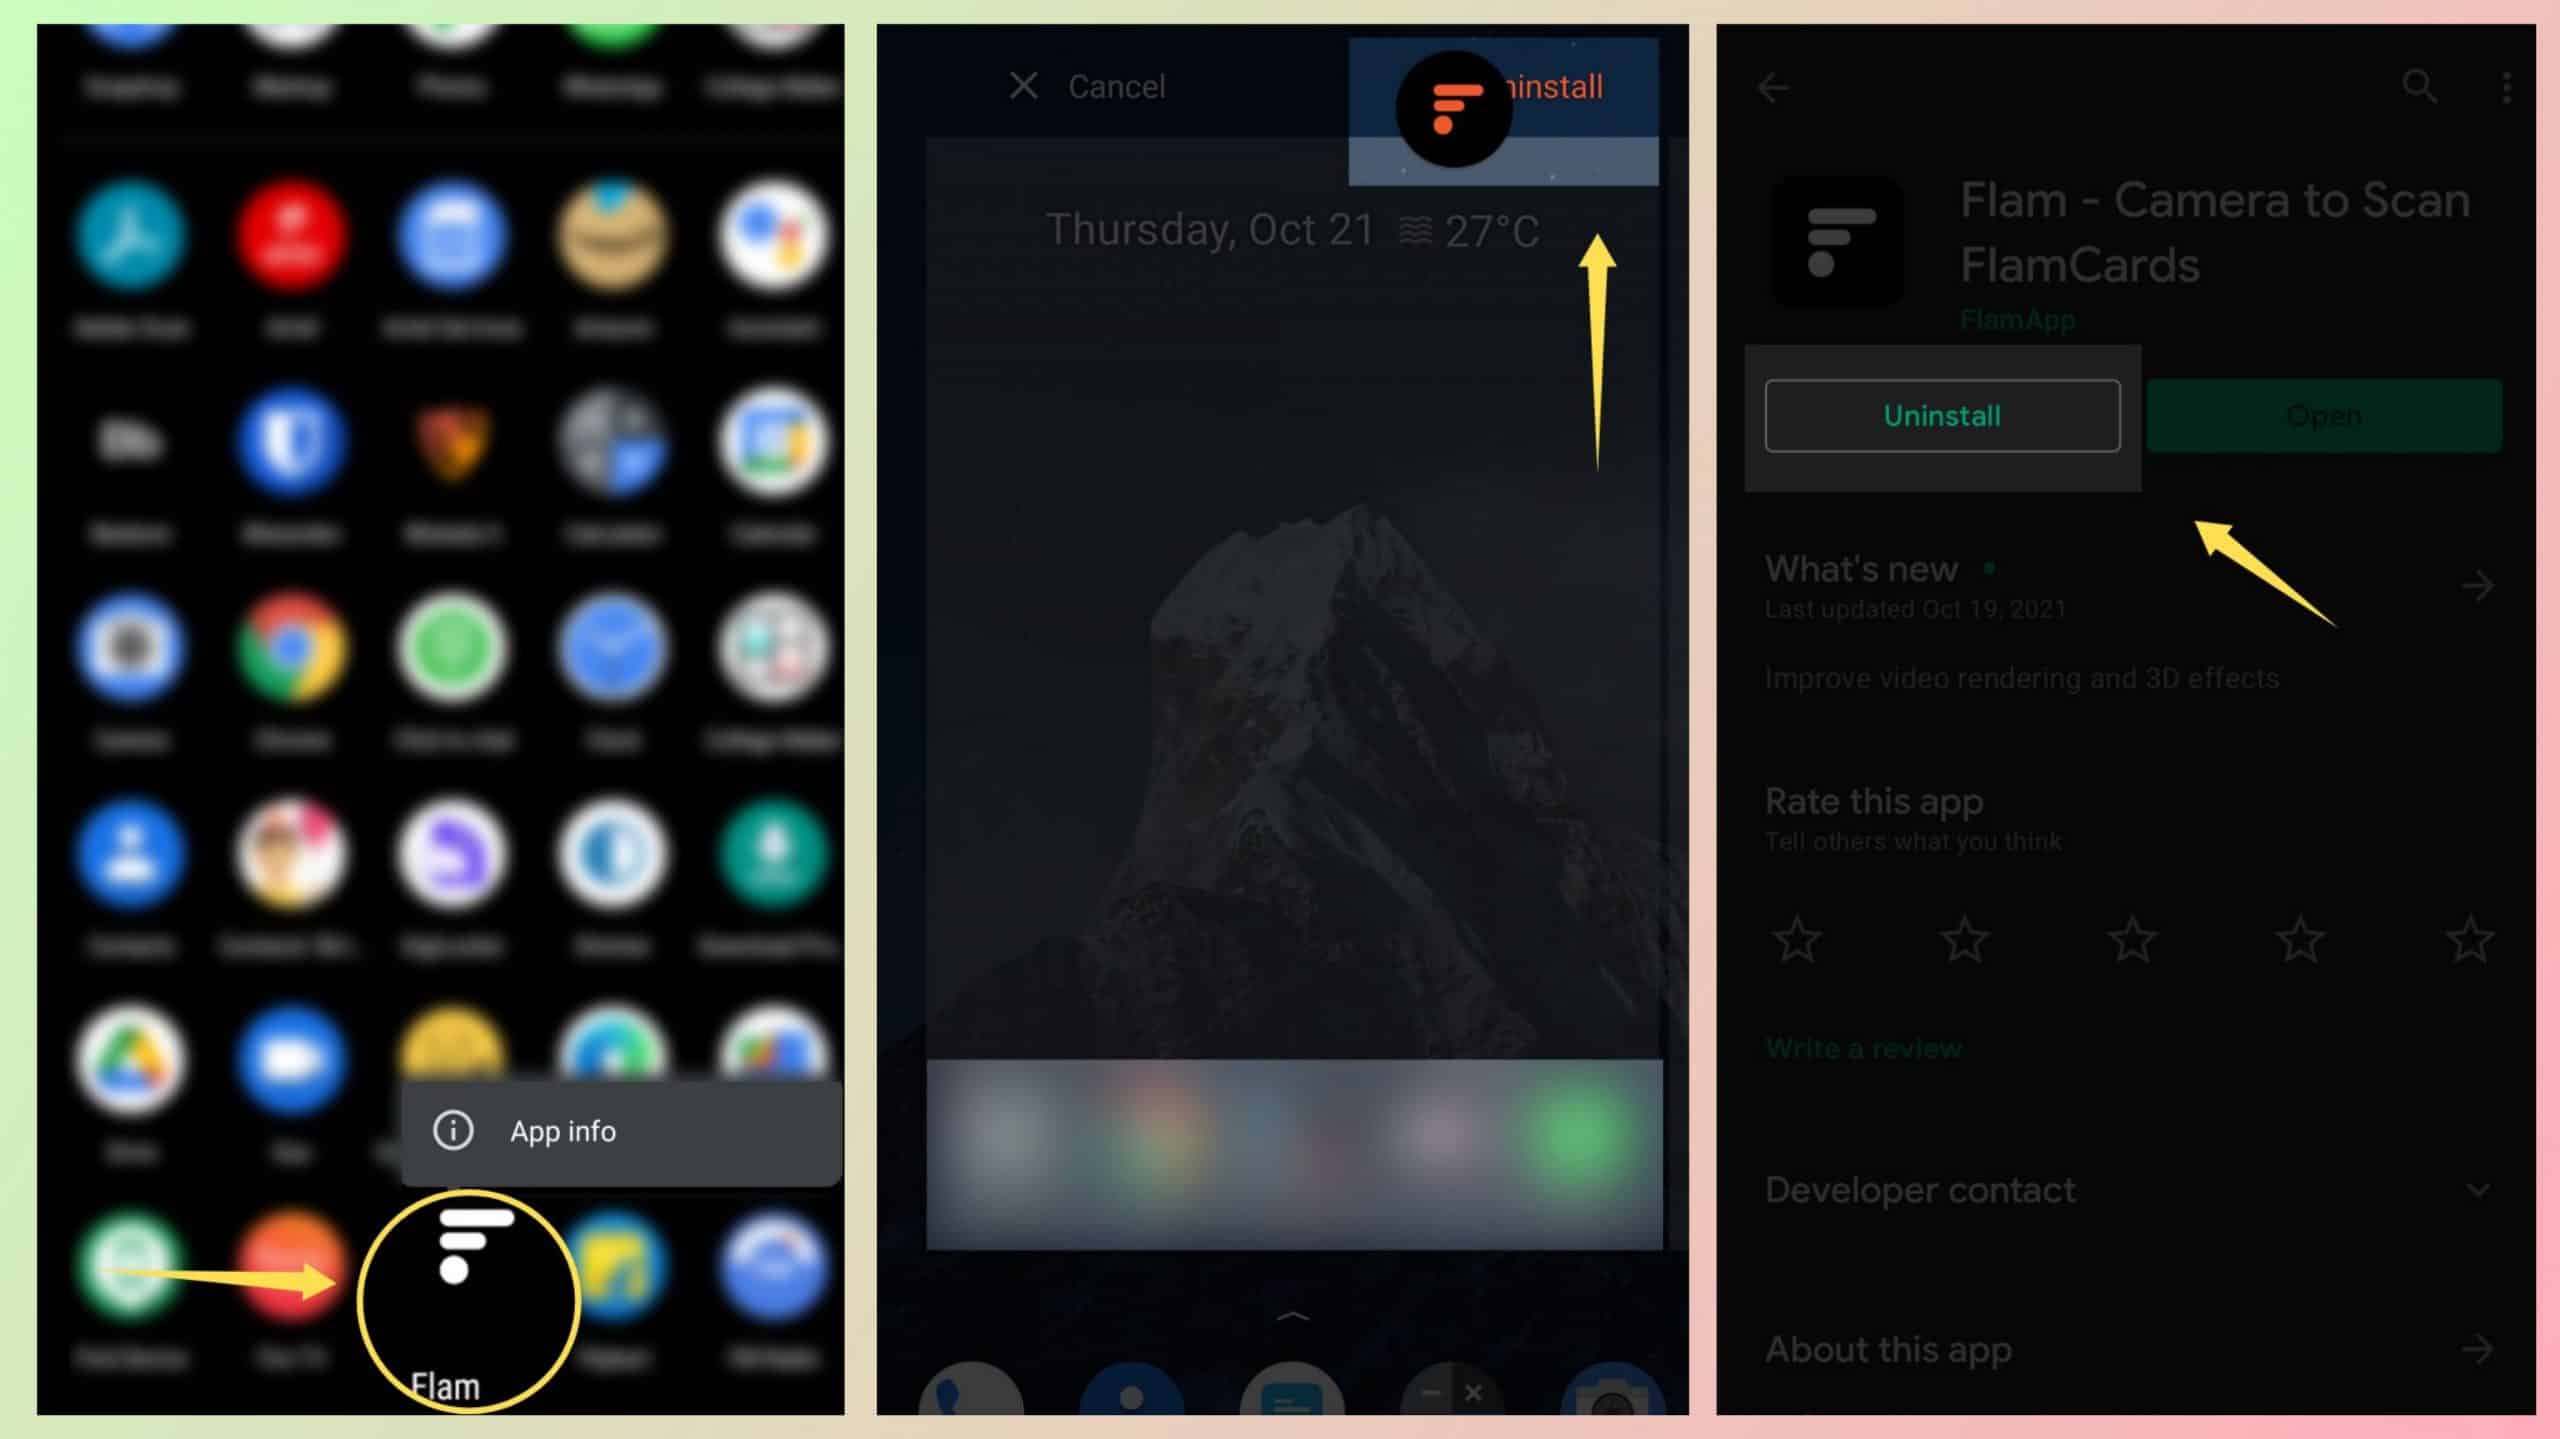
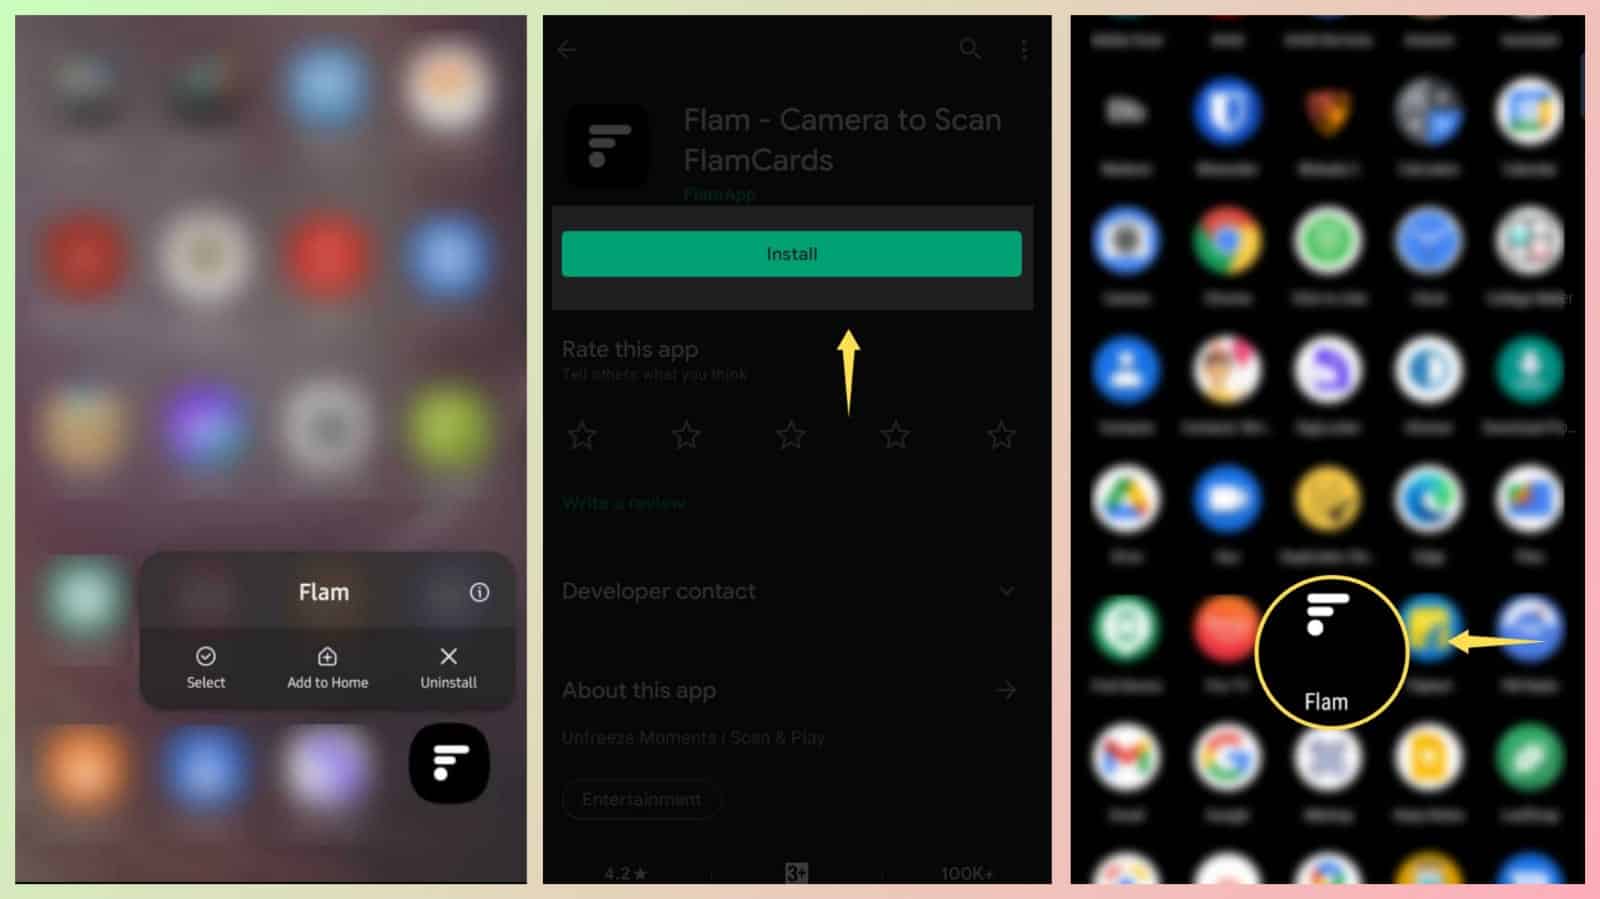
However, this is not how apps in many other UI’s get deleted. You need to long-press the app icon for those phones until you see the uninstall option, clicking which deletes that particular application. You can also search for the app on the Play Store and find a direct button to uninstall it from there itself.
Once the app is uninstalled, go to the Play Store and search for the app in the search box. Once found, click on “Install,” and done! The app will be present again in your app gallery, and you probably won’t be greeted by the same problem again.
8. Restart Your Phone
Let us remind you once more: a simple restart of your device can prove to be miraculous. For many such problems, like, unresponsive apps, frozen screens, inactive UI, and buttons, this three-step process should be enough to tackle it. Most people know how to do it, but here’s how to perform a reboot if you don’t know.
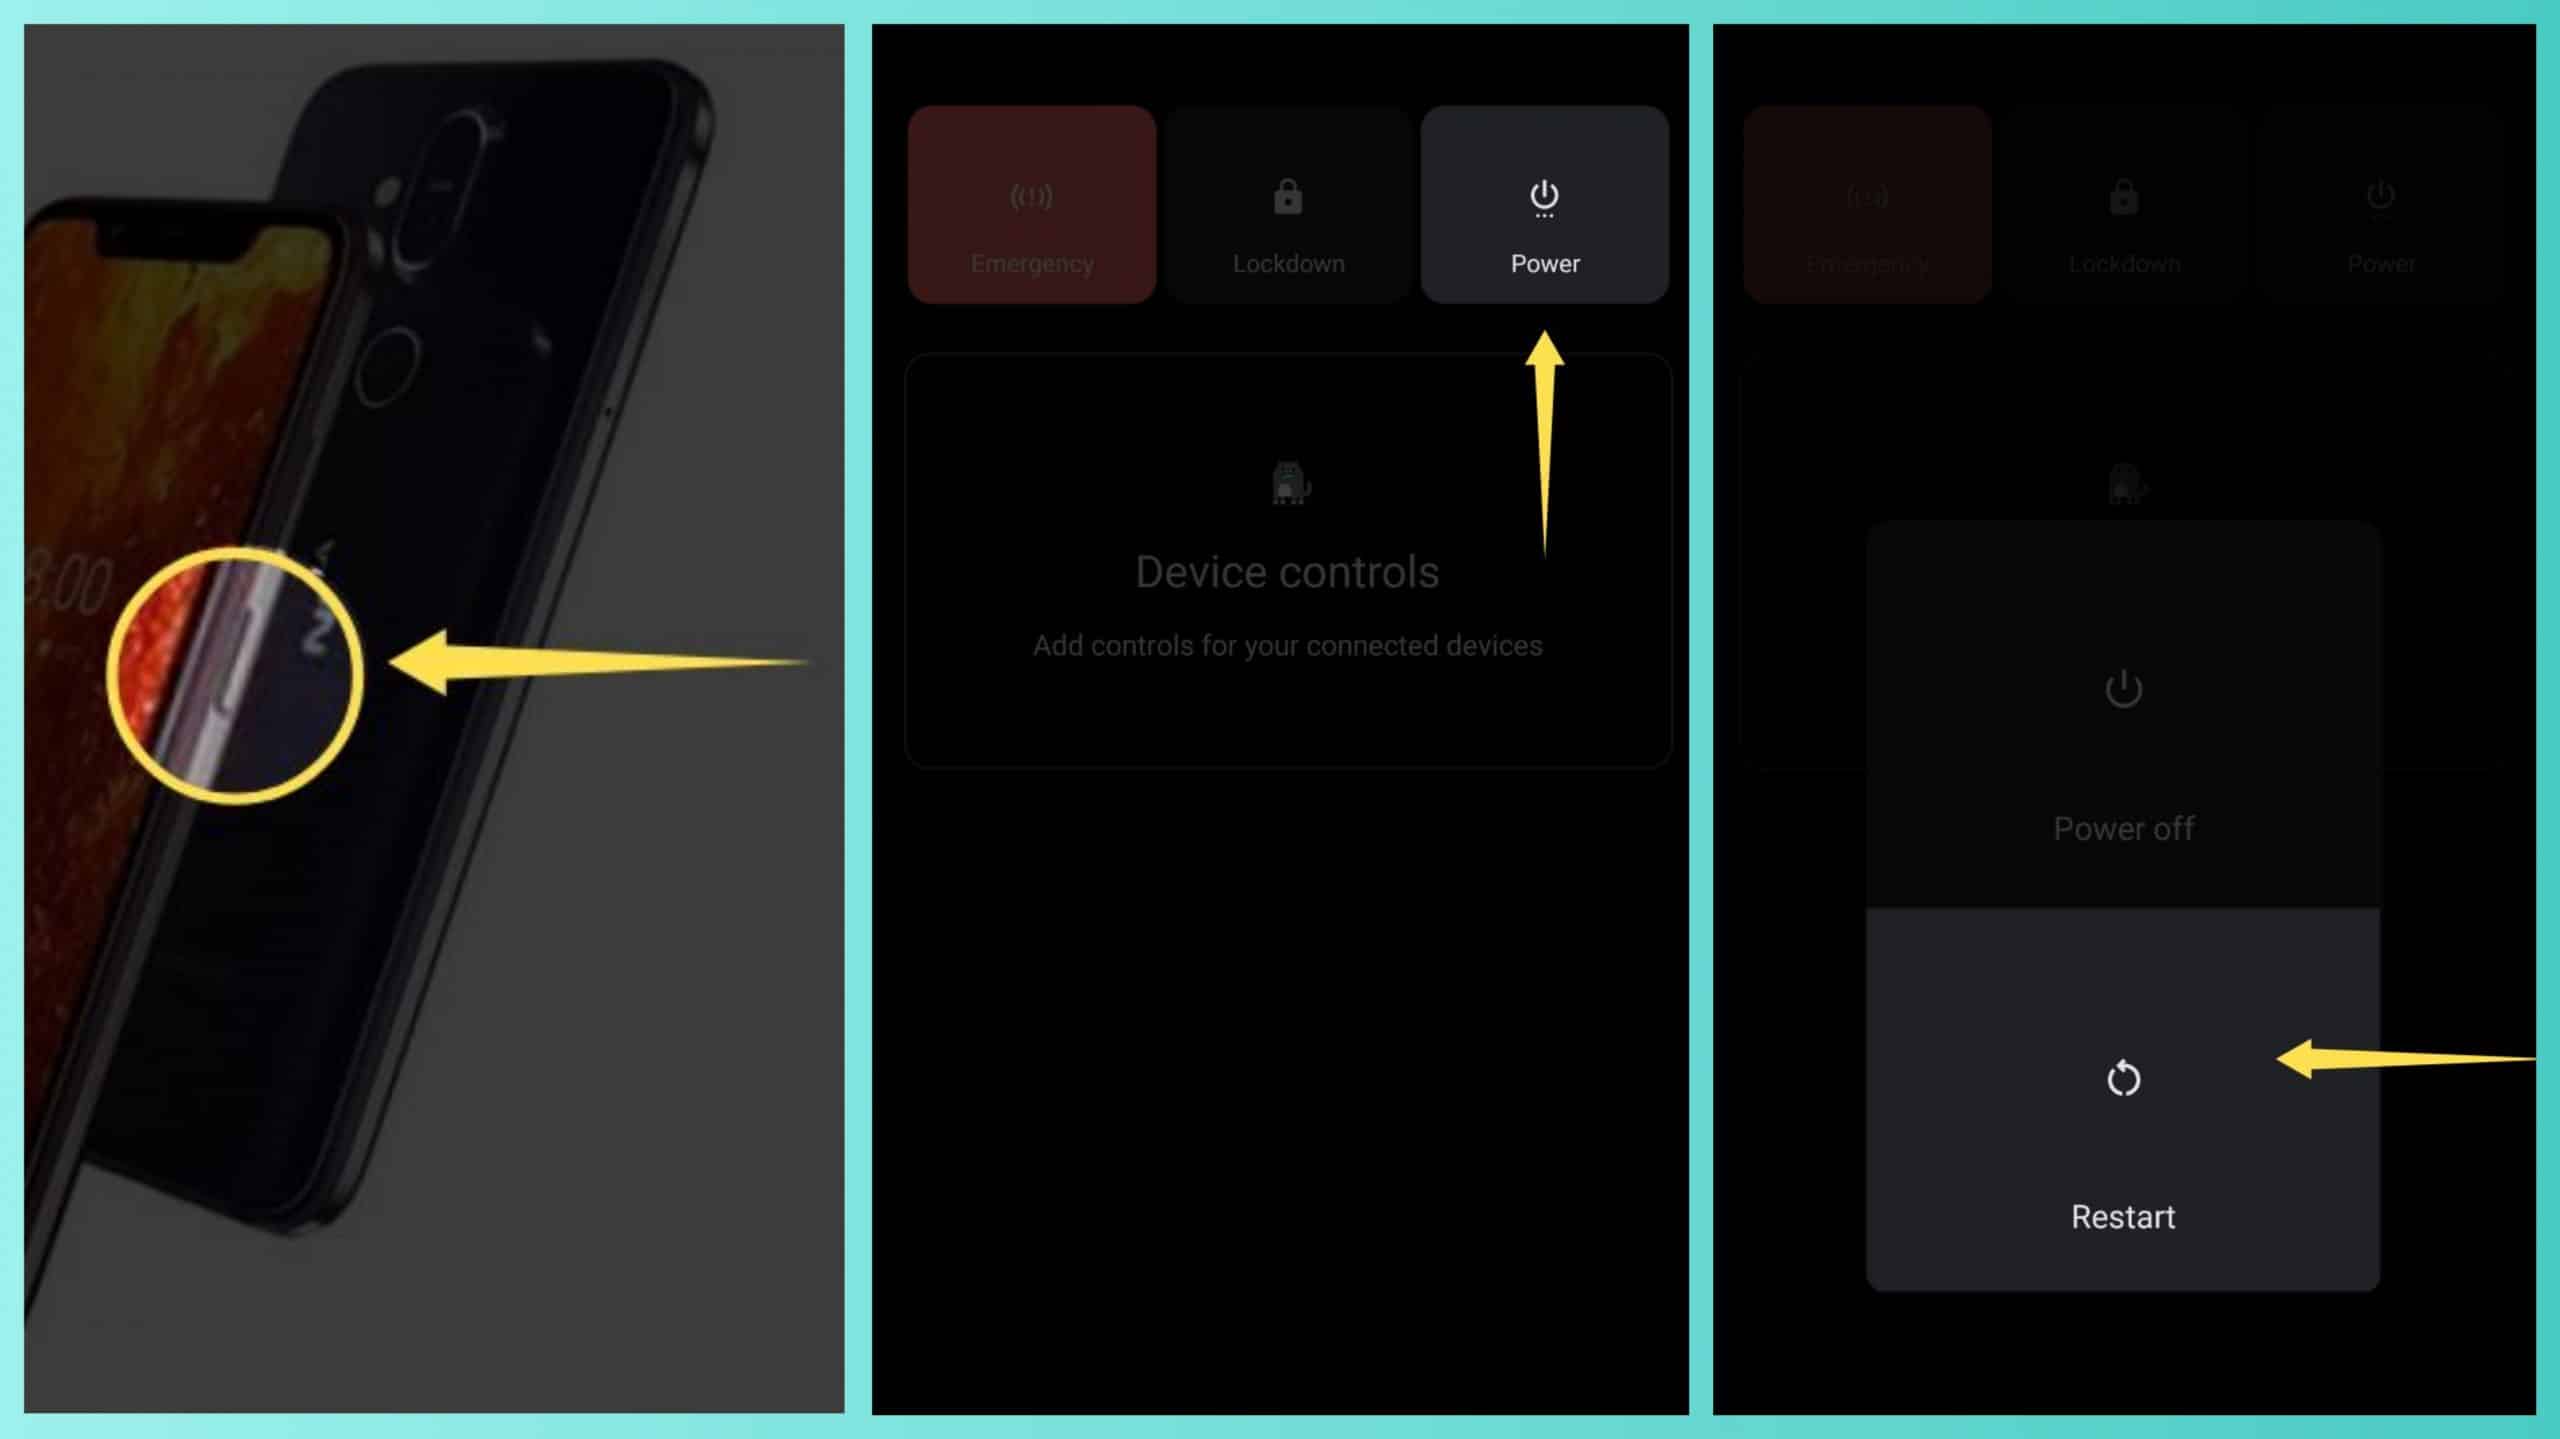
Firstly, find your device’s power button on either side of it (usually present on the right side), and then long-press it till you see a new screen. Once you see such a screen showing options like “Power,” “Emergency,” “Lockdown,” etc., click on the “Power” option. (device-specific; check your phone’s manual for more information)
It will now reveal two options — “Power off” and “Restart”; click on the latter one and wait a while. Your device should get turned off and turn on again by itself. After the process gets completed, type your pin/passcode or draw your pattern and get in. You’ve successfully performed a reboot, and now you can check if that app works fine or not.
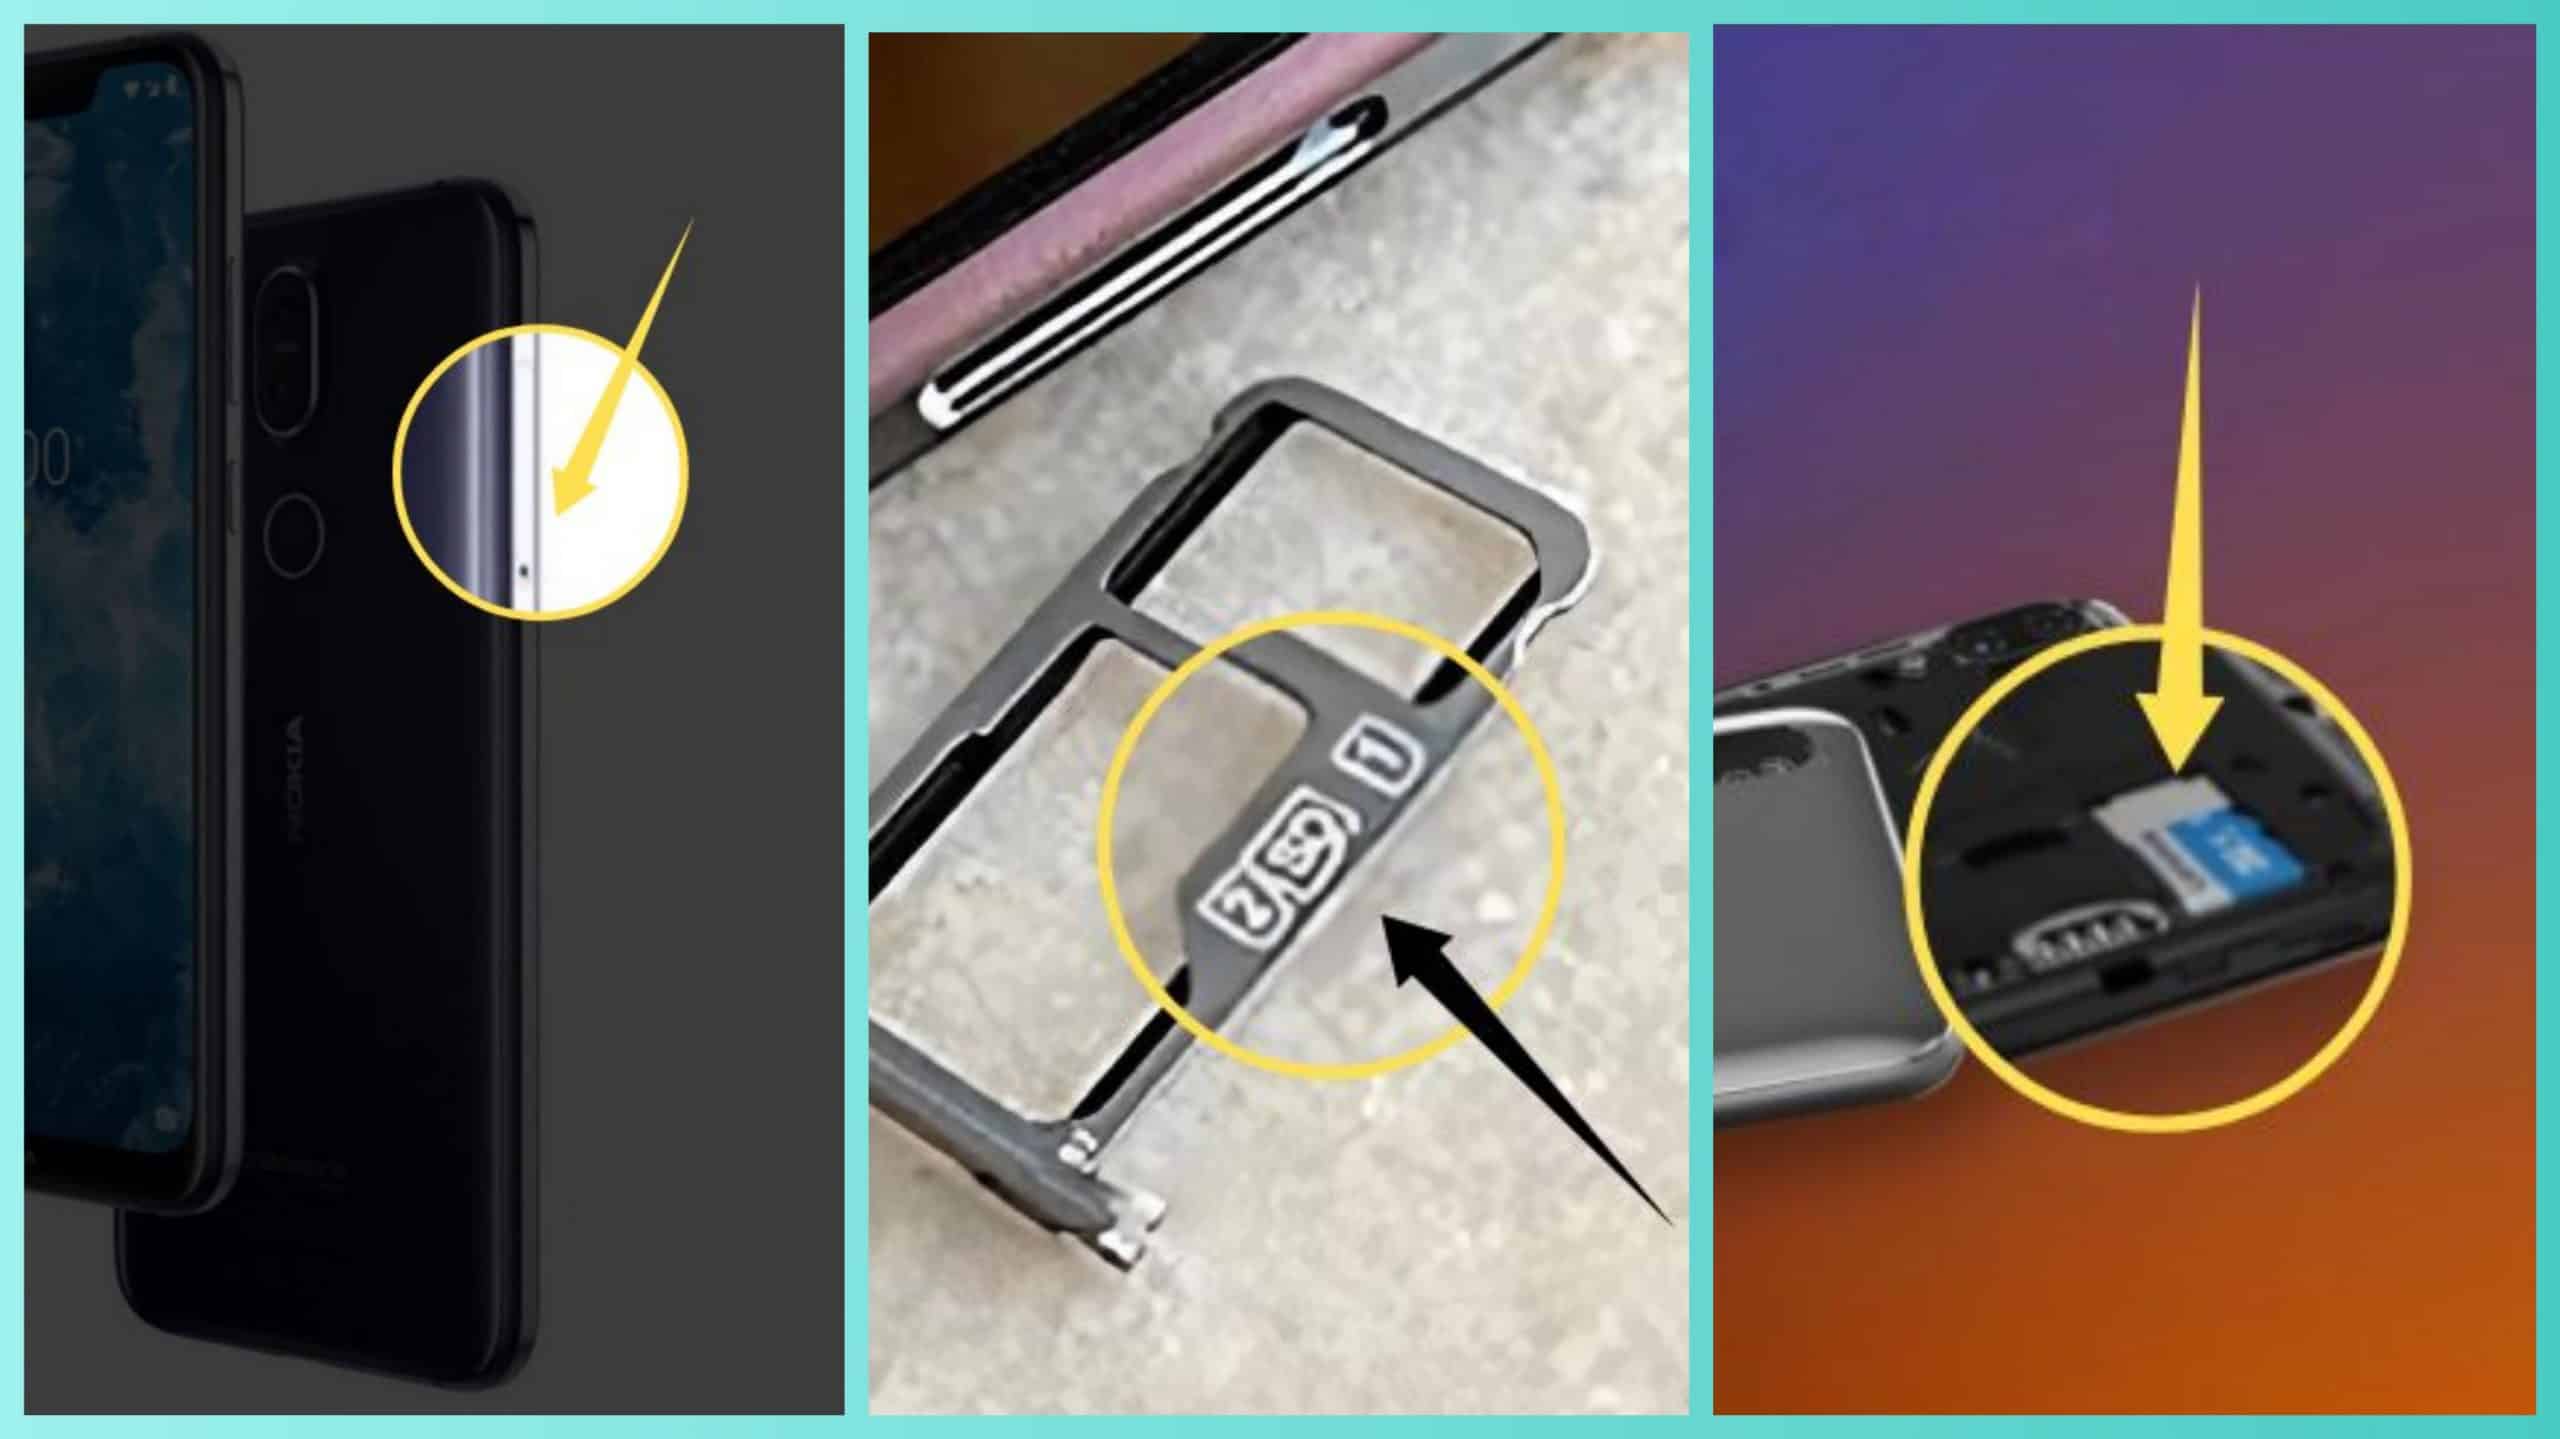
Additionally, to be on the safer side, remove the SD-Card from the SIM tray, if any, just in case it was corrupted. Corrupted cards can cause trouble sometimes, so it’s better to remove them initially and then check if the apps work or not. For the how-to, here’s a self-explanatory pictorial representation. For phones with a removable back cover, consider looking at the third picture.
9. Reset to Factory Settings
If the issue of apps not working on android is persistent after all tries, you might have to reset your device as a last option. We perform it when there’s a problem in our system and not in the app or anywhere else. What happens here is that the system wipes out everything and allows the user to set it up again from scratch. Make sure to back up your data in advance because there’s no way of getting it back once the device undergoes a factory reset.
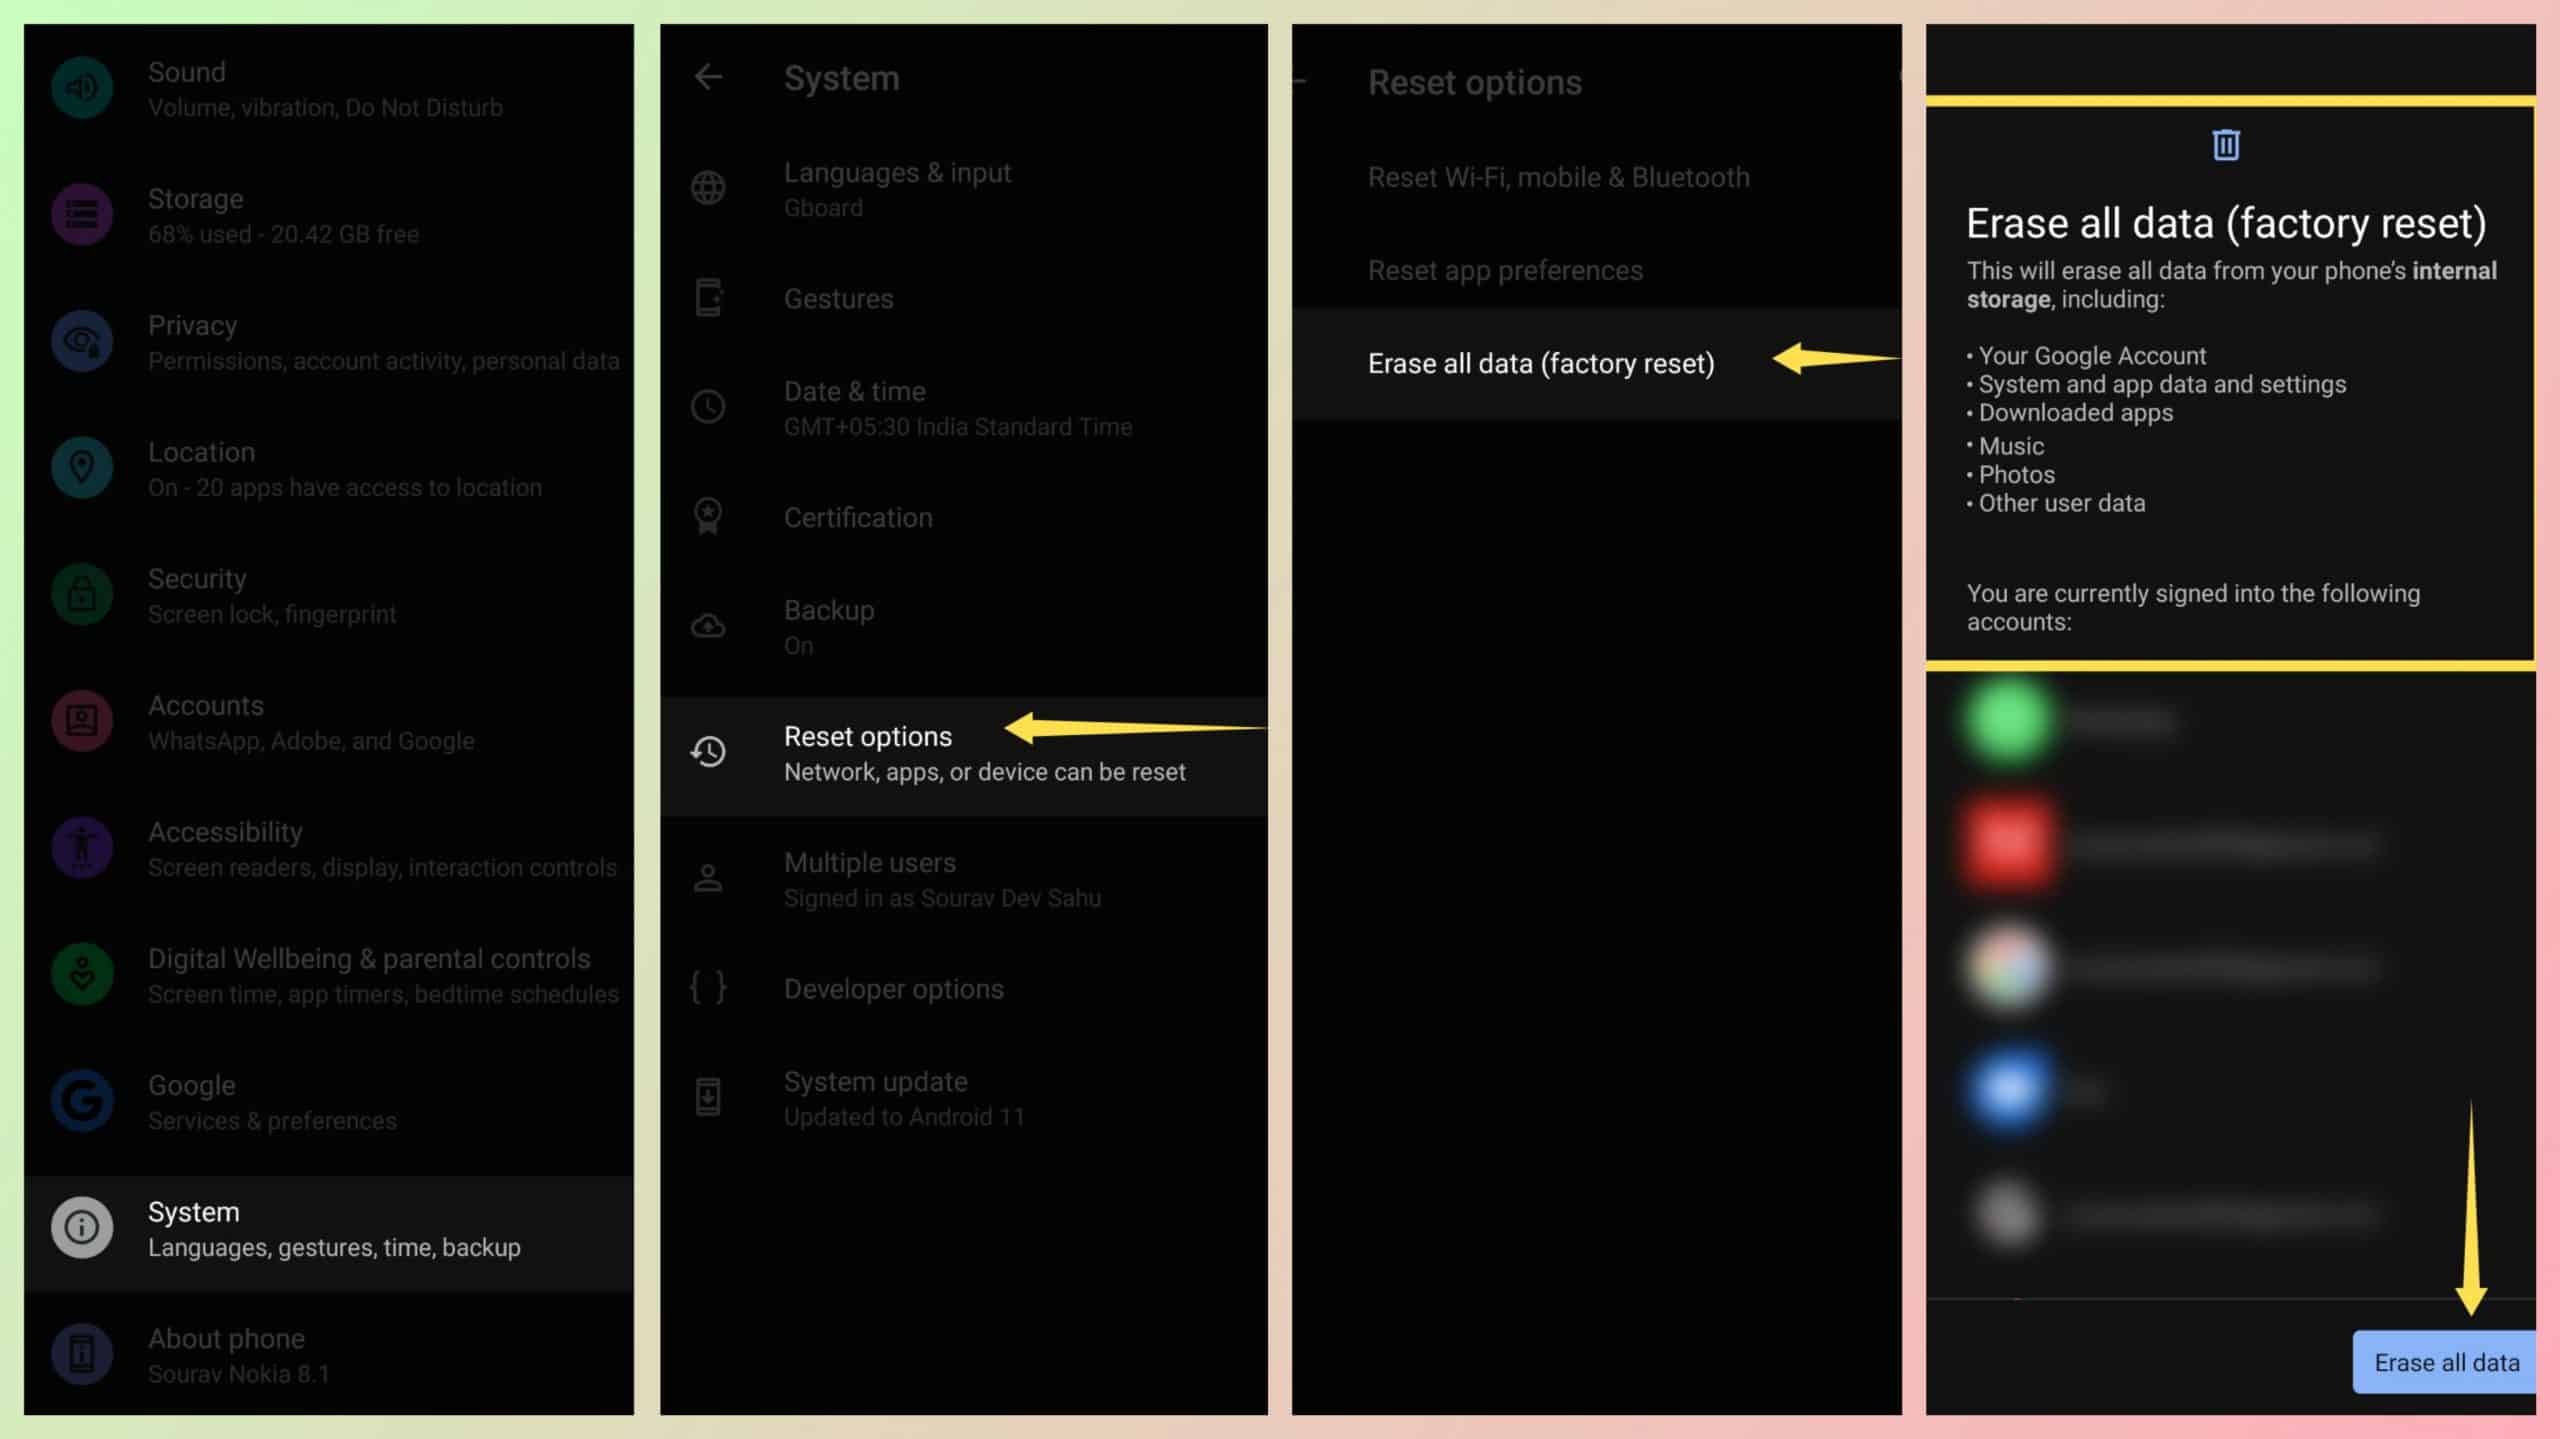
Once you’ve made up your mind, revisit your phone’s settings, and search for the “System” option. It will direct you to another page, where you must find “Reset options.” Upon clicking, it will show you three options: Reset Wi-Fi, mobile and Bluetooth, Reset app preferences, and Erase all data (factory reset). Select the last option.
Please stop what you’re doing and spend some time reading what it says. After double-checking your backup and triple-checking your decision, click on “Erase all data.” Voila! You now have a new phone internally, as fresh as it came out of the factory.
The path of finding the reset option might be different on other handsets; again, this particular device is a Nokia 8.1 running Stock Android based on Android 11. For MIUI, follow the steps showcased below.

Conclusion: Fix Apps not Working on Android
We think that this guide will solve most of the issues concerning apps not working on android. While the final solution, i.e., resetting your device, might not be for everybody, you can choose not to do it, even if none of the above fixes work. Additionally, you can contact the app developers too and request them to solve the issues in the next update.
Lastly, you can always try out alternatives to those faulty apps, and we’ll make sure to link some of our articles regarding alternative app choices down below. Thanks for reading our article till the end. We’d love to hear your thoughts in the comments down below.