After the Windows 10 update, the way Windows handles cumulative updates has changed. Windows 10 downloads and installs updates automatically on your PC. While Automatic Updates are convenient and ensures updated security patches, it’s frustrating at the same time. As a result, you might want to completely disable or stop automatic updates on Windows 10.
Not all the updates bring enhancements to the system; some updates might bring additional bugs. These bugs often affect the user experience negatively. Sometimes, you might have to restart your PC for the updates to finish, which can take longer than expected to interrupt your workflow.
If you notice these problems repeatedly with every update, it’s best to permanently disable the Windows 10 updates. If you want to stop automatic updates on Windows 10, there are 4 ways to do that. This guide will show you how to stop automatic updates on Windows 10 using Settings, Registry, Metered Connection, and Group Policy Editor.
How to Disable Windows 10 Automatic Updates
There are three methods to effectively disable or stop Windows 10 from automatically downloading and installing updates. These methods are tested and work effectively.
- Using Settings
- Using Group Policy Editor
- Using Registry
- Setting up a Metered Connection
Method 1: Stop Automatic Updates Using Settings
If you don’t want to disable Windows 10 updates permanently, you can skip a few of them. Using this method, you can pause updates until the day you like. If you are running Windows 10 Home or Pro, you will have the option of stopping the updates for up to 35 days.
If you want to disable automatic updates on Windows 10 temporarily, follow these steps:
- Open Settings by pressing Win + I on keyboard.
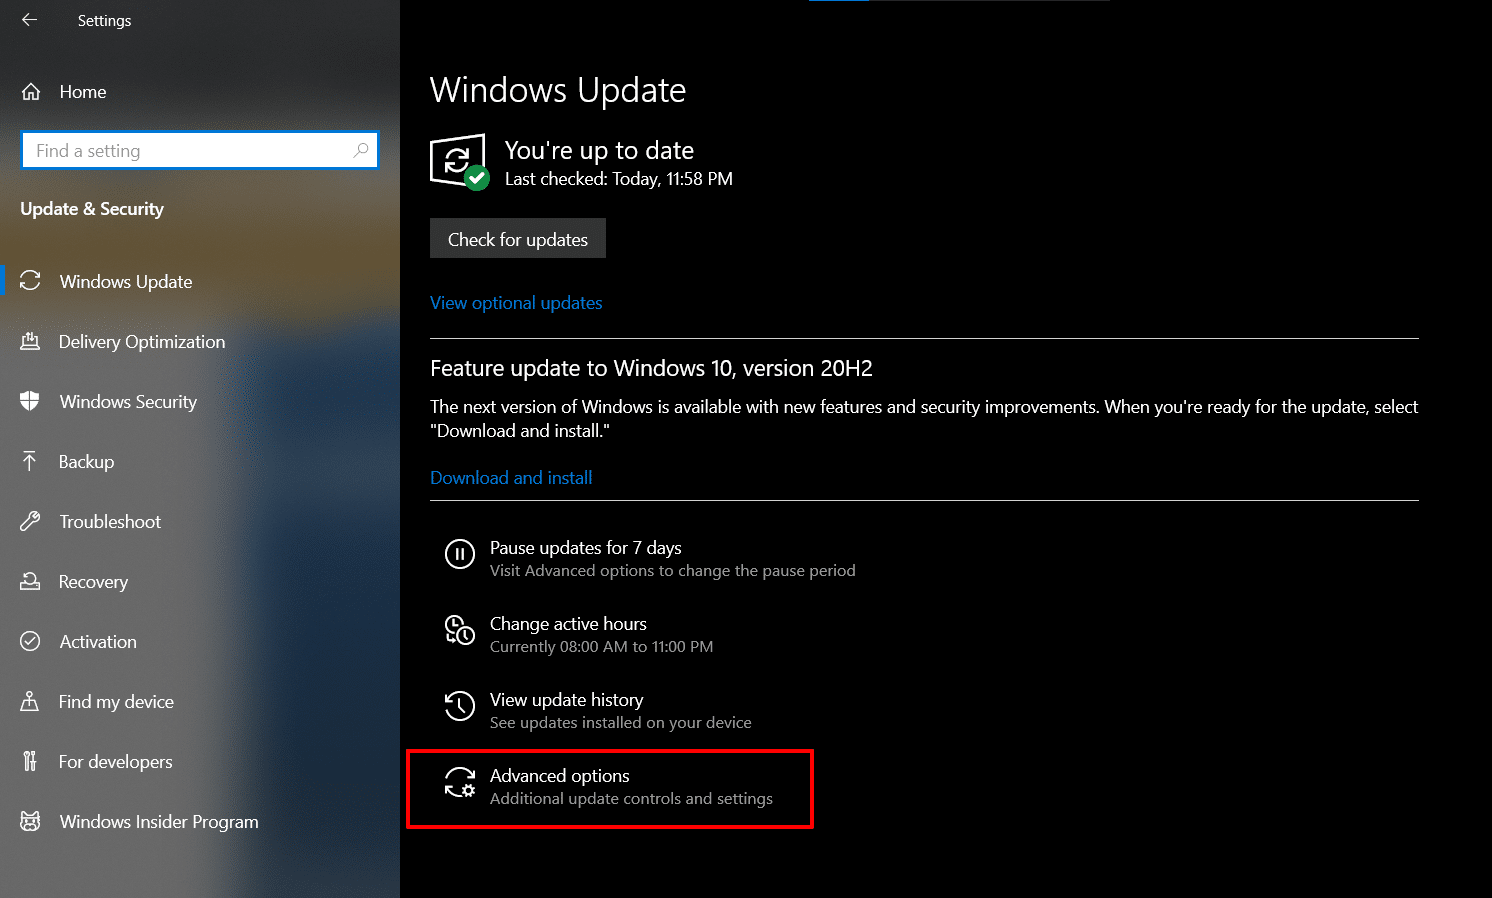
- Click on Update & Security.
- Click on Advanced Options listed under Windows Update.

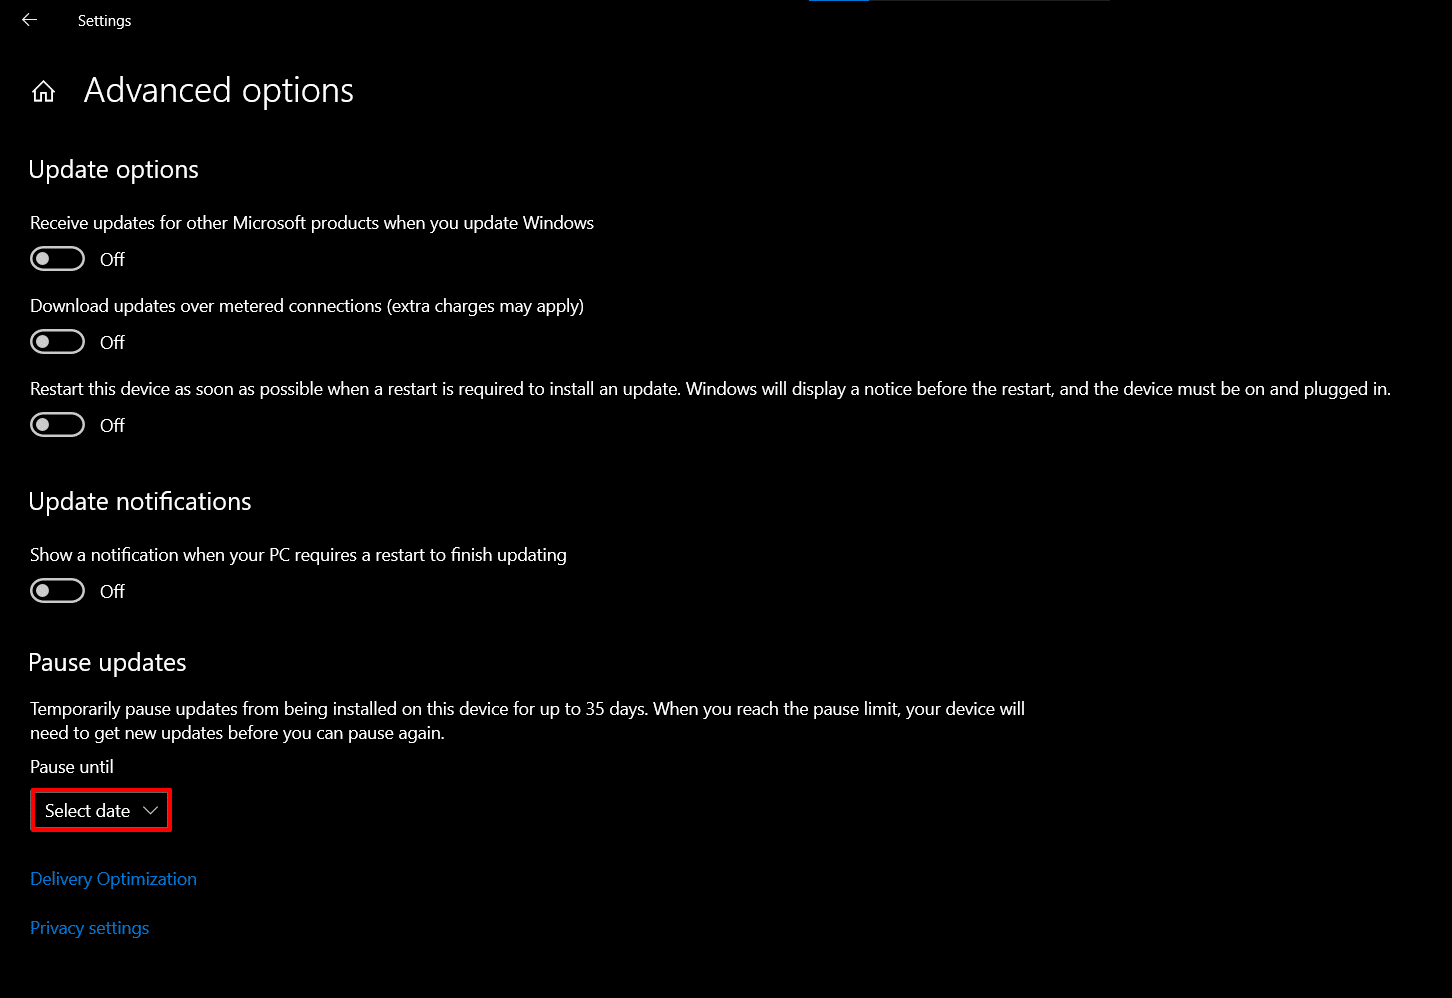
- Click on “Select date” drop-down menu under the Pause Updates section, and select how long you want to disable the updates.

Once you follow the steps above, Windows 10 updates will be disabled completely for the next date you’ve specified. But when the device reaches the specified date, you must install the updates if you want to use the option again.
You can also undo these changes anytime by following the same process above. But make sure to choose “Select date” in Step 4. Alternatively, you can click the Resume Updates button on the Windows Update Settings to resume updates.
Previously, Windows 10 allowed users to delay feature and security updates. But that has changed with the latest version of Windows 10. You can no longer postpone these feature updates on Windows 10.
Method 2: Disable or Limit Automatic Updates Using Group Policy Editor
The Group Policy Editor on Windows 10 Pro allows users to disable or stop automatic updates permanently. Additionally, you can also choose when to install them on your device using the Group Policy Editor.
How to Disable Automatic Updates on Windows using Group Policy Editor
Here’s how to stop Automatic Updates on Windows 10 updates using Group Policy:
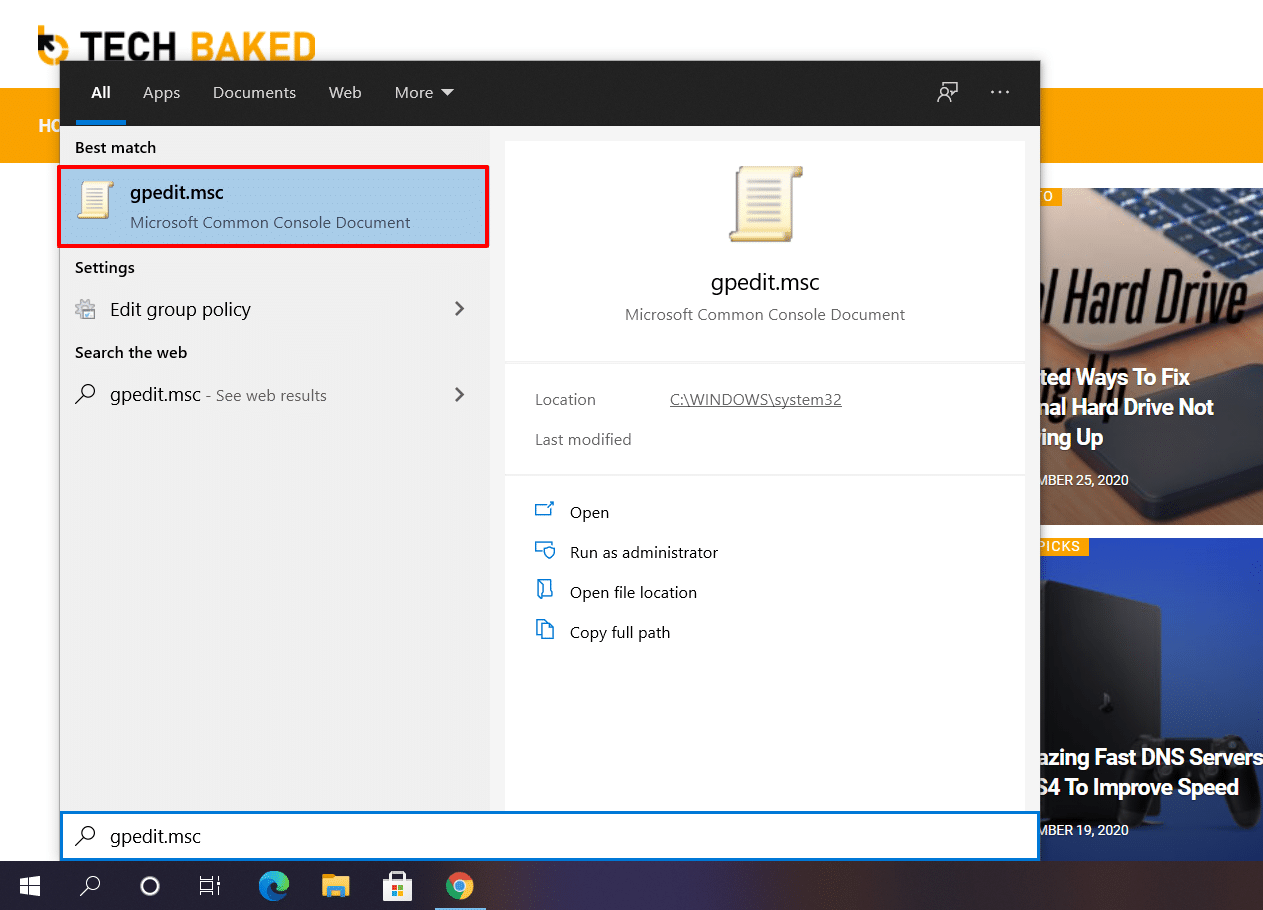
- Click Start and type “gpedit.msc” and press Enter.

- Once you open Group Policy Editor, navigate to the following path:
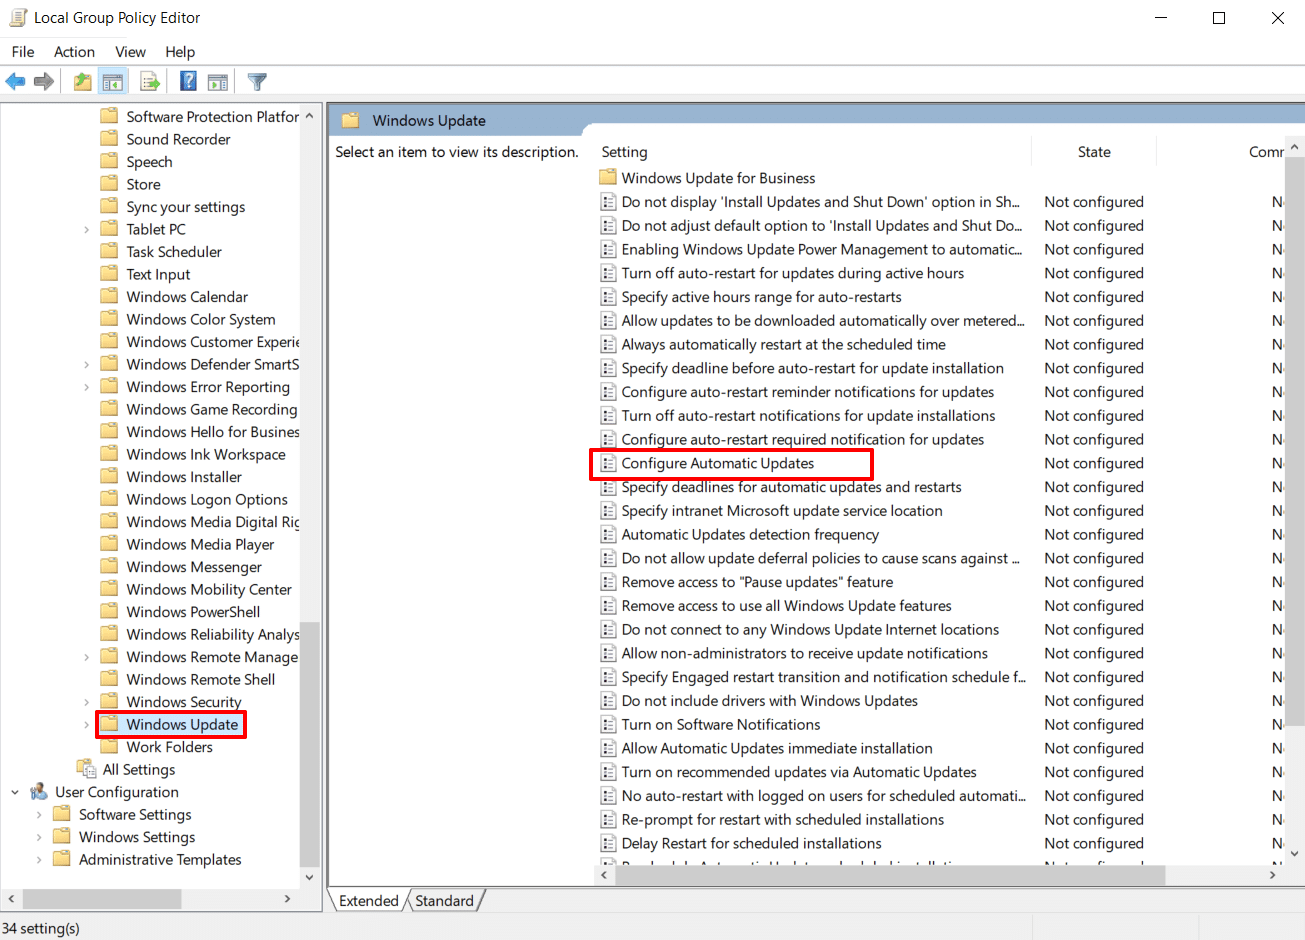
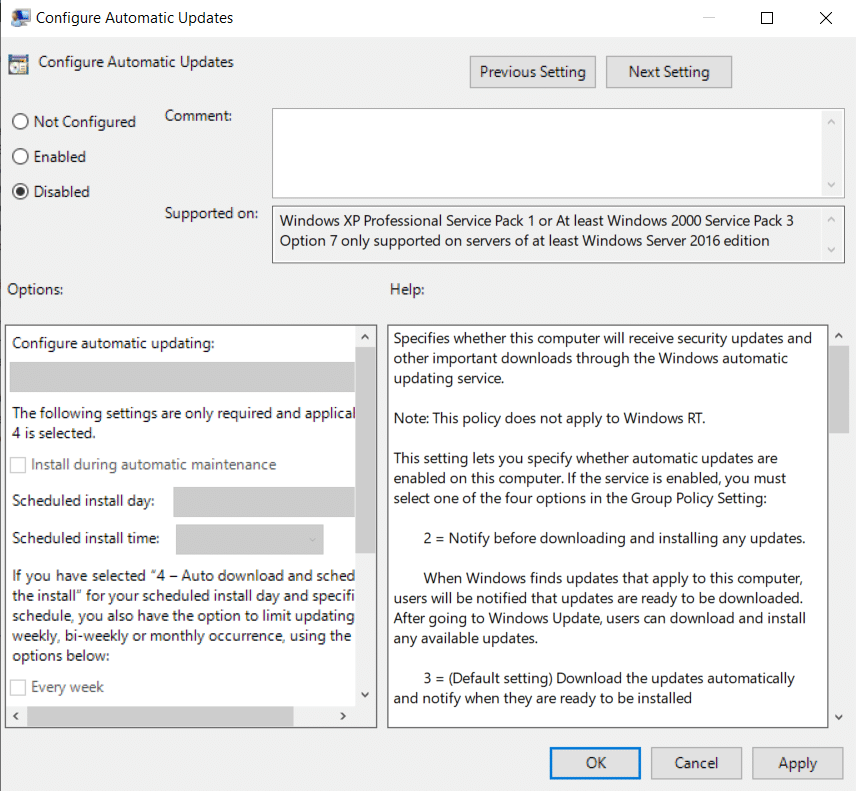
Computer Configuration > Administrative Templates > Windows Components > Windows Updates - From the listed options, double-click the Configure Automatic Updates policy option.
- Click on the Disable option to disable the automatic updates on Windows 10 permanently.

- Click on the Apply option.
- Click OK and close everything.
Once you complete the above steps, Windows 10 will stop automatic updates from downloading on your PC. Unlike the Settings method, you will still have the option to choose updates manually. You can find them under Settings > Updates & Security > Windows Update. Click on Check for Updates to choose which updates to install manually.
How to Limit Automatic Updates on Windows using Group Policy Editor
You can also limit Automatic Updates on Windows using Group Policy Editor. You can set them to be notified before downloading or installing updates.
To manage or limit automatic updates on Windows, follow these steps:
- Click Start and type “gpedit.msc” and press Enter.
- Once you open Group Policy Editor, navigate to the following path:
Computer Configuration > Administrative Templates > Windows Components > Windows Updates - From the listed options, double-click the Configure Automatic Updates policy option.
- Click on the Enable option.

- You can configure automatic updating settings as the following:
- 2 – Notify for download and auto-install.
- 3 – Auto download and notify for install.
- 4 – Auto download and schedule the install.
- 5 – Allow local admin to choose the setting.
- 7 – Auto-Download, Notify to install, Notify to Restart.
- Click on the Apply option.
- Click OK and close everything.
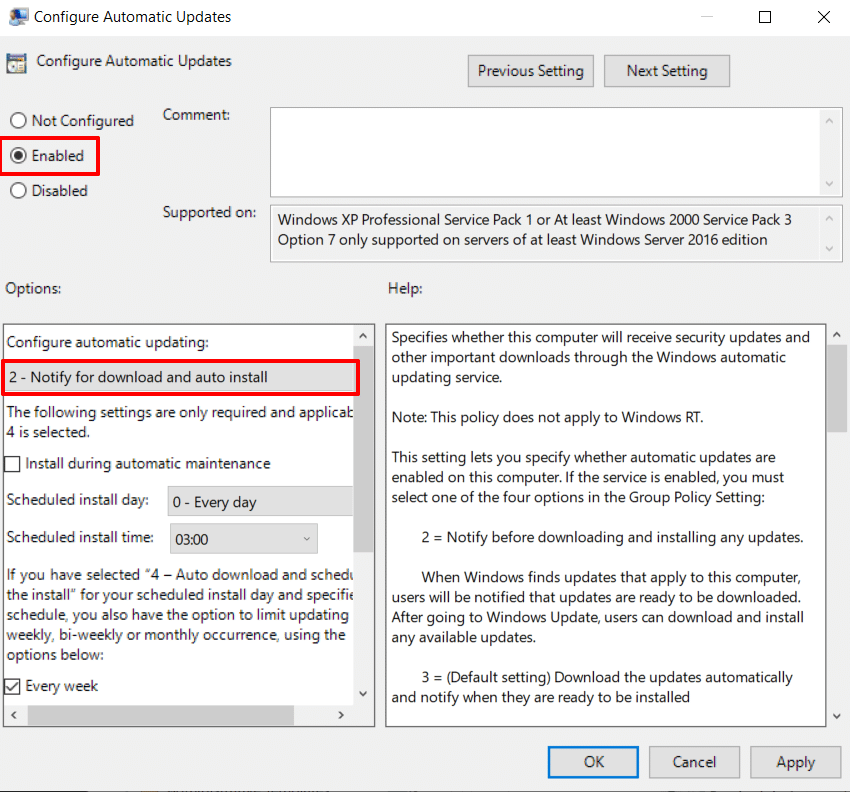
If you choose to limit updates, then 2- Notify for download and auto-install should be the best option for you. Once you are done with the steps, Windows updates will be disabled permanently and you will get a notification whenever a new update is available
Method 3: Limit or Stop Automatic Updates Using Registry Editor
If you want to permanently limit or disable automatic updates on Windows 10, you should use the registry editor method.
Remember that Registry editing is a risky gamble. If you make a mistake, the changes are irreversible, and you will have to install Windows 10 from scratch. We recommend you take a full backup before you want to stop automatic updates using Registry.
How to Stop Automatic Updates on Windows using Registry Editor
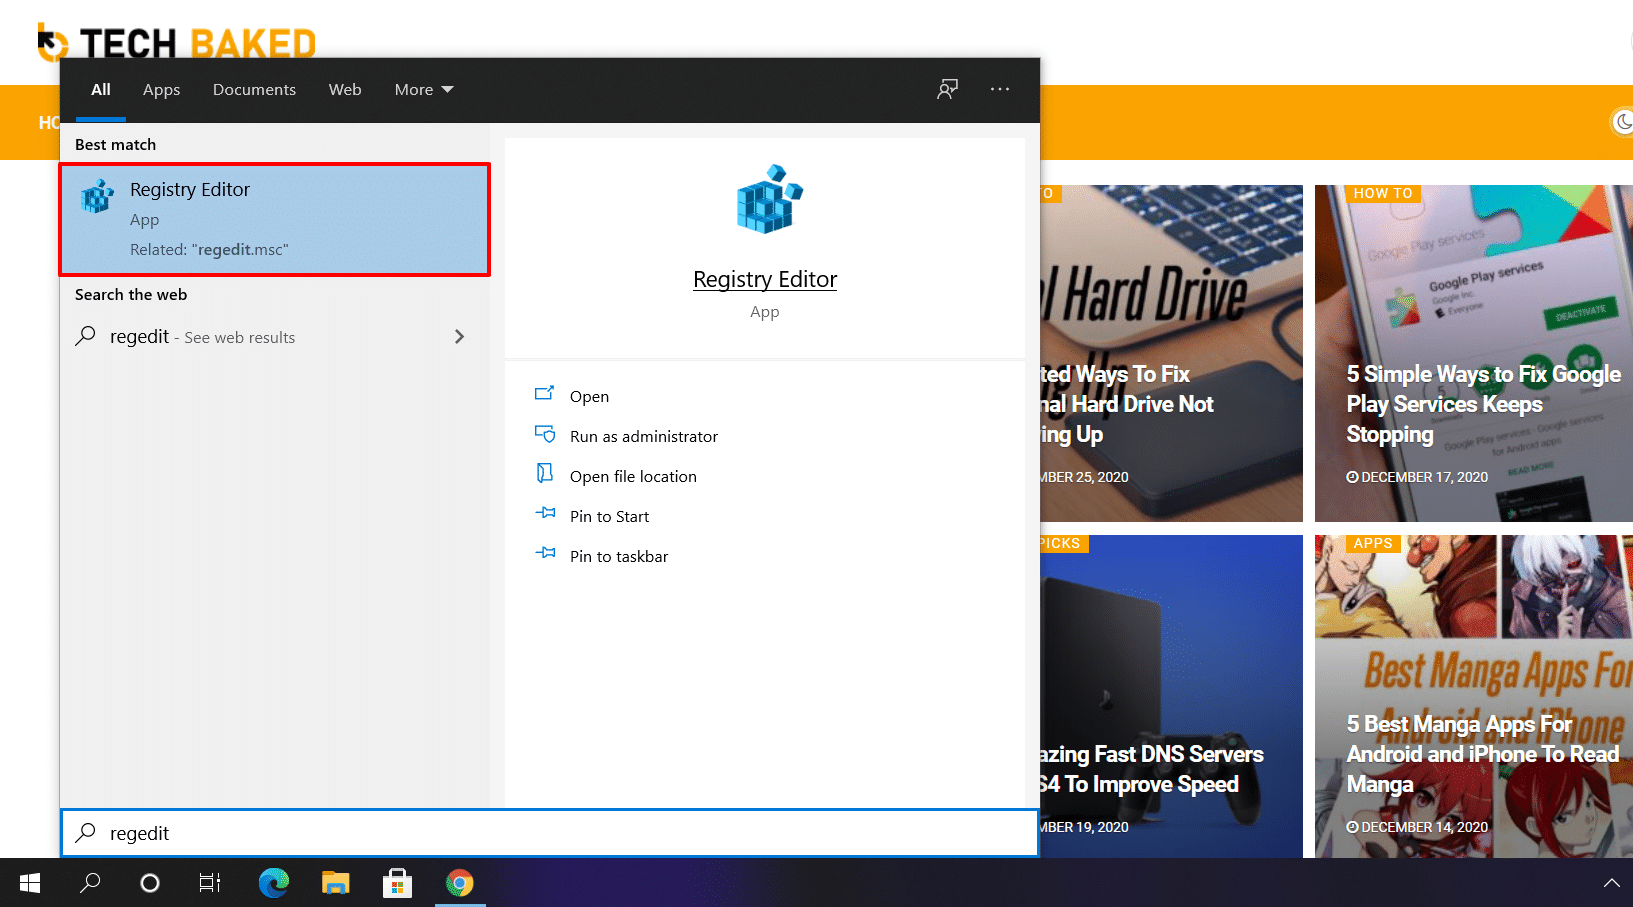
- Click Start, and type regedit. Click on the first result as shown. Click Yes if prompted by UAC.

- Once the Registry Editor is open, navigate to the following path:
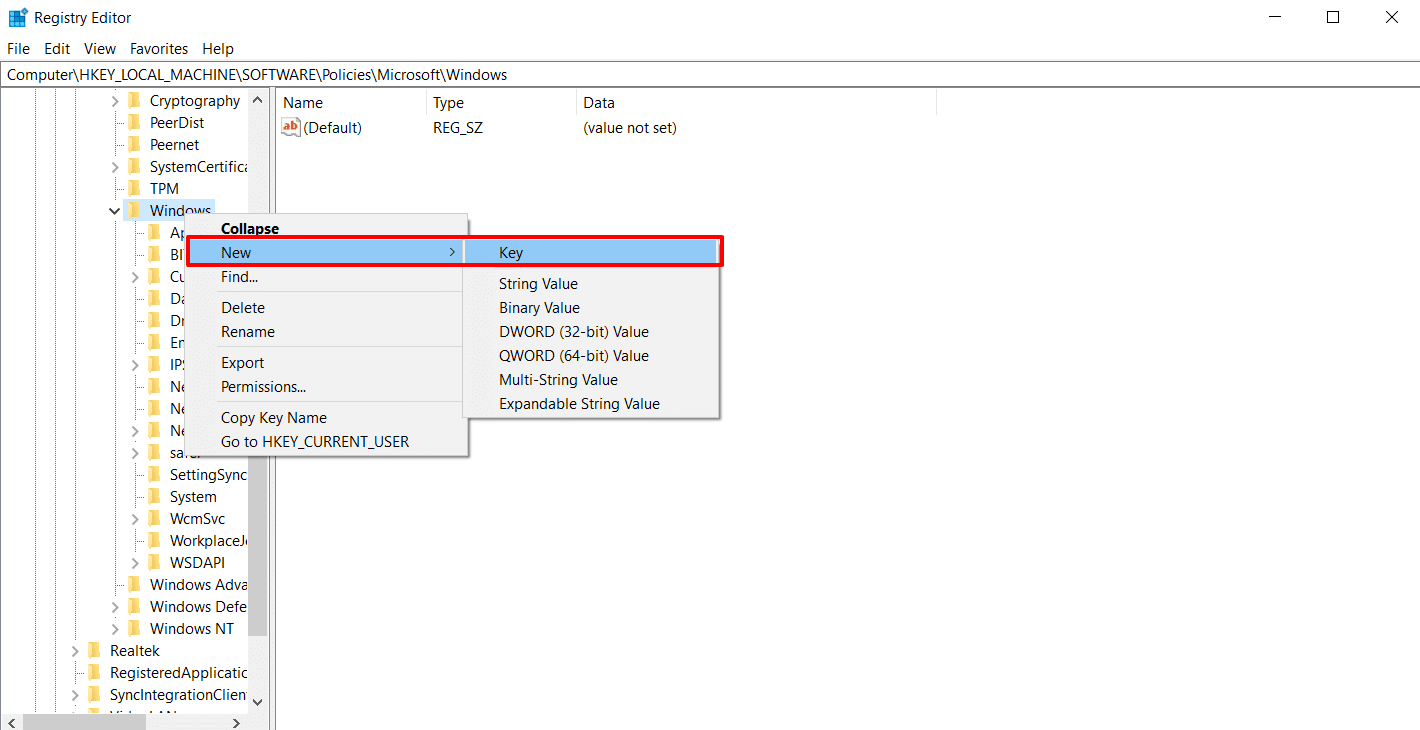
HKEY_LOCAL_MACHINE > SOFTWARE > Policies > Microsoft > Windows - Right-click on the Windows folder and select New > Key option.

- When prompted to name it, type WindowsUpdate and press Enter.
- Right-click on the created WindowsUpdate folder and select New > Key option.
- Name it AU and press Enter.
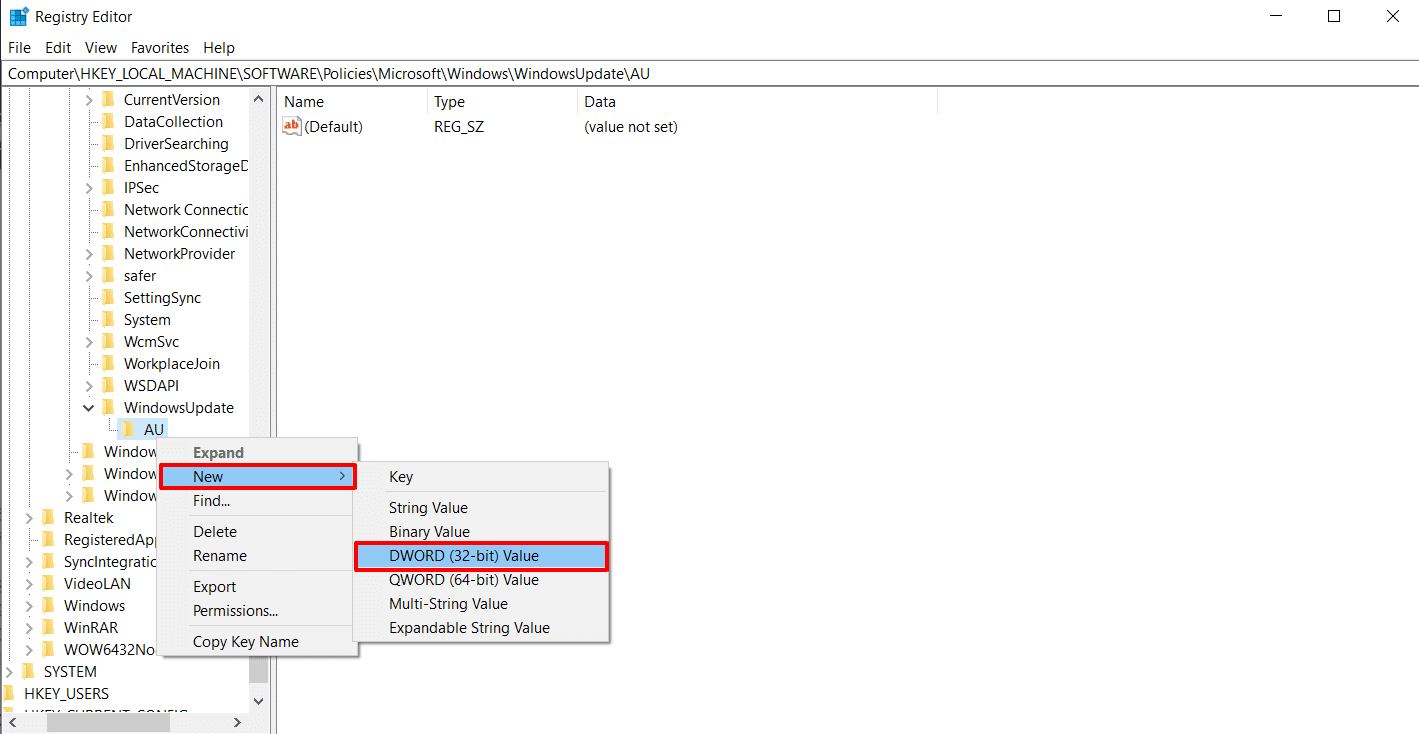
- Now right-click the newly created AU folder and select New > DWORD (32-bit) Value option.

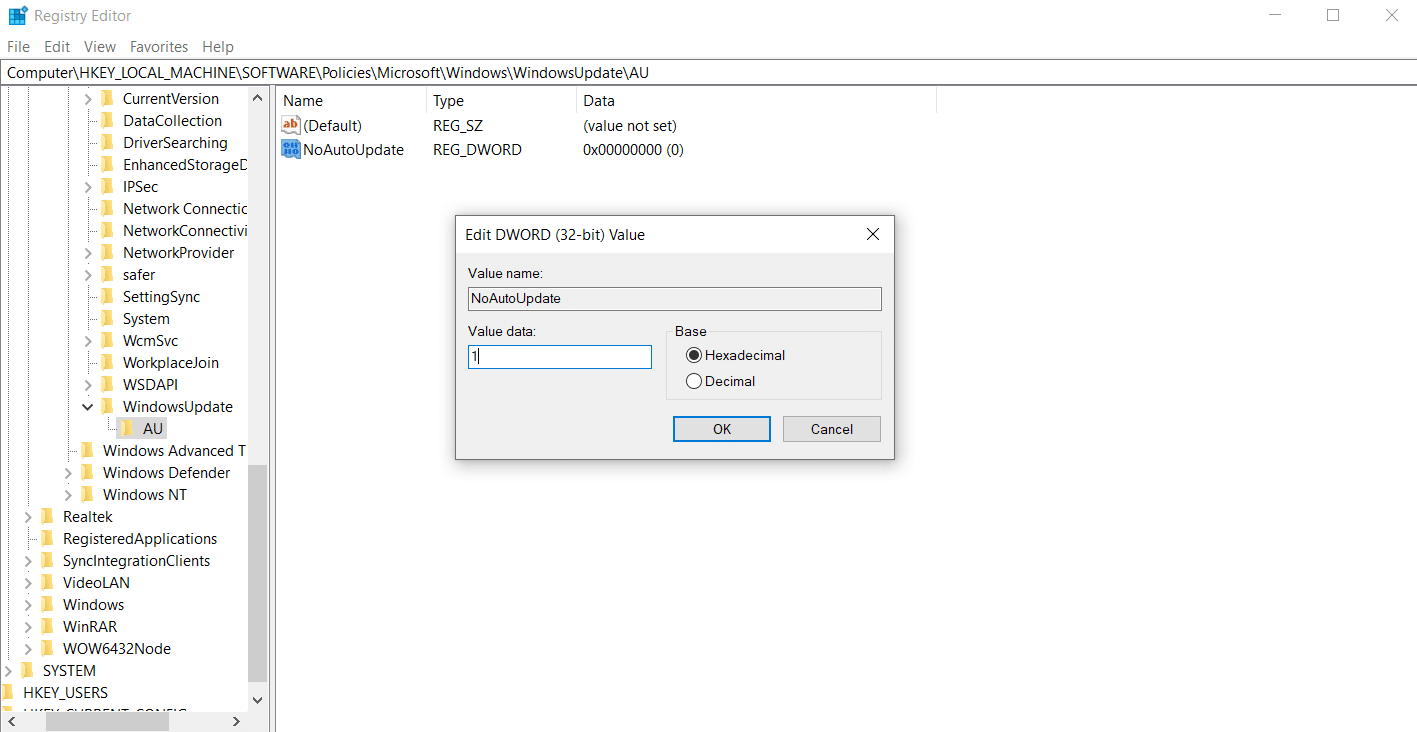
- Name it NoAutoUpdate and press Enter.
- Double-click the NoAutoUpdate key on the right-side panel and change its value from 0 to 1.
- Click OK
- Restart your computer.

Once done with these steps, Windows 10 will stop Automatic Updates on your computer permanently. Similar to the Group Policy Editor, you can resume the updates again using the Check for Updates option under the Windows Update settings.
How to Limit Automatic Updates on Windows using Registry Editor
Similar to the Group Policy Editor, you can also choose Windows to notify and download updates. To customize automatic updates to an extent, follow the steps below:
- Click Start, and type regedit. Click on the first result as shown. Click Yes if prompted by UAC.

- Once the Registry Editor is open, navigate to the following path:
HKEY_LOCAL_MACHINE > SOFTWARE > Policies > Microsoft > Windows - Right-click on the Windows folder and select New > Key option.

- When prompted to name it, type WindowsUpdate and press Enter.
- Right-click on the created WindowsUpdate folder and select New > Key option.
- Name it AU and press Enter.
- Now right-click the newly created AU folder and select New > DWORD (32-bit) Value option.

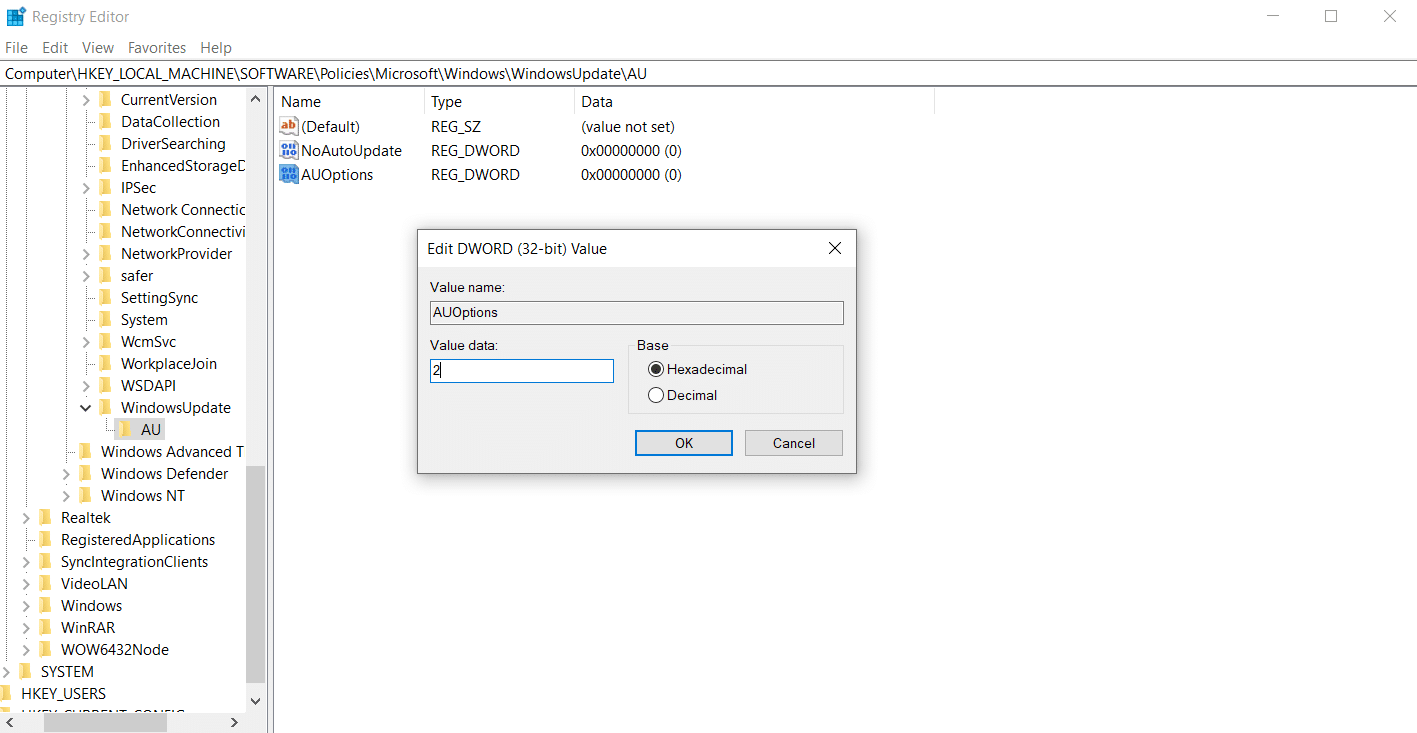
- Name it AUOptions and press Enter.
- Double-click the AUOptions key on the right-side panel and change its value from 0 to 2,3,4,5,7 based on your preferences. Here are what those numbers mean:
- 2 – Notify for download and auto-install.
- 3 – Auto download and notify for install.
- 4 – Auto download and schedule the install.
- 5 – Allow local admin to choose the setting.
- 7 – Auto-Download, Notify to install, Notify to Restart.
- Click OK
- Restart your computer.
After completing these steps, Windows will completely stop automatic updates on your computer. By limiting those updates, you’ll be notified before downloading and installing updates by Windows.
If you wish to restore the settings on Registry Editor, undo the steps by deleting the options you created. Once done, restart your computer and you’ll be good to go.
Method 4: Stop Automatic Updates by Setting up a Metered Connection
If you are using a WiFi connection, it’s much easier to disable Windows Updates. It can be done easily by setting up a metered connection. A Metered connection on Windows uses less bandwidth by disabling automatic downloads and updates.
To stop automatic updates by setting up a metered connection, follow these steps:
- Open Settings by pressing Win + I on keyboard.
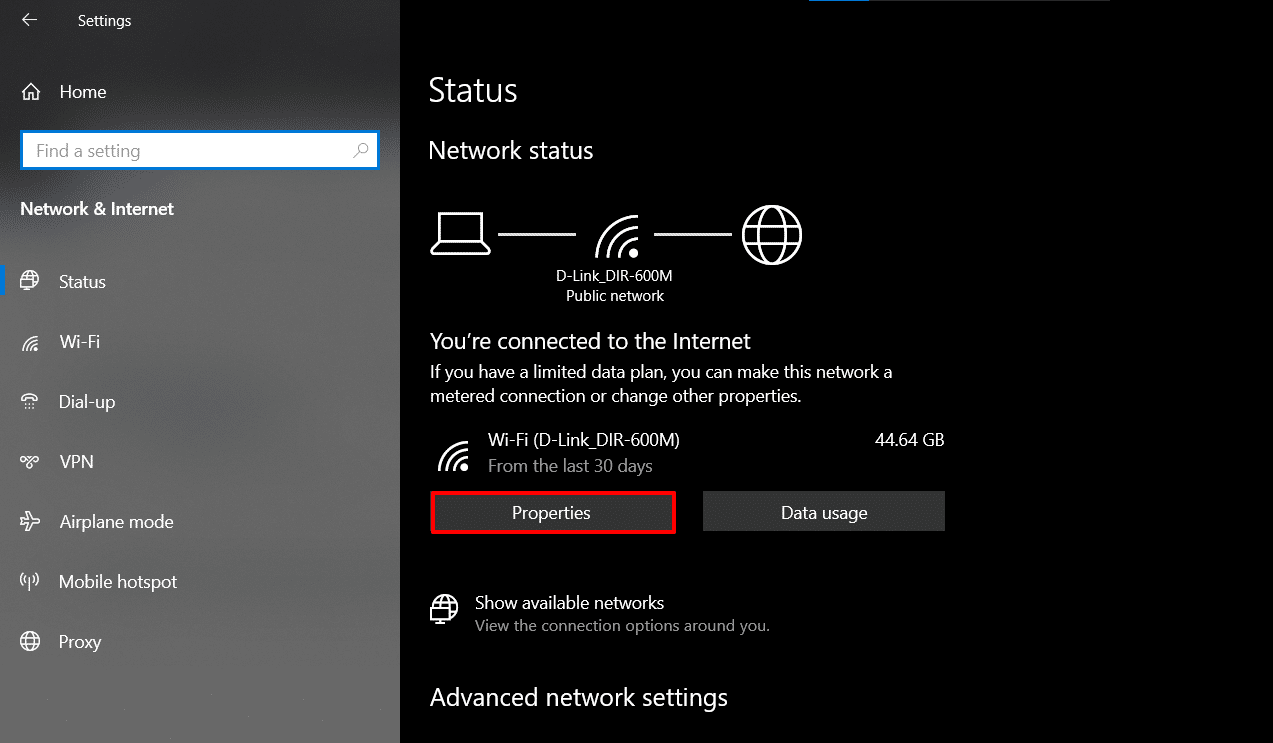
- Click on Network & Internet option.
- Click on the Properties option after connecting to your WiFi network.

- Toggle the Set as Metered connection option.

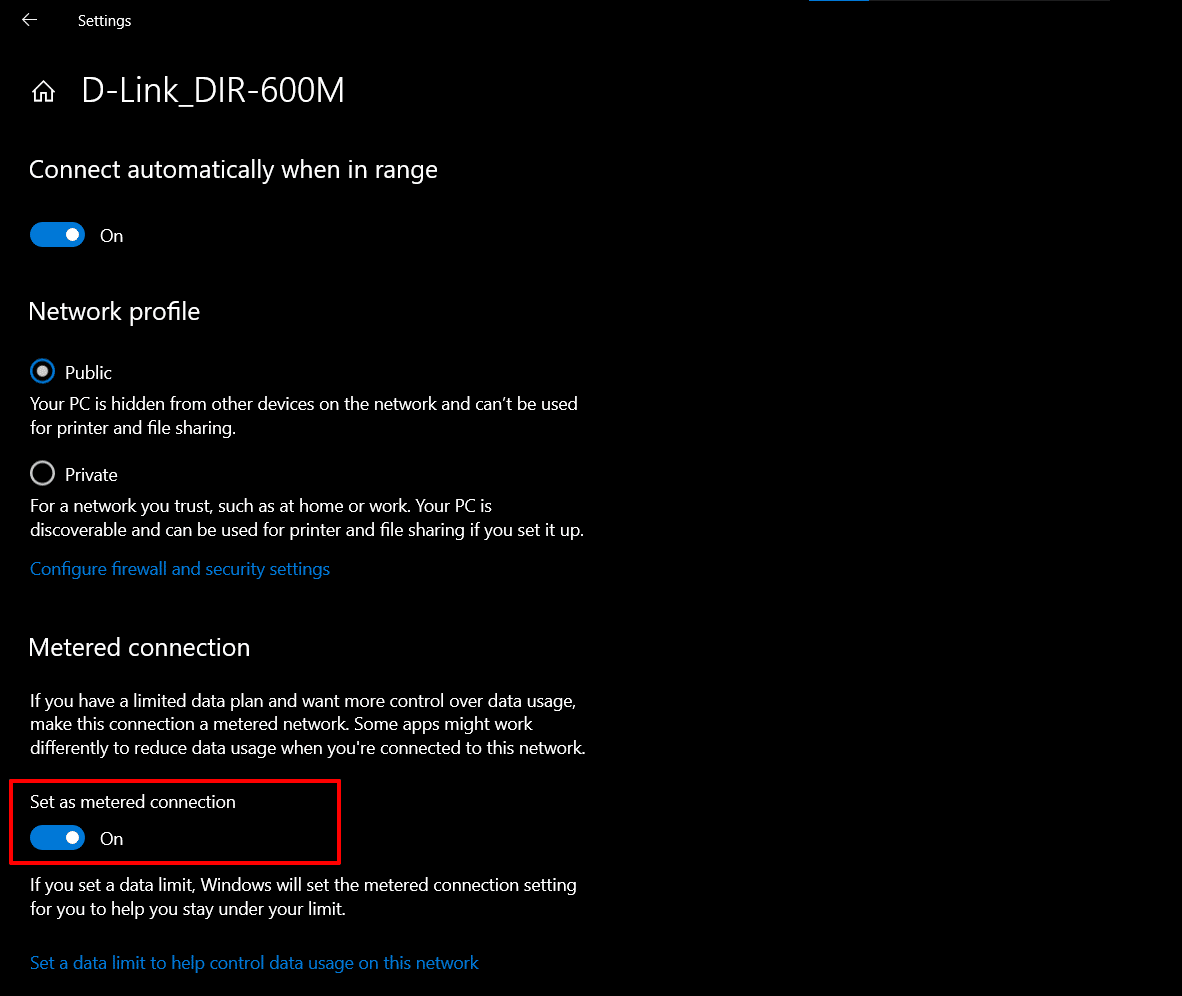
That’s it and Windows 10 will now stop Automatic Updates on your computer. You can choose to Check for Updates at your convenience along with which ones to install. Windows 10 doesn’t allow Metered connection on Ethernet, so you might not find it if you run a wired or broadband connection.
Frequently Asked Questions
Should I disable or Stop Automatic Updates on Windows 10?
Can I permanently disable or stop Automatic Updates on Windows 10?
How to Stop a Windows 10 Update in Progress?
Windows Automatic Updates Are Now Disabled Permanently
We hope that you were able to stop Automatic Updates on Windows 10. Disabling Windows Automatic updates is a better choice to save your internet connection’s bandwidth and saving your computer for Windows bugs from time to time. A lot of automatic updates would want you to reboot your PC while you are doing your work. These methods will help you to disable Windows Updates permanently. If you have any questions or suggestions, leave them in the comments section below.
READ NEXT:
- How To Fix WHEA Uncorrectable Error (0x0000124) on Windows 10 Easily
- 6 Tested Ways To Fix External Hard Drive Not Showing Up
- 5 Simple Ways to Fix Google Play Services Keeps Stopping
- What is “System Interrupts” Process and How to Fix High CPU Usage Caused by System Interrupts
- How To Move and Rearrange Pages in Word in 3 Simple Ways
- How To Find Your Motherboard Model and Manufacturer on Your Windows PC
- How To Lock Facebook Profile for More Privacy in 4 Easy Steps
- 8 Incredible Ways To Remove Activate Windows Watermark Permanently on Windows 10
I use StopUpdates 10, a great program. My Windows will not restart without my express permission!
Thanks for the suggestion, we will try to include it on this list.